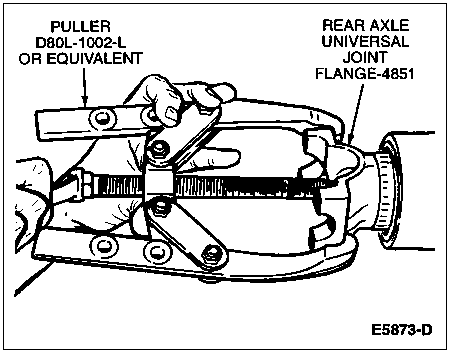
Section 05-02A: Axle, 10.25-Inch Ring Gear | 1996 F-250 Light Duty (Semi-Float), F-250 HD and F-350 (Full-Float) Workshop Manual |
Description | Tool Number |
---|---|
Companion Flange Holding Tool | T57T-4851-B |
Pinion Shaft Thread Protector | T85T-4209-AH |
Pinion Bearing Cone Remover | T71P-4621-B |
Removal
NOTE: Before removing the differential case (4204), check the ring gear runout as described in Inspection Before Disassembly in the Cleaning and Inspection portion of this section. If ring gear runout exceeds 0.101mm (0.004 inch), the differential case and ring gear must be removed to perform the Differential Runout Check in the Removal and Installation portion of this section. The differential runout check will isolate the cause of excessive ring gear runout.
Remove the axle shafts (4234). Refer to Axle Shaft, Semi-Floating Axle in the Removal and Installation portion of this section, or refer to Section 05-02B for full-floating axles.
CAUTION: Right and left bearing retaining caps must not be interchanged.
NOTE: The direction of triangles on bearing retaining caps must be noted. When reassembled, the triangles must be pointing in the same direction (outboard) as before removal.
Mark one bearing retaining cap to make sure the caps are installed in their original positions during assembly.
Loosen the differential bearing cap bolts and bearing caps.
CAUTION: When using the pry bar, place a wood block between the pry bar and the axle housing to protect the machined surface from damage.
Pry out the differential case, differential bearing cups (4222) and differential bearing shims (4067) until they are loose in the bearing caps. Remove the bearing caps and remove the differential assembly from the carrier.
CAUTION: Do not damage anti-lock speed sensor ring when removing ring gear. If anti-lock speed sensor ring is removed from case, it must be replaced with a new one.
If required, remove the bolts that attach the ring gear to the differential case. Remove the ring gear from the case by striking at alternate holes around the gear.
If required, remove the anti-lock speed sensor ring with a soft-faced hammer. Discard the anti-lock speed sensor ring.
Mark the driveshaft (4602) in relation to the rear axle universal joint flange (4851) (if not already marked). Remove the driveshaft-to-axle-flange U-bolts and nuts. Wrap universal joint with tape and set driveshaft aside.
Install an inch-pound torque wrench on the pinion nut. Record the torque required to maintain rotation of the pinion through several revolutions.
NOTE: Scribe a mark on the rear axle universal joint flange and pinion stem for alignment during assembly.
Install Companion Flange Holding Tool T57T-4851-B on the rear axle universal joint flange and remove the pinion nut.
Remove the rear axle universal joint flange using Puller D80L-1002-L or equivalent.
NOTE: If available, install Pinion Shaft Thread Protector T85T-4209-AH on the pinion threads and drive the pinion from the housing. Care should be taken not to allow the drive pinion to fall from the housing.
With a soft-faced hammer, drive the pinion out of the front bearing cone and remove it through the rear of the housing.
CAUTION: Use care not to damage rear axle drive pinion seal (4676) bore in housing when prying, gripping or striking.
Pry up on metal flange of rear axle drive pinion seal. Install gripping pliers and strike with hammer until rear axle drive pinion seal is removed.
Remove rear axle drive pinion shaft oil slinger (4670) and outer differential pinion bearing from axle housing.
NOTE: Do not remove the pinion bearing cups from the carrier casting unless the cups are damaged.
If the pinion bearing cups are to be replaced, tap alternately (with a brass drift of suitable length) on opposite sides of the cup during removal to prevent cup from cocking in the casting.
To remove the inner differential pinion bearing, use Pinion Bearing Cone Remover T71P-4621-B as shown.
NOTE: Measure the drive pinion bearing adjustment shim (4663), which is found under the bearing cone, with a micrometer and record the thickness (as a reference to be compared to the shim gauge reading prior to installing the bearing).
Remove the drive pinion bearing adjustment shim from the drive pinion.