NOTE: Refer to Section 05-02B for full-floating axle shaft removal.
Clean all dirt from the area of axle housing cover (4033) with a wire brush or cloth.

Section 05-02A: Axle, 10.25-Inch Ring Gear | 1996 F-250 Light Duty (Semi-Float), F-250 HD and F-350 (Full-Float) Workshop Manual |
Removal
Raise vehicle on a hoist. Remove wheel and tire.
NOTE: Refer to Section 05-02B for full-floating axle shaft removal.
Clean all dirt from the area of axle housing cover (4033) with a wire brush or cloth.

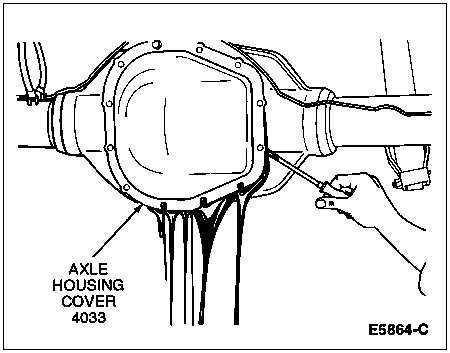
Place a drain pan under the axle and drain rear axle lubricant by removing the axle housing cover.
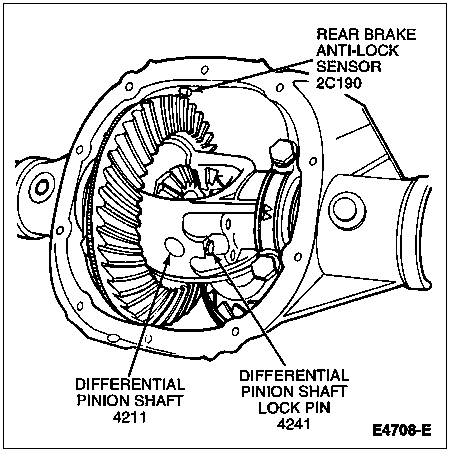
Remove differential pinion shaft lock pin (4241) and differential pinion shaft (4211).
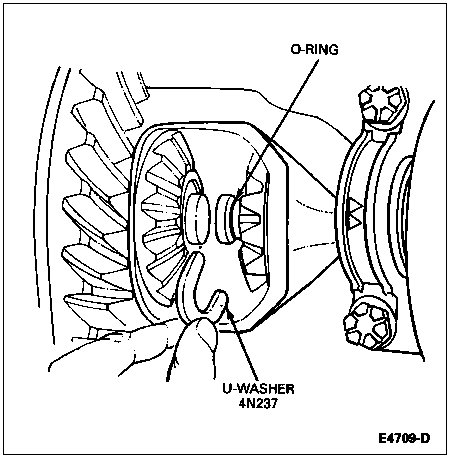
NOTE: Use care not to lose or damage the rubber O-ring in the axle shaft groove under the u-washer (4N237).
Push axle shafts (4234) inboard. Remove u-washer from the button end of each axle shaft.
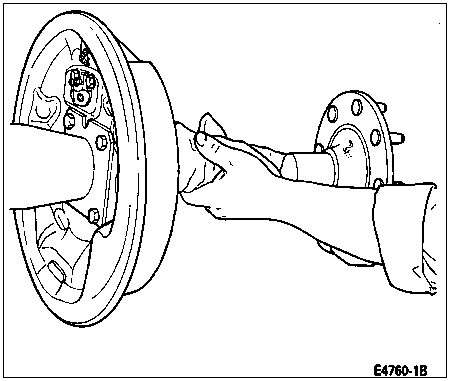
Remove axle shaft from the axle housing, being careful not to damage the inner wheel bearing oil seals (1177).
Installation
Slide the axle shafts into place in the axle housing. Exercise care so that the splines or any portion of the axle shafts do not damage the inner wheel bearing oil seals. Push the axle shafts inboard (toward the center of the vehicle) enough to allow installation of the u-washer.
NOTE: A rubber O-ring is used to hold the u-washer in position on the axle shaft. Make sure the O-ring is in the groove at the button end of the axle shaft before installing the u-washer.
Install the u-washers on the button end of the axle shafts and push the u-washers outboard so that the shaft lock seats in the counterbore of the differential side gear (4236).
Position the differential pinion shaft through the differential case (4204) and pinions, aligning the hole in the differential pinion shaft with the hole in the differential pinion shaft lock pin. Apply Threadlock® and Sealer EOAZ-19554-AA or equivalent meeting Ford specification WSK-M2G315-A5 (Type II) to the differential pinion shaft lock pin threads. Install differential pinion shaft lock pin and tighten to 20-40 Nm (15-30 lb-ft).

![]() CAUTION: Make sure machined surfaces on both axle housing cover and carrier are clean and free of oil before installing the new silicone sealant. Inside of axle must be covered when cleaning the machined surface to prevent contamination.
CAUTION: Make sure machined surfaces on both axle housing cover and carrier are clean and free of oil before installing the new silicone sealant. Inside of axle must be covered when cleaning the machined surface to prevent contamination.
Clean the gasket mating surface of the rear axle carrier casting and axle housing cover.
NOTE: Axle housing cover must be installed within 15 minutes of application of the silicone or new sealant must be applied.
Apply a new continuous bead of Silicone Rubber D6AZ-19562-AA or -BA or equivalent meeting Ford specification ESB-M4G92-A or ESE-M4G195-A to the carrier casting face inboard of the cover bolt holes.
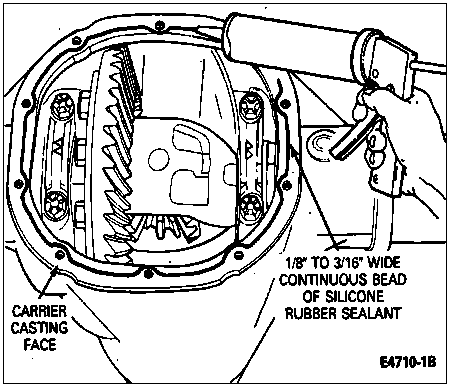
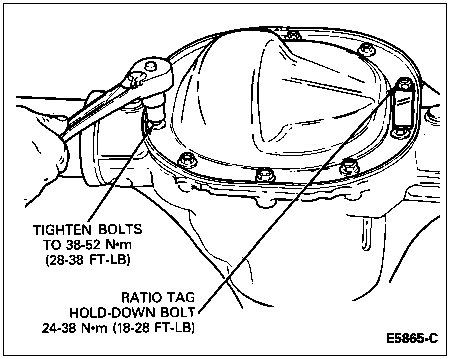
Install axle housing cover and tighten cover bolts to 38-52 Nm (28-38 lb-ft) as shown. Tighten the cover bolts in a cross-wise pattern to make sure axle housing cover is drawn down uniformly. Tighten the ratio tag hold-down bolt to 24-38 Nm (18-28 lb-ft).
For in-vehicle repairs, add lubricant through the filler hole until the lubricant level reaches the bottom of the filler hole with the axle in the running position (approximately 6.5 U.S. pints). For out-of-vehicle repairs, add 7.5 U.S. pints of lubricant. Use Premium Rear Axle Lubricant XY-80W90-QL or -KL or equivalent meeting Ford specification WSP-M2C197-A for conventional axles, plus 8 ounces of Additive Friction Modifier C8AZ-19B546-A or equivalent meeting Ford specification EST-M2C118-A for complete refill of limited slip applications.
Install wheel and tire. Tighten lug nuts (1012) to 170-230 Nm (126-170 lb-ft).
Road test the vehicle.