SECTION 303-01B: Engine Ś 3.0L (4V) | 2002 Escape Workshop Manual |
IN-VEHICLE REPAIR | Procedure revision date: 10/21/2002 |
Engine Front Cover
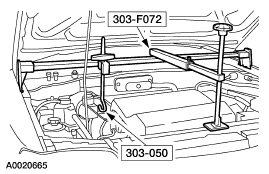
Special Tool(s) | 3-Bar Engine Support Kit
303-F072 |
 | Engine Lifting Brackets
303-050 (T70P-6000) |
Material| Item | Specification |
|---|
Metal Surface Cleaner
F4AZ-19A536-RA | WSE-M5B392-A |
Silicone Gasket and Sealant
F7AZ-19554-EA | WSE-M4G323-A4 |
Removal
- Remove the RH and LH valve covers. For additional information, refer to Valve Cover LH and Valve Cover RH in this section.
- Remove the oil pan. For additional information, refer to Oil Pan in this section.
- Remove the generator. For additional information, refer to Section 414-02.
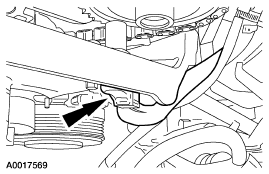
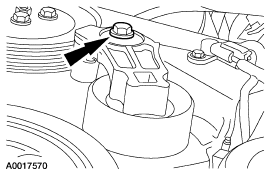
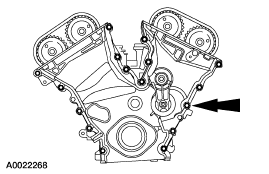
- Remove the bolt and the camshaft position (CMP) sensor.
- Lower the vehicle.
- Remove the power steering pump. For additional information, refer to Section 211-02.
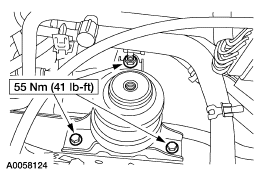
- Install front engine support insulator.
- Remove the special tool.
- Raise and support the vehicle. For additional information, refer to Section 100-02.
- Remove the bolt and remove the belt tensioner.
- Remove the crankshaft front seal. For additional information, refer to Crankshaft Front Oil Seal in this section.
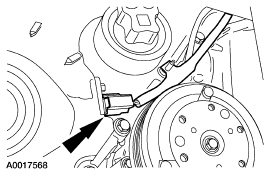
- Remove the crankshaft position (CKP) sensor.
- Disconnect the electrical connector.
- Remove the bolt and the sensor.
NOTE: Remove the engine front cover with the vehicle raised in the air.
Remove the bolts, studs and the engine front cover.- Remove and discard the front cover gaskets.
Installation
 CAUTION: Do not use metal scrapers, wire brushes, power abrasive discs or other abrasive means to clean the sealing surface. These tools cause scratches and gouges, which make leak paths. Use a plastic scraping tool to remove all traces of sealant.
- Clean all sealing surfaces with metal surface cleaner.
- Install three new gaskets in the front cover.
NOTE: The engine front cover must be installed and the bolts tightened within four minutes of applying the sealant.
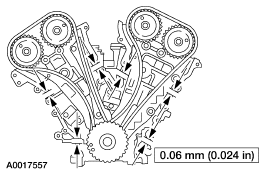
Apply a 6 mm (0.24 in) diameter dot of silicone gasket and sealer to the cylinder block, lower cylinder block and cylinder head mating surfaces.
NOTE: Fasteners 1, 3, 4, 8, 10, 11, 14, 15 and 16 are studs.
Position the cover and install the studs and bolts in the sequence shown.
- Install the (CKP) sensor and connect the electrical connector.
- Install the crankshaft front seal. For additional information, refer to Crankshaft Front Oil Seal in this section.
- Install the tensioner and bolt.
- Install the CMP and the bolt.
- Connect the electrical connector.
- Install the generator. For additional information, refer to Section 414-02.
- Install the oil pan. For additional information, refer to Oil Pan in this section.
- Lower the vehicle.
- Install the special tool.
- Remove the front engine support insulator.
- Remove the nut.
- Remove the bolts and the insulator.
- Install the power steering pump. For additional information, refer to Section 211-02.
- Install the RH and LH valve cover. For additional information, refer to Valve Cover RH and Valve Cover LH removal in this section.