Section 12-00: Climate Control System, Service | 1996 F-150, F-250, F-350, F-Super Duty and Bronco, F-Super Duty Motorhome Chassis Workshop Manual |
| Description | Tool Number |
|---|---|
| Spring Lock Coupling Disconnect Tool Set | T84L-19623-B |
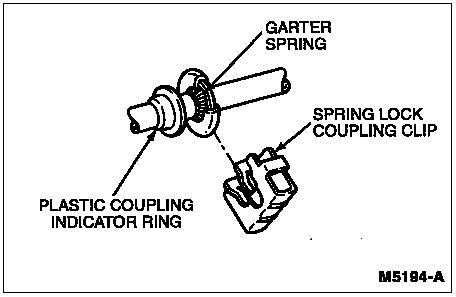
The spring lock coupling is a refrigerant line coupling held together by a garter spring inside a circular cage. When the coupling is connected, the flared end of the female fitting slips behind the garter spring inside the cage on the male end of the fitting. Once coupled, refrigerant is sealed inside the system through the use of O-rings on the refrigerant lines. These O-rings are made of a special material and are green in color. They are intended for use in R-134a refrigerant systems and must be replaced every time a refrigerant line coupling is disconnected and reconnected for replacement or for any other service reasons. Refer to the Service Parts List at the end of this procedure for more information on the O-rings or replacement garter springs.
Coupling — Disconnect
Discharge the A/C system. Refer to Service Procedures, System Discharging and Recovery in this section. Observe all safety precautions.
If applicable, remove the spring lock coupling clip.
Fit the appropriate spring lock coupling disconnect tool from the Spring Lock Coupling Disconnect Tool Set T84L-19623-B to the coupling.
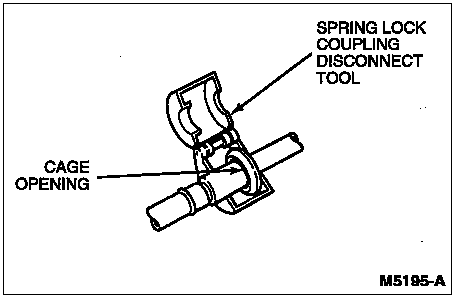
NOTE: The garter spring may not release if the spring lock coupling tool is cocked while pushing it into the cage.
Close tool around refrigerant line and push it into the open side of the cage to expand the garter spring and release the female fitting.

After the garter spring is expanded, pull the fitting apart. A slight twisting motion may be required to separate the coupling.
Once the coupling is disconnected, remove the tool and cap the line openings to prevent dirt and moisture from entering the system.
Coupling — Connect
Check to make sure that the garter spring is properly installed in the cage on the male fitting. If the garter spring is missing, replace it with one of the proper size. Refer to the Service Parts List at the end of this procedure.
If the garter spring is damaged, it must be replaced. Remove the damaged garter spring with a small wire hook (do not use a screwdriver) and replace the garter spring with one of the proper size. Refer to the Service Parts List at the end of this procedure.
If applicable, remove any shipping caps and/or plugs from the ends of the refrigerant lines.
Lubricate and install new green O-rings on the female fitting using clean refrigerant oil, Motorcraft YN-12B or equivalent meeting Ford specification WSH-M1C231-B. Refer to the Service Parts List at the end of this procedure for more information on the correct O-rings. The use of any O-ring other than the specified green O-ring may allow the connection to leak intermittently during vehicle operation.
Lubricate the male fitting, green O-ring seals and the inside of the female fitting with clean refrigerant oil, Motorcraft YN-12B or equivalent meeting Ford specification WSH-M1C231-B.
| Item | Part Number | Description |
|---|---|---|
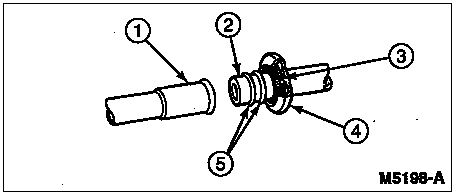
| 1 | — | Female Fitting |
| 2 | — | Male Fitting |
| 3 | — | Garter Spring |
| 4 | — | Cage |
| 5 | — | Replacement O-Ring Seals |
Install plastic indicator ring into the cage opening of the male fitting, if the plastic indicator ring is to be used.
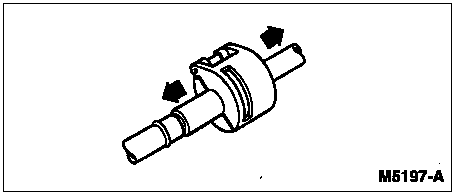
Fit female fitting to the male fitting and push until the garter spring snaps over the flared end of the female fitting.
If the plastic indicator ring is used, it will pop out of the cage opening when the coupling is connected to indicate engagement. The plastic indicator ring will remain free of the spring lock coupling but will be held captive on the refrigerant line. If the plastic indicator ring is not used, ensure coupling engagement by visually checking that garter spring is over the flared end of the female fitting.
Install the spring lock coupling clip, if applicable. The use of the spring lock coupling clip offers a secondary retention of the spring lock coupling.
Evacuate, leak test and recharge the A/C system. Refer to the Service Procedures portion of this section. Observe all safety precautions.
| Part Number | Description |
|---|---|
| E35Y-19D690 | O-Ring Seal Kit — A/C Spring Lock Coupling (Kit contains 3/8, 1/2 and 5/8-inch coupling O-rings and 3/8, 1/2 and 5/8-inch coupling garter springs). |