Section 10-03: Speed Control System, Electronic | 1996 F-150, F-250, F-350, F-Super Duty and Bronco Workshop Manual |
DIAGNOSIS AND TESTING
Pinpoint Tests
NOTE: For 7.3L DI diesel speed control diagnosis, refer to the Powertrain Control/Emissions Diagnosis Manual OBDI or OBDII.
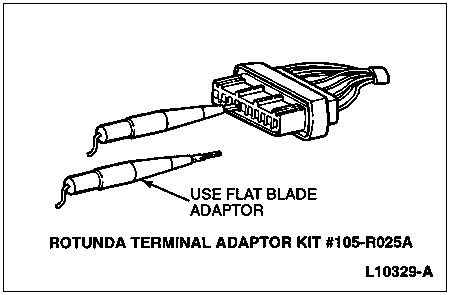
To avoid connector terminal damage, always use test probe adapters. Failure to comply may result in spread terminals and intermittent speed control operations.
PINPOINT TEST A: SPEED CONTROL INOPERATIVE
A1 VERIFY THERE IS POWER TO SPEED CONTROL SERVO
- Disconnect harness connector from the speed control servo.
- Use Rotunda 73 Digital Multimeter 105-R0051 or equivalent to make the specified measurements at the harness connector.
- Use Rotunda Terminal Adapter Kit No. 105-R025A to avoid connector terminal damage.
- Key to RUN.
- Measure voltage between Pin 7 (B+, Circuit 298) and Pin 10 (GND, Circuit 901).
Is there battery voltage (12v nom.)?
A2 CHECK MODULE GROUND CIRCUIT
- Key off.
- Measure the resistance between Pin 10 (GND, Circuit 901) and ground point on the chassis.
Is resistance less than 5 ohm?
| Yes | No |
|---|
| GND is OK. Power to Module may be open. CHECK fuse 5 in Power Distribution Box and Circuit 298. TEST for normal operation. GO to A3 | REPAIR open in ground Circuit 901. TEST for normal operation. |
A3 CHECK FOR STUCK STOPLIGHT SWITCH
- With no brakes applied, measure the voltage between Pin 4 (BRK, Circuit 306) and Pin 10 (GND, Circuit 901).
Is the battery voltage (12v nom.)?
| Yes | No |
|---|
| Stoplight switch is stuck on. REPLACE stoplight switch. | Stoplight switch is not stuck on. GO to A4. |
A4 CHECK BRAKE/CLUTCH CIRCUIT GROUND
- Key off.
- Measure the resistance between Pin 4 (BRK, Circuit 306) and Pin 10 (GND, Circuit 901).
Is resistance less than 20 ohms?
| Yes | No |
|---|
| Brake/Clutch input circuit OK. GO to A5. | Brake light bulbs blown or brake/clutch circuit open. SERVICE circuit including clutch pedal position switch. |
A5 CHECK DEACTIVATOR CIRCUIT (AT MODULE CONNECTOR)
- Key off, no brakes applied.
- Measure the voltage between Pin 9 (DEACT, Circuit 307) and Pin 10 (GND, Circuit 901).
Is there battery voltage (12v nom.)?
| Yes | No |
|---|
| GO to A9. | No power from deactivator. GO to A6. |
A6 CHECK DEACTIVATOR SWITCH (AT SWITCH)
- Remove body harness connector from deactivator switch.
- Measure the resistance between the two pins of the deactivator switch with no brakes applied.
Is resistance less than 1 ohm?
| Yes | No |
|---|
| Deactivator switch OK. GO to A7. | Deactivator switch defective. REPLACE switch. REPEAT Step A5. |
A7 VERIFY THERE IS POWER AT DEACTIVATOR HARNESS CONNECTOR
- Measure voltage between Pin 1 (Circuit 10) of the deactivator switch harness connector and chassis ground.
Is there battery voltage (12v nom.)?
| Yes | No |
|---|
| Power at connector OK. GO to A8. | SERVICE for blown fuse or open in deactivator switch circuit. |
A8 CHECK FOR OPEN CIRCUIT BETWEEN DEACTIVATOR SWITCH AND SERVO
- Measure resistance from Pin 2 (Circuit 307) of deactivator switch and Pin 9 (DEACT, Circuit 307) of service assembly of speed control servo.
Is resistance less than 1 ohm?
| Yes | No |
|---|
| CHECK for bent or corroded pins on deactivator switch and harness connector. SERVICE as required. REPEAT Step A5. If connections are serviceable, GO to A9. | Open in wire harness. SERVICE as required. |
A9 CHECK FOR STUCK COMMAND SWITCHES
- Key off.
- With no steering wheel switches depressed, measure the resistance between Pin 5 (COMMAND, Circuit 151) and Pin 6 (COMMAND RTN, Circuit 848).
Is resistance greater than 3k ohms?
| Yes | No |
|---|
| No stuck switches. GO to A10. | One of the command switches is stuck. REPLACE switch. |
A10 CHECK ON SWITCH OPERATION
- Key off.
- With steering wheel ON switch depressed, measure voltage between Pin 5 (COMMAND, Circuit 151) and Pin 10 (GND, Circuit 901).
Is there battery voltage (12v nom.)?
| Yes | No |
|---|
| ON switch OK. GO to A12. | ON switch not functioning. GO to A11. |
A11 CHECK FOR OPEN CIRCUIT IN "ON" SWITCH GROUND
- With horn depressed, measure voltage between Pin 6 (Circuit 848) and chassis ground.
Is there battery voltage (12v nom.)?
| Yes | No |
|---|
| Open circuit between Pin 5 and command switches or inoperative switches. SERVICE as required. | Open circuit or fuse in horn relay feed or open circuit in switch ground. SERVICE as required. REPEAT Step A10. |
A12 CHECK SET/ACCEL SWITCH OPERATION
- Key off.
- With the SET/ACCEL switch depressed, measure the resistance between Pin 5 (COMMAND, Circuit 151) and Pin 6 (COMMAND RTN, Circuit 848).
Is resistance approximately 680 (640-720) ohms?
| Yes | No |
|---|
| Switch is OK. GO to A13. | Switch not functioning. REPLACE switch. |
A13 CHECK FOR SHORT IN COMMAND SWITCH RETURN CIRCUIT
- Measure resistance between Pin 6 (Circuit 848) and Pin 10 (GND, Circuit 901).
Is resistance less than 1 ohm?
| Yes | No |
|---|
| SERVICE short in Circuit 848. | Return circuit OK. GO to A14. |
A14 VERIFY SPEED SIGNAL
- Operate vehicle by raising the rear wheels. Set speed at 30 mph. Use an AC voltmeter to measure the voltage between Pin 3 (SPEED SIG, Circuit 679) and Pin 10 (GND, Circuit 901).
Is voltage reading 4-5 volts?
| Yes | No |
|---|
| Speed signal OK. GO to A15. | SERVICE Programmable Speedometer/Odometer. GO to Section 13-01. |
A15 CHECK FOR BROKEN OR BOUND ACTUATOR CABLE
- Remove speed control actuator cable from speed control servo. Check for broken speed control actuator by pulling on speed control actuator and noting throttle movement.
Is speed control actuator OK?
| Yes | No |
|---|
| REPLACE speed control servo. | SERVICE speed control actuator cable. |
PINPOINT TEST B: SET SPEED FLUCTUATES
B1 CHECK THAT CONDITION OCCURS ONLY WHILE USING SPEED CONTROL
- Drive vehicle at the speed in which the condition occurs.
Does the speedometer needle waiver by more than ± 2 mph?
| Yes | No |
|---|
| Bad Programmable Speedometer/Odometer Module, RABS speed sensor, or rear axle ring gear. SERVICE as necessary. | GO to B2. |
B2 CHECK PROGRAMMABLE SPEEDOMETER/ODOMETER MODULE OUTPUT SIGNAL
- Check PSOM output signal.
Did PSOM pass output signal test?
| Yes | No |
|---|
| GO to B3. | SERVICE as required. |
B3 CHECK FOR BINDING IN SPEED CONTROL ACTUATOR CABLE AND THROTTLE BODY LINKAGE
- Check for binding or sticking of speed control cable or throttle linkage and throttle plate.
- Make sure throttle cable bracket and speed control servo bracket are not loose.
Are components OK?
| Yes | No |
|---|
| REPLACE speed control servo and VERIFY condition is corrected. | SERVICE as required. |
PINPOINT TEST C: SPEED CONTROL DOES NOT DISENGAGE WHEN BRAKES ARE APPLIED
C1 CHECK FOR BINDS IN SPEED CONTROL ACTUATOR/THROTTLE BODY ATTACHMENT
- Disconnect 10-way connector from speed control servo.
- Check for binding of speed control actuator cable.
Is speed control actuator cable OK?
| Yes | No |
|---|
| GO to C2. | SERVICE as required. |
C2 CHECK BRAKE SWITCH OPERATION
- With brakes applied, measure the voltage between Pin 4 (BRK, Circuit 306) and Pin 10 (GND, Circuit 901).
Is there battery voltage (12v nom.)?
| Yes | No |
|---|
| REPLACE speed control servo. | Switch not functioning. REPLACE or SERVICE. |
PINPOINT TEST D: SPEED CONTROL DOES NOT DISENGAGE WHEN CLUTCH IS APPLIED
D1 CHECK CLUTCH CIRCUIT
- Key off.
- Measure the resistance between Pin 4 (Circuit 306) and Pin 10 (Circuit 901).
Is resistance less than 20 ohms?
| Yes | No |
|---|
| Clutch input circuit OK. GO to D2. | Clutch circuit open. SERVICE circuit including clutch pedal position switch. |
D2 CHECK CLUTCH OPERATION
- With clutch pedal applied, measure the voltage between Pin 4 (Circuit 306) and Pin 10 (Circuit 901).
Is there battery voltage (12v nom.)?
| Yes | No |
|---|
| REPLACE speed control servo. | Switch not functioning. REPLACE or SERVICE. |
PINPOINT TEST E: COAST SWITCH INOPERATIVE
E1 CHECK COAST SWITCH OPERATION
- Disconnect 10-way connector from speed control servo.
- Key off.
- With COAST switch depressed, measure the resistance between Pin 5 (COMMAND, Circuit 151) and Pin 6 (COMMAND RTN, Circuit 848) while rotating steering wheel through full range.
Is resistance approximately 120 (114-126) ohms?
| Yes | No |
|---|
| COAST switch OK. GO to E2. | REPLACE switch. |
E2 CHECK COMMAND SWITCH RETURN CIRCUIT
- Measure the resistance between Pin 6 (COMMAND RTN, Circuit 848) and Pin 10 (GND, Circuit 901).
Is resistance less than 1 ohm?
| Yes | No |
|---|
| Switch return is incorrectly grounded. SERVICE as required. | REPLACE speed control servo. |
PINPOINT TEST F: SET/ACCL SWITCH INOPERATIVE
F1 CHECK SET/ACCL SWITCH OPERATION
- Disconnect 10-way connector from speed control servo.
- Key off.
- With SET/ACCL switch depressed, measure the resistance between Pin 5 (COMMAND, Circuit 151) and Pin 6 (COMMAND RTN, Circuit 848) while rotating steering wheel through full range.
Is resistance approximately 680 (646-714) ohms?
| Yes | No |
|---|
| SET/ACCL OK. GO to F2. | REPLACE switch. |
F2 CHECK COMMAND SWITCH RETURN CIRCUIT
- Measure the resistance between Pin 6 (COMMAND RTN, Circuit 848) and Pin 10 (GND, Circuit 901).
Is resistance less than 1 ohm?
| Yes | No |
|---|
| Speed control actuator switch return is incorrectly grounded. SERVICE as required. | REPLACE speed control servo assembly. |
PINPOINT TEST G: RESUME SWITCH INOPERATIVE
G1 CHECK RESUME SWITCH OPERATION
- Disconnect 10-way connector from speed control servo.
- Key off.
- With RESUME switch depressed, measure the resistance between Pin 5 (COMMAND, Circuit 151) and Pin 6 (COMMAND RTN, Circuit 848) while rotating steering wheel through full range.
Is resistance approximately 2200 (2090-2310) ohms?
| Yes | No |
|---|
| RESUME OK. GO to G2. | REPLACE switch. |
G2 CHECK COMMAND SWITCH RETURN CIRCUIT
- Measure the resistance between Pin 6 (COMMAND RTN, Circuit 848) and Pin 10 (GND, Circuit 901).
Is resistance less than 1 ohm?
| Yes | No |
|---|
| Switch return is incorrectly grounded. SERVICE as required. | REPLACE speed control servo. |
PINPOINT TEST H: OFF SWITCH INOPERATIVE
H1 CHECK OFF SWITCH OPERATION
- Disconnect 10-way connector from speed control servo.
- Key off.
- With OFF switch depressed, measure the resistance between Pin 5 (COMMAND, Circuit 151) and Pin 6 (COMMAND RTN, Circuit 848) while rotating steering wheel through full range.
Is resistance less than 4 ohms?
| Yes | No |
|---|
| REPLACE speed control servo. | OFF switch not functioning. REPLACE switch. |