Place the carrier in a holding fixture, remove and clean all gasket surfaces and remove the bearing caps. Note the matched numbers or letters stamped on the cap and carrier. These numbers or letters must be matched upon assembly.

Section 05-03A: Axle, Front Drive, Dana Models 44 and 50 | 1996 F-150, F-250 4x4 and Bronco Workshop Manual |
| Description | Tool Number |
|---|---|
| Differential Housing Spreader Adapters | T80T-4000-B |
| Companion Flange Holding Tool | T57T-4851-B |
| Companion Flange Remover | T65L-4851-A |
| Bearing Cup Puller | T77F-1102-A |
| Impact Slide Hammer | T50T-100-A |
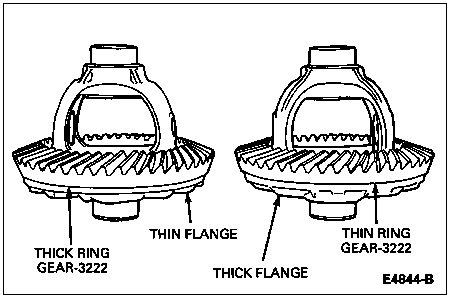
NOTE: 44 Series front drive axle ratios 3.07 to 1 up to 3.54 to 1 incorporate a thick differential case flange and a thin ring gear. Ratios above 3.54 to 1 incorporate a thin differential case flange and a thick ring gear.
Disassembly
Remove carrier. Refer to Slip-Yoke, RH and Stub Shaft Assembly, Carrier, Carrier Oil Seal and Bearing in the Removal and Installation portion of this section.
Place the carrier in a holding fixture, remove and clean all gasket surfaces and remove the bearing caps. Note the matched numbers or letters stamped on the cap and carrier. These numbers or letters must be matched upon assembly.
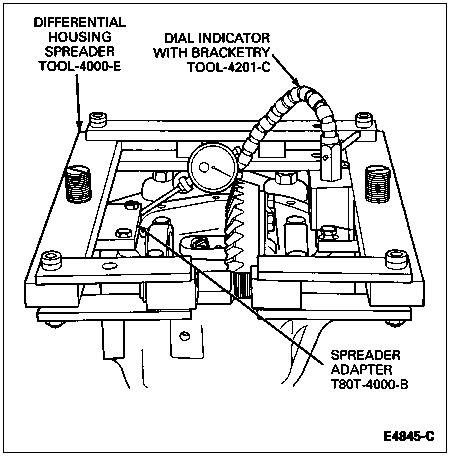
Mount Differential Housing Spreader TOOL-4000-E or equivalent and Differential Housing Spreader Adapters T80T-4000-B on carrier. Place Dial Indicator with Bracketry TOOL-4201-C or equivalent on the carrier and spread the housing. Do not spread the carrier over 0.25mm (0.010 inch).
Remove the differential case from the carrier. It may be necessary to pry the differential case from the carrier with pry bars. Use caution to avoid damaging any machined surfaces. Remove and tag differential bearing cups (4222) to indicate from which side of the carrier they were removed. Remove the spreader tool.
Turn the nose of the carrier up. Hold the end yoke with Companion Flange Holding Tool T57T-4851-B and remove the pinion nut and washer from the differential pinion shaft (4211).
Remove the end yoke with Companion Flange Remover T65L-4851-B. If the yoke shows any signs of wear in the area of seal contact, replace the yoke.
![]() CAUTION: Be careful not to damage the pinion bearing preload shims located on the splined end of the pinion. If damaged, replace with shims of equal thickness. Do not lose the shims.
CAUTION: Be careful not to damage the pinion bearing preload shims located on the splined end of the pinion. If damaged, replace with shims of equal thickness. Do not lose the shims.
Remove the drive pinion by tapping on the drive pinion shaft with a rawhide or nylon hammer. Catch the pinion to prevent damage to the pinion.
Remove the pinion seal from the carrier bore by using Bearing Cup Puller T77F-1102-A and Impact Slide Hammer T50T-100-A. Replace the pinion seal with a new one during assembly.
Remove the outer pinion bearing and the oil slinger from the carrier input bore.
Remove the pinion bearing preload shims. Remove all shims from the carrier. Replace any damaged shims during assembly. Shims are available in thicknesses of 0.08, 0.13, 0.25 and 0.76mm (0.003, 0.005, 0.010 and 0.030 inch).
Remove the inner pinion bearing cup and baffle using Pinion Bearing Cup Remover Set D81T-4628-C (Model 44 axles) or D81T-4628-D (Model 50 axles) and Driver Handle D81L-4000-A or equivalents. Drive the bearing cup out of the bore.
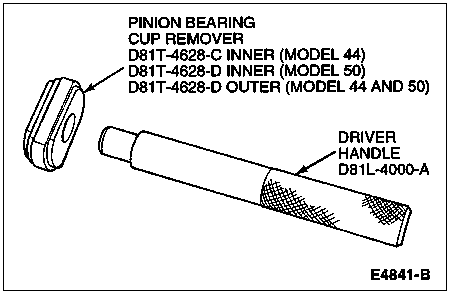
Turn the nose of the carrier down and remove the outer pinion bearing cup. Drive the cup from the carrier using Pinion Bearing Cup Remover D81T-4628-C (Model 44 axles) or D81T-4628-D (Model 50 axles) and Driver Handle D81L-4000-A or equivalents.
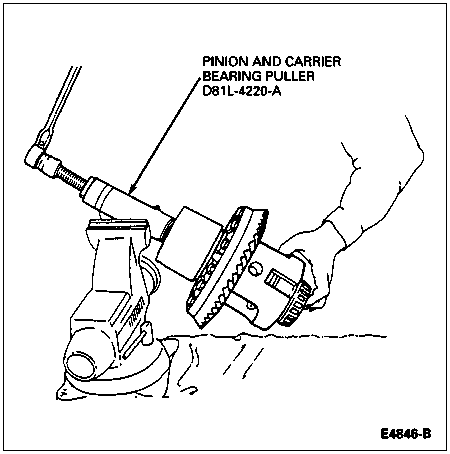
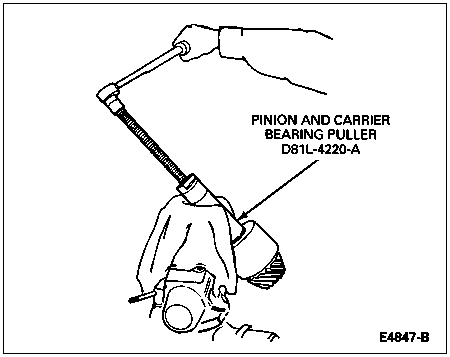
Remove the differential case bearings and shims from the case. Place Step Plate D80L-630-5 or equivalent under bearing to protect the bearing. Install Pinion and Carrier Bearing Remover D81L-4220-A or equivalent and remove the bearing as shown. Turn the case over and remove the other bearing.
Wire the shims, bearing cup and cone together and identify from which side of the case they were removed. If any shims are damaged, replace with new shims upon assembly.
NOTE: Whenever removing the bolts of the differential ring gear, discard the bolts and replace with new bolts upon assembly.
Place a few shop towels over the vise to prevent the ring gear teeth from being nicked, after it is free from the case. Place the case in a vise. Remove the ring gear bolts. Tap the ring gear with a rawhide hammer to free it from the case. Remove the case and differential ring gear and pinion from the vise.
NOTE: Shim/slinger is located between the pinion gear head and the differential pinion bearing (4630). Be careful not to damage the shim/slinger when removing the bearing cone. If the shim/slinger is damaged, measure the thickness and replace with shim/slinger of equal thickness. Refer to the following chart.
Remove the bearing and selective shims from the drive pinion with Pinion and Carrier Bearing Puller D81L-4220-A or equivalent.
| mm | Inches |
|---|---|
| 1.35 | 0.053 |
| 1.40 | 0.055 |
| 1.45 | 0.057 |
| 1.50 | 0.059 |
| 1.55 | 0.061 |
| 1.60 | 0.063 |
| 1.65 | 0.065 |
| 1.70 | 0.067 |
| 1.75 | 0.069 |
| 1.80 | 0.071 |
| 1.85 | 0.073 |
Inspect all parts for damage and replace as required.