Rear Axle Pinion Depth Gauge Tools
Section 05-02A: Axle, 10.25-Inch Ring Gear | 1996 F-250 Light Duty (Semi-Float), F-250 HD and F-350 (Full-Float) Workshop Manual |
| Description | Tool Number |
|---|---|
| Rear Axle Pinion Depth Gauge Tool Set | T79P-4020-A |
| Handle (Part of Set T79P-4020-A) | T76P-4020-A11 |
| Truck Pinion Depth Gauge | T80T-4020-A |
| Gauge Block (Part of Set T80T-4020-A) | T80T-4020-F42 |
| Screw (Part of Set T80T-4020-A) | T80T-4020-F43 |
| Aligning Adapter | T85T-4020-AH1 |
| Gauge Disc | T85T-4020-AH2 |
| Inner Pinion Bearing Cone Replacer | T85T-4621-AH |
| Axle Bearing/Seal Plate | T75L-1165-B |
| Pinion Seal Replacer | T83T-4676-A |
| Companion Flange Replacer | T85T-4851-AH |
| Companion Flange Holding Tool | T57T-4851-B |
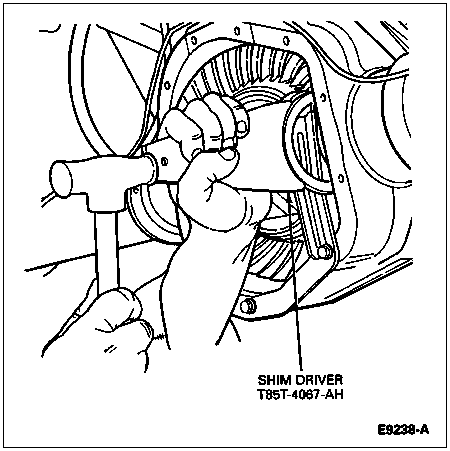
| Shim Driver | T85T-4067-AH |
Individual differences in machining the rear axle differential carrier casting and the ring gear and pinion and variation in bearing widths require a pinion shim between the inner pinion bearing and pinion head, in order to locate the pinion for correct tooth contact with the ring gear.
When replacing a differential ring gear and pinion (4209), the correct shim thickness for the new gearset to be installed is determined by the following procedure using the tools shown below.
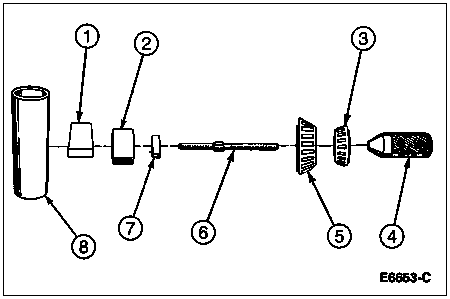
Rear Axle Pinion Depth Gauge Tools
| Item | Part Number | Description |
|---|---|---|
| 1 | T80T-4020-F42 | Gauge Block (Part of T80T-4020-A) |
| 2 | T85T-4020-AH2 | Gauge Disc |
| 3 | 4621 | Differential Pinion Bearing (Outer) |
| 4 | T76P-4020-A11 | Handle (Part of T79P-4020-A) |
| 5 | 4630 | Differential Pinion Bearing (Inner) |
| 6 | T80T-4020-F43 | Screw (Part of T80T-4020-A) |
| 7 | T85T-4020-AH1 | Aligning Adapter |
| 8 | D81T-4020-F51 | Gauge Tube |
Assemble the aligning adapter, gauge disc and gauge block to the screw.
Place the inner differential pinion bearing (new, or used if in good condition) over the aligning tool and insert it into the rear axle pinion bearing cup (4628) of the carrier.
Place the outer differential pinion bearing into the pinion bearing cup and assemble the tool handle into the screw.
Roll the assembly back and forth a few times to seat the bearings while tightening the tool handle by hand. Tighten the tool handle to 27 Nm (20 lb-ft). The gauge block must be offset as shown (45 degrees) to obtain an accurate reading.
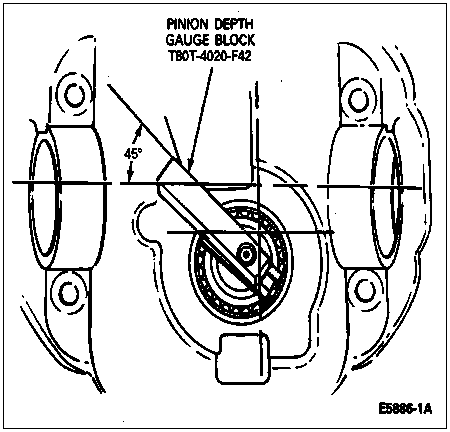
Center the gauge tube into the differential bearing bore. Install the bearing retaining caps and tighten the bolts to 95-115 Nm (70-85 lb-ft). Bearing retaining caps are to be installed with the triangles pointing outboard.
NOTE: Pinion shims must be flat. Do not use dirty, bent, nicked or mutilated pinion shims as a gauge.
Utilize pinion shims as the gauge for shim selection. This will minimize errors in attempting to stack feeler gauge stock together or simple addition errors in calculating correct shim thickness. A slight drag should be felt on the pinion shim for correct selection. Do not force the pinion shim between the gauge block and the gauge tube. This will minimize selection of a pinion shim thicker than required which results in a deep tooth contact in final assembly of integral axles.
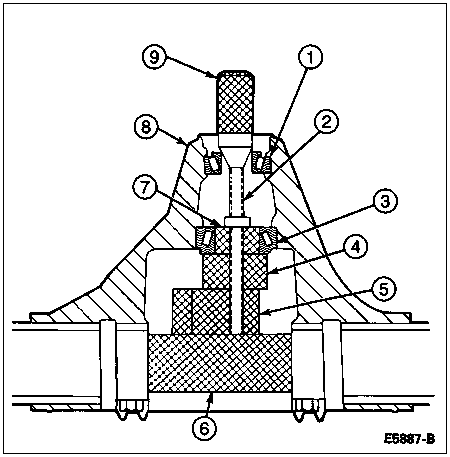
| Item | Part Number | Description |
|---|---|---|
| 1 | 4621 | Differential Pinion Bearing (Outer) |
| 2 | T80T-4020-F43 | Screw (Part of T80T-4020-A) |
| 3 | 4630 | Differential Pinion Bearing (Inner) |
| 4 | T85T-4020-AH2 | Gauge Disc |
| 5 | T80T-4020-F42 | Gauge Block (Part of T80T-4020-A) |
| 6 | D81T-4020-F51 | Gauge Tube |
| 7 | T85T-4020-AH1 | Aligning Adapter |
| 8 | 4010 | Rear Axle Housing |
| 9 | T76P-4020-A11 | Handle (Part of T79T-4020-A) |
NOTE: The same differential pinion bearing used in the following procedure must be used in final assembly of the axle.
NOTE: Make sure the press load is not applied to the bearing cage.
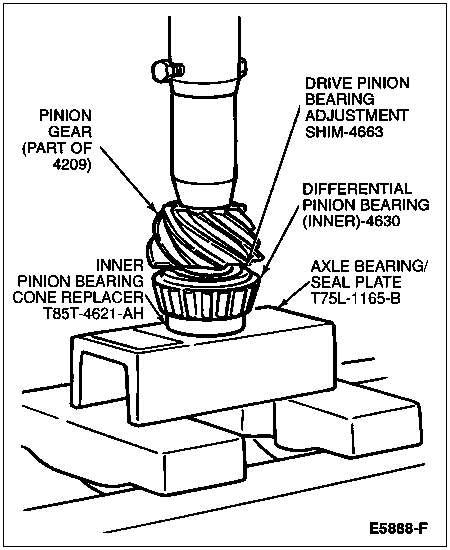
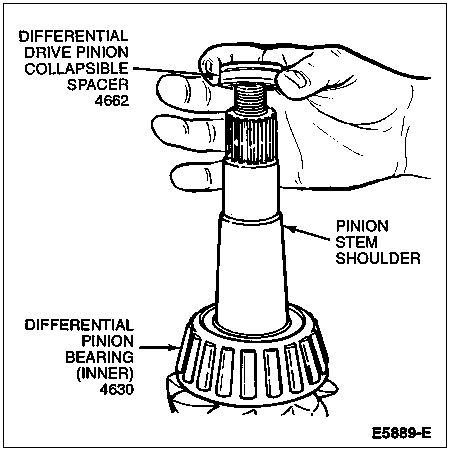
Place the selected shim(s) on the pinion and press the bearing until it is firmly seated on the shaft using Inner Pinion Bearing Cone Replacer T85T-4621-AH and Axle Bearing/Seal Plate T75L-1165-B.
Check splines on the pinion stem to be sure they are free of burrs. If burrs are evident, remove them by using a fine crocus cloth, working in a rotational motion. Wipe the pinion clean.
Place the differential drive pinion collapsible spacer (4662) on the pinion stem against the pinion stem shoulder.
![]() CAUTION: Installation without the proper tool may result in early seal failure. If rear axle drive pinion seal (4676) becomes cocked during installation, remove it and install new one.
CAUTION: Installation without the proper tool may result in early seal failure. If rear axle drive pinion seal (4676) becomes cocked during installation, remove it and install new one.
Install the differential pinion bearing (4621) (outer) and oil slinger in the housing bore and install the rear axle drive pinion seal on the Pinion Seal Replacer T83T-4676-A.

Clean the seat surface of the rear axle drive pinion seal.
Install the rear axle drive pinion seal in the housing bore using Pinion Seal Replacer T83T-4676-A.
Coat the lips of the rear axle drive pinion seal with Premium Long-Life Grease XG-1-C or -K or equivalent meeting Ford specification ESA-M1C75-B.

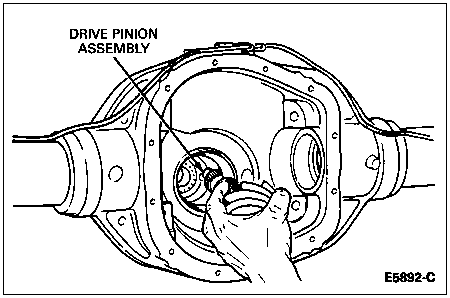
From the rear of the axle housing, install the drive pinion, drive pinion bearing adjustment shims (4663), differential pinion bearing (4630) (inner), and differential drive pinion collapsible spacer into the housing pinion shaft bore.
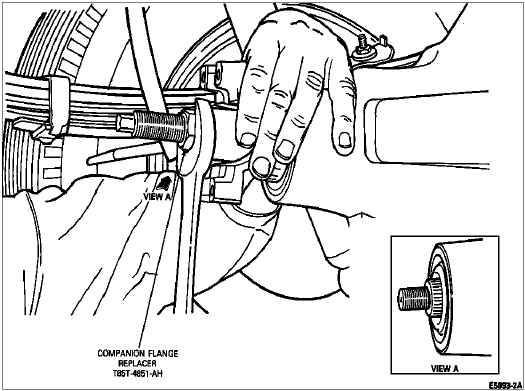
Apply a small amount of lubricant to the rear axle companion flange shaft splines. Align the mark on the rear axle universal joint flange (4851) with the mark on the pinion stem.
NOTE: If a new rear axle universal joint flange is being installed, disregard the scribe mark on the pinion stem.
NOTE: The rear axle universal joint flange must never be hammered on or installed with power tools.
With the drive pinion in place in the axle housing, install rear axle universal joint flange using Companion Flange Replacer T85T-4851-AH.
Hold the rear axle universal joint flange with Companion Flange Holding Tool T57T-4851-B while tightening the nut.
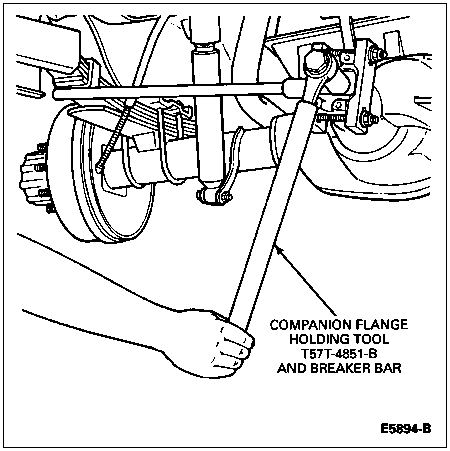
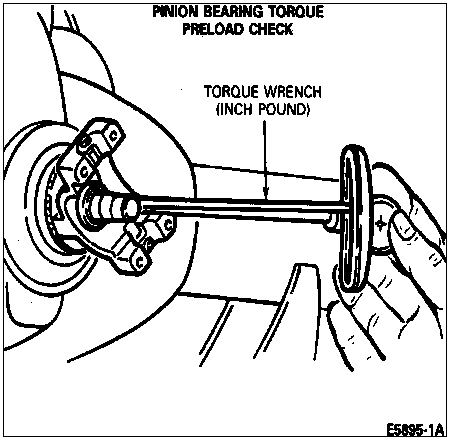
Tighten the pinion nut, rotating the pinion occasionally to make sure cone and roller bearings are seating properly. Take frequent torque-to-rotate (preload) readings until the original recorded preload reading is obtained by rotating the pinion with a Nm (inch-pound) torque wrench.
If the original recorded preload is lower than specification (original bearings 0.9-1.5 Nm [8-14 lb-in]; new bearings 1.8-3.3 Nm [16-29 lb-in]), tighten to specification. If the preload is higher than specification, tighten to original reading as recorded.
Under no circumstances should the pinion nut be backed off to reduce preload. If reduced preload is required, a new collapsible spacer and pinion nut must be installed.
![]() CAUTION: Tab on anti-lock speed sensor ring must be aligned with slot in differential case (4204).
CAUTION: Tab on anti-lock speed sensor ring must be aligned with slot in differential case (4204).
Start two ring gear bolts through the differential case into the ring gear to make sure ring gear bolt holes align with differential case bolt holes properly.

| Item | Part Number | Description |
|---|---|---|
| 1 | 43114-S100 | Ring Gear Bolts |
| 2 | 4B409 | Anti-Lock Speed Sensor Ring |
| 3 | 4209 | Ring Gear |
| 4 | — | Anti-Lock Speed Sensor Ring Tab (Part of 4B409) |
| 5 | — | Differential Case Slot (Part of 4204) |
Press the anti-lock speed sensor ring and ring gear on the differential case. The ring gear acts as a pilot for the anti-lock speed sensor ring. Apply Threadlock® and Sealer EOAZ-19554-AA (WSK-M2G315-A5) or equivalent to ring gear bolts and tighten to 136-163 Nm (100-120 lb-ft).

With pinion depth set and pinion installed, placedifferential case (with ring gear, anti-lock speed sensor ring, thrust washers, differential side gears (4236), bearings and cups) in carrier.

To simplify installation, fabricate two differential case retaining straps from metal stock as shown. These retaining straps will prevent the differential case from falling out of the rear axle housing (4010).
Attach the straps at the 11 o'clock and 1 o'clock positions in the cover bolt holes. Install bolts and rotate straps to contact the bearing cups. Make sure access is available for differential bearing shim installation.

Install a 6.73mm (0.265-inch) differential bearing shim on left side.

Install left bearing cap and tighten bolts finger-tight.

NOTE: Apply pressure toward left side to make sure that the left bearing cup is seated.
Install progressively larger shims on the right side until the largest shim selected can be installed by hand.

NOTE: Triangles on bearing cap must point outboard.
Install right side bearing retaining cap and tighten bearing cap bolts to 95-115 Nm (70-85 lb-ft).
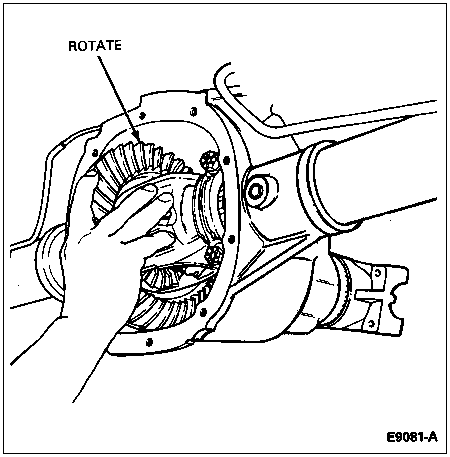
Rotate assembly to make sure it rotates freely.
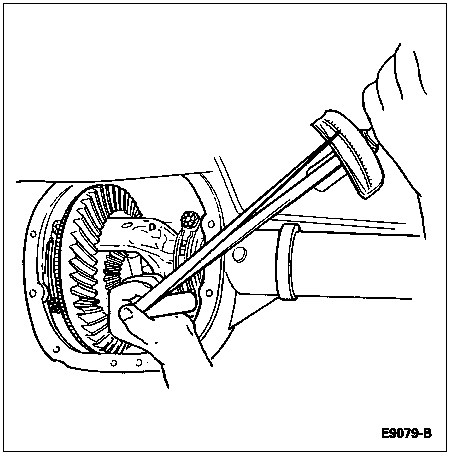
Check ring gear and pinion backlash with a Dial Indicator with Bracketry TOOL-4201-C or equivalent.
If the backlash is 0.20-0.38mm (0.008-0.015 inch) (0.30-0.38mm [0.012-0.015 inch] preferred), proceed to Step 35.
If the backlash is zero, proceed to Step 30.
If the backlash is 0.025-0.177mm (0.001-0.007 inch) or greater than 0.38mm (0.015 inch), proceed to Step 31.

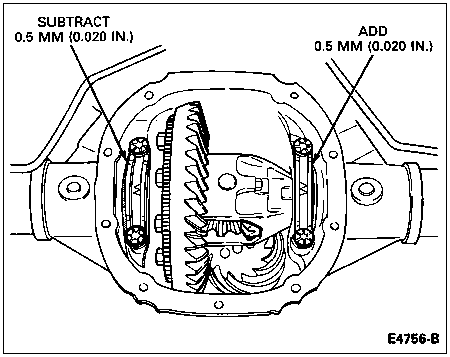
If a zero backlash condition occurs, add 0.50mm (0.020 inch) to the right side and subtract 0.50mm (0.020 inch) from the left side.
Recheck backlash. If backlash is within specification, go to Step 36. If backlash is not within specification, proceed to Step 32.
If backlash is 0.025-0.177mm (0.001-0.007 inch), or greater than 0.38mm (0.015 inch), correct backlash by increasing thickness of one differential bearing shim and decreasing thickness of the other differential bearing shim by the same amount. Refer to Backlash and Shim Change Chart.
| Backlash Change Required | Thickness Change Required | Backlash Change Required | Thickness Change Required | ||||
|---|---|---|---|---|---|---|---|
| mm | Inches | mm | Inches | mm | Inches | mm | Inches |
| 0.025 | 0.001 | 0.050 | 0.002 | 0.228 | 0.009 | 0.304 | 0.012 |
| 0.050 | 0.002 | 0.050 | 0.002 | 0.254 | 0.010 | 0.355 | 0.014 |
| 0.076 | 0.003 | 0.101 | 0.004 | 0.279 | 0.011 | 0.355 | 0.014 |
| 0.101 | 0.004 | 0.152 | 0.006 | 0.304 | 0.012 | 0.406 | 0.016 |
| 0.127 | 0.005 | 0.152 | 0.006 | 0.330 | 0.013 | 0.457 | 0.018 |
| 0.152 | 0.006 | 0.203 | 0.008 | 0.355 | 0.014 | 0.457 | 0.018 |
| 0.178 | 0.007 | 0.254 | 0.010 | 0.381 | 0.015 | 0.508 | 0.020 |
| 0.203 | 0.008 | 0.254 | 0.010 | — | — | — | — |

NOTE: Triangles on bearing caps must point outboard.
Install differential bearing shim and bearing retaining caps. Tighten cap bolts to 109-129 Nm (80-95 lb-ft).

Rotate assembly several times to make sure differential bearings (4221) seat properly.
Recheck backlash. If backlash is within specification, go to Step 36. If backlash is not within specification, repeat Step 32.
Backlash specification: 0.20-0.38mm (0.008-0.015 inch). Preferred range: 0.30-0.38mm (0.012-0.015 inch).
Remove bearing caps and bolts. To establish differential bearing preload, increase both left and right differential bearing shim sizes by 0.152mm (0.006 inch). Make sure differential bearing shims are fully seated and assembly turns freely.
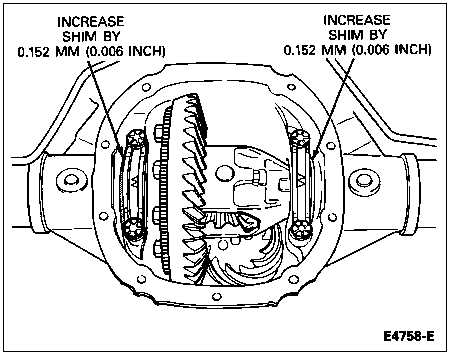
Install the differential bearing shims (4067) by driving into position with Shim Driver T85T-4067-AH.
NOTE: Triangles on bearing caps must point outboard.
Install bearing caps and tighten cap bolts to 109-129 Nm (80-95 lb-ft). Recheck backlash. If not to specification, repeat Step 28.
Install the driveshaft (4602). Align the paint or scribe marks on the rear axle universal joint flange and driveshaft and connect the driveshaft.
Tighten attaching bolts and nuts to 11-20 Nm (8-15 lb-ft).
Install the axle shafts (4234) and carrier cover. Refer to Axle Shaft, Semi-Floating Axle, in the Removal and Installation portion of this section.