Section 05-00: Axle and Driveshaft, Service | 1996 F-150, F-250, F-350 4x2 and 4x4, F-Super Duty and Bronco Workshop Manual |
DIAGNOSIS AND TESTING
Component Tests
Driveline Vibration
Driveline vibration exhibits a higher frequency and lower amplitude than does high-speed shake. Driveline vibration is directly related to the speed of the vehicle and is usually noticed at speeds of 72 km/h (45 mph) or higher. Driveline vibration can be perceived as a tremor in the floorpan or is heard as a rumble, hum or boom. Driveline vibration can exist in all drive modes, but may exhibit different symptoms depending upon whether the vehicle is accelerating, decelerating, floating or coasting. If the vibration is particularly noticeable during acceleration or deceleration, especially at lower speeds, then driveline angle should be checked. Driveline vibration can be duplicated by supporting the axle upon a hoist or upon jack stands, though the brakes may need to be applied lightly in order to simulate road resistance.
Raise vehicle promptly after road testing, on twin-post hoist or jack stands, to prevent tire flat-spotting. Engage drivetrain and run-up to observed road test speed to verify presence of vibration. If not evident, check non-driving wheels with wheel-balancer spinner to rule out imbalance as a possible cause. On 4x4s, unlock front hubs or remove hub covers before spinning wheels. If required, balance non-driving wheels and repeat road test. If vibration is still evident, proceed to Step 3.
If vibration appeared in road speed hoist test, mark relative position of drive wheels on rear axle (4001) or hub lugs to permit reinstallation in original position, and remove wheels. Secure brake drums, if present, by installing all lug nuts in reversed position (on single-wheel vehicles) and repeat road-speed run-up. Dual rear wheel lug nuts (1012) may be installed in the normal orientation. If vibration is gone, see drive wheel runout and balance procedures in Section 04-04. If vibration persists, proceed to Step 3.
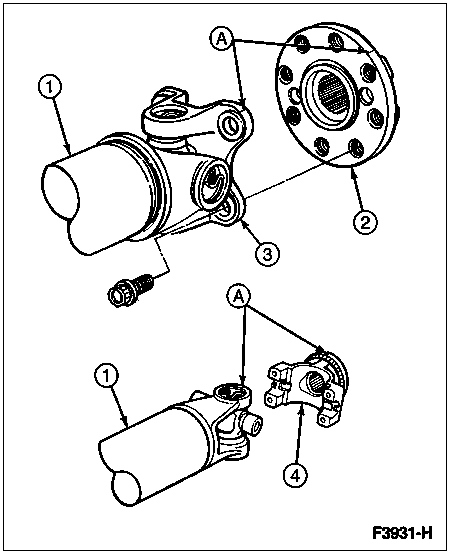
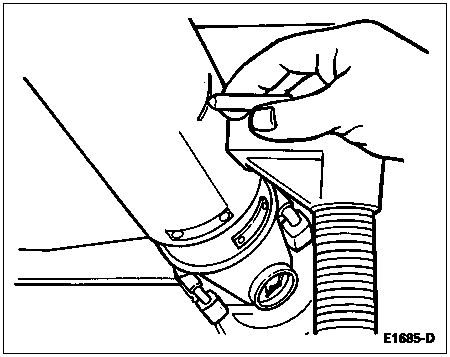
Inspect driveshaft (4602) for signs of physical damage, missing balance weight, undercoating, or improperly seated, worn, or binding universal joints. Check the index marks (paint spots) on rear of driveshaft and rear axle universal joint flange (4851). If these marks are more than 90 degrees apart, disconnect driveshaft and reindex to align marks as close as possible. The indexing marks denote the point of maximum runout of the rear axle universal joint flange and minimum imbalance of the driveshaft. Clean driveshaft and replace universal joints as necessary, or replace driveshaft if damaged. After any corrections are made, recheck vibration at road test speed. If gone, reinstall wheels and road test. If vibration persists, proceed to Step 4.

| Item | Part Number | Description |
| 1 | 4602 | Driveshaft |
| 2 | 4851 | Rear Axle Universal Joint Flange (Circular) |
| 3 | 4782 | Driveshaft Centering Socket Yoke |
| 4 | 4851 | Rear Axle Universal Joint Flange (Half-Round) |
| A | — | Scribe Marks |
With vehicle on hoist and wheels off, measure runout at front, center, and rear of driveshaft with indicator, rotating driveshaft by turning a brake drum or rotor. On a one-piece driveshaft, if runout exceeds 0.89mm (0.035 inch) at front or center, the driveshaft must be replaced. If front and center are within this limit, but rear runout is not, mark the rear runout high point and proceed to Step 5. If runout is within limits at all points, proceed to Step 7 or to Driveshaft Runout and Balance in the Adjustments portion of this section.

NOTE: Move universal joints in each direction of rotation during reindexing. If a universal joint feels stiff or has a gritty feel in any direction, replace the universal joint.
Note or mark the indexing of driveshaft to rear axle universal joint flange. Disconnect the driveshaft, reindex 180 degrees, and reconnect. Circular rear axle universal joint flanges can be indexed in 45-degree increments to fine tune the runout condition; half-round rear axle universal joint flanges are limited to two positions. Check runout at rear of driveshaft, and if still over 0.89mm (0.035 inch), mark high point and see Step 6. If runout is no longer excessive, check for vibration at road test speed, and, if still present, reindex the driveshaft slip yoke (4841) on the transmission output shaft 180 degrees and road test the vehicle.
If the vibration persists, proceed to Step 7 or to Driveshaft Runout and Balance in the Adjustments portion of this section.
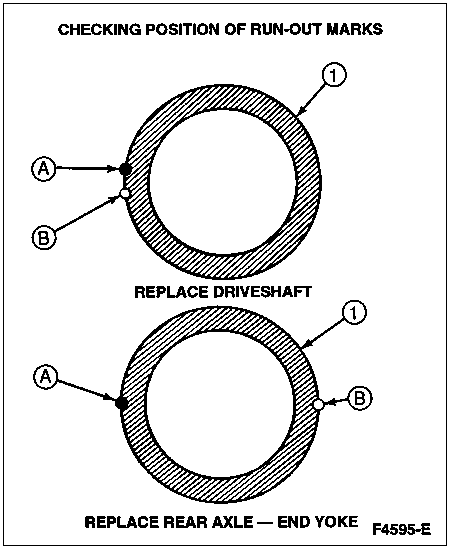
Excessive driveshaft runout may originate in the driveshaft itself or in the rear axle universal joint flange. To determine which, compare the two high points marked in Steps 4 and 5. If the marks are close together, within about 25mm (1 inch), the shaft is eccentric, and should be replaced and checked for vibration. If the marks are on opposite sides of the driveshaft, about 180 degrees apart, the yoke or rear axle universal joint flange is responsible. After replacing, check for runout. When replacing a rear axle universal joint flange, driveshaft runout should not exceed 0.89mm (0.035 inch). When runout is within limits, recheck for vibration at road speed. If vibration persists, balance the driveshaft.

| Item | Part Number | Description |
| 1 | 4602 | Driveshaft |
| A | — | First Runout Mark |
| B | — | Second Runout Mark |
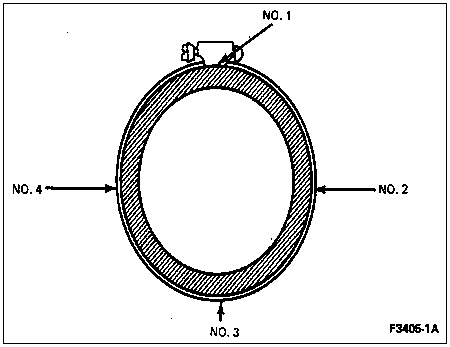
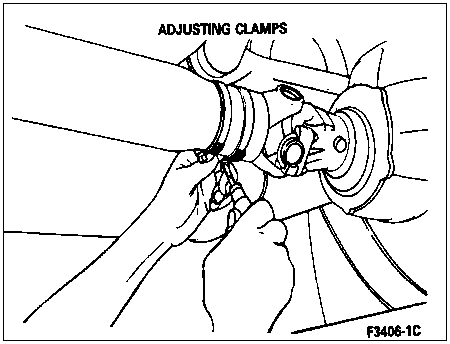
Driveshaft balancing involves installing one or two hose clamps on the driveshaft, near the rear end of a one-piece driveshaft. Best positioning of the hose clamp head(s) can be determined by trial-and-error, if special balancing equipment is not available. If transducer-and-strobe equipment is available, refer to Driveshaft Runout and Balance in the Adjustments portion of this section.
Mark the rear of the driveshaft into four approximately equal sectors, and number the marks 1 through 4. Install a hose clamp on the driveshaft with its head at position No. 1. Check for vibration at road speed. Recheck with the clamp at each of the other positions, to find the position for minimum vibration. If two adjacent positions show equal improvement, position the clamp head between them.

If condition is still not acceptable, add a second clamp at the same position and recheck vibration. If no improvement is noted, rotate the clamps in opposite directions, equal distances from the best position determined in Step 8. Initially, separate the clamp heads about 12mm (1/2 inch), and recheck vibration at road speed.
Repeat the process with increasing separation until the best combination is found, or vibration is reduced to an acceptable level.

Install wheels and road test, since vibration noticeable on the hoist may not be evident during the road test. If vibration is still not acceptable, replace the rear axle drive line vibration damper (4A263), if so equipped. If road test is not acceptable, check tooth contact pattern. Repair as necessary. If tooth contact pattern is okay, replace differential ring gear and pinion (4209).
Driveline Angularity
Driveline angularity is the angular relationship between the engine crankshaft (6303), the driveshaft and the rear axle pinion. Factors determining driveline angularity include ride height (rear spring (5560)) and engine mounts.
Low speed vibration, less than 72 km/h (45 mph), especially when the vehicle is subjected to heavy acceleration or deceleration, is an indication of improper driveline angles. When these conditions exist, check the universal joints for proper seating, mounting and operation.
Driveline Angularity

Driveshaft Vibrates
Road test vehicle to determine critical vibration points. Note road speed, engine rpm and shift lever positions at which vibration occurs.
Stop vehicle and run engine with clutch depressed (automatic transmission in neutral) through critical speed ranges determined in Step 1.
With clutch depressed, all potential engine and clutch concerns are eliminated. If vibration persists, the driveshaft must be balanced as described in this section.
Traction-Lok® Differential
SPECIAL SERVICE TOOL(S) REQUIRED
| Description | Tool Number |
|---|
| Traction-Lok® Torque Tool | T66L-4204-A |
A Traction-Lok® differential can be checked for proper operation without removing it from the rear axle housing (4010).
 WARNING: A VEHICLE EQUIPPED WITH A TRACTION-LOK® DIFFERENTIAL WILL ALWAYS HAVE BOTH WHEELS DRIVING. IF, WHILE THE VEHICLE IS BEING SERVICED, ONLY ONE WHEEL IS RAISED OFF THE FLOOR AND THE REAR AXLE IS DRIVEN BY THE ENGINE, THE WHEEL ON THE FLOOR COULD DRIVE THE VEHICLE OFF THE STAND OR JACK. BE SURE BOTH REAR WHEELS ARE OFF THE FLOOR.
Raise one rear wheel and remove the wheel cover (1130). Install adapter for Traction-Lok® Torque Tool T66L-4204-A on the lug bolts (1107).
Using a torque wrench with the capacity of at least 271 Nm (200 lb-ft), rotate the axle shaft (4234). Make sure that the transmission is in neutral, one rear wheel is on the floor and the other rear wheel is raised off the floor. The breakaway torque required to start rotation should be at least 27 Nm (20 lb-ft). The initial breakaway torque may be higher than the continuous turning torque but this is normal. The axle shaft should turn with even pressure throughout the check without slipping or binding. If the torque reading is less than specified, check the differential case (4204) for improper assembly.

To service Traction-Lok® differential, refer to Section 05-02H.
Limited Slip Differential
To service limited slip differential, refer to Section 05-02F for F-Super Duty (rear axle), Section 05-03D for F-150 and Bronco (front axle) or Section 05-02C for F-250 and F-350 (rear axle).
In-Vehicle Check
To demonstrate the proper performance of the limited slip differential:
Place one wheel on good, dry surface and the other wheel on ice, mud or snow.
Gradually open throttle to obtain maximum traction prior to "break-away." The ability to move the vehicle will demonstrate proper performance of a limited slip rear axle assembly.
When starting with one wheel on an excessively slippery surface, a slight application of the parking brake may be necessary to help energize the limited slip feature of the differential. Release the brake when traction is established. Use light throttle on starting to provide maximum traction.
If, with unequal traction, both wheels slip, the limited slip rear axle has done all it can possibly do.
In extreme cases of differences in traction, the wheel with the least traction may spin after the limited slip feature has transferred as much torque as possible to the non-slipping wheel.
Universal Joint Flange Runout Check, Rear Axle, Circular
SPECIAL SERVICE TOOL(S) REQUIRED
| Description | Tool Number |
|---|
| Companion Flange Runout Gauge | T92L-4851-B |
| Clamp Plate | T92L-4851-C |
 CAUTION: This operation disturbs the pinion bearing preload. Pinion bearing preload must be reset if the pinion nut has been loosened or removed for rear axle universal joint flange reindexing or replacement.
Raise the vehicle on a hoist that supports the rear axle (twin-post hoist). Refer to Section 00-02.
Remove the driveshaft assembly. Refer to Section 05-01.
Check the rear axle universal joint flange for damage.
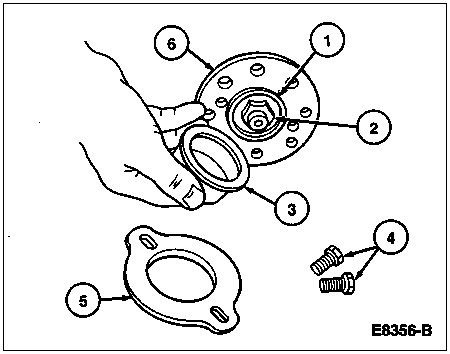
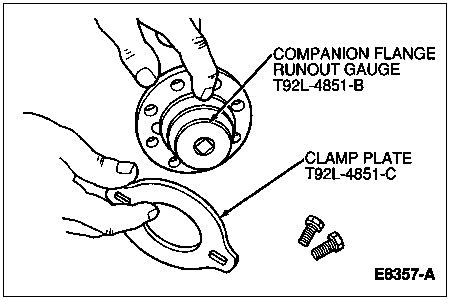
Position Companion Flange Runout Gauge T92L-4851-B on rear axle universal joint flange.

| Item | Part Number | Description |
| 1 | — | Pilot (Part of 4851) |
| 2 | 354845 | Pinion Nut |
| 3 | T92L-4851-B | Companion Flange Runout Gauge |
| 4 | — | Bolts (2 Req'd)
(Part of T92L-4851-C) |
| 5 | T92L-4851-C | Clamp Plate |
| 6 | 4851 | Rear Axle Universal Joint Flange |
Install Clamp Plate T92L-4851-C on Runout Gauge.

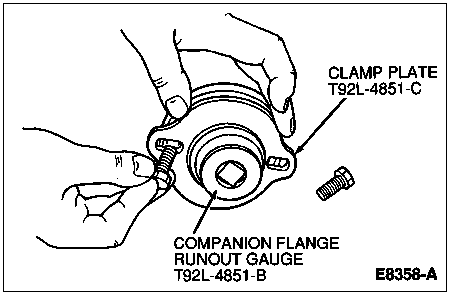
Align holes in clamp plate with holes in rear axle universal joint flange and install bolts. Snug bolts evenly.

NOTE: Refer to Section 05-02G for rear axle universal joint flange removal and installation procedures.
Using Dial Indicator/Magnetic Base D78P-4201-B or equivalent, turn companion flange runout gauge as shown to locate and mark high spot on rear axle universal joint flange. If flange runout exceeds 0.254mm (0.010 inch), remove rear axle universal joint flange, reindex 180 degrees on pinion and reinstall. Check runout again. If necessary, rotate rear axle universal joint flange until an acceptable runout is obtained. If flange runout is still more than 0.254mm (0.010 inch), replace rear axle universal joint flange.

If excessive runout is still evident after replacement of the rear axle universal joint flange, replace the differential ring gear and pinion. Repeat the above checks until runout is within specification. Install the driveshaft assembly. Refer to Section 05-01.
Universal Joint Flange Runout Check, Rear Axle, Half-Round
SPECIAL SERVICE TOOL(S) REQUIRED
| Description | Tool Number |
|---|
| Gauge Pin | T92T-4851-E |
| Gauge Pin | T92T-4851-F |
| Gauge Pin | T92T-4851-G |
| Companion Flange Runout Gauge | T92T-4851-D |
Raise the vehicle on a hoist.
Remove the driveshaft. Refer to Section 05-01.
Check the rear axle universal joint flange for damage to the universal joint bearing locating lugs. If the lugs are shaved (worn) or damaged, replace the rear axle universal joint flange.
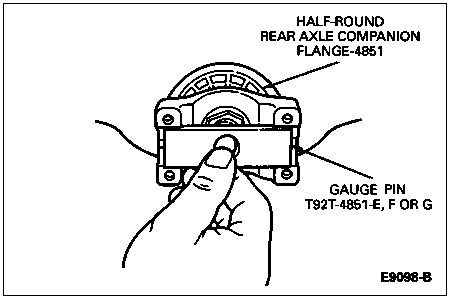
Insert correct size Gauge Pin, T92T-4851-E, T92T-4851-F or T92T-4851-G.

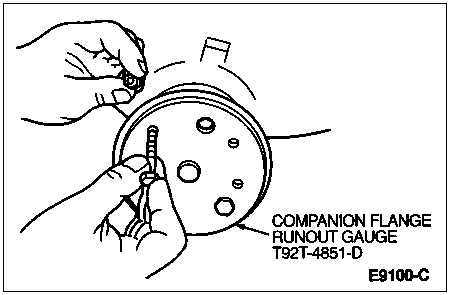
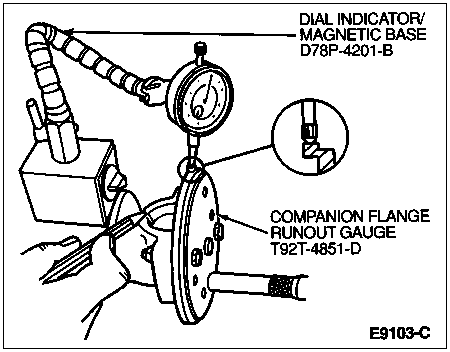
Position Companion Flange Runout Gauge T92T-4851-D on gauge pin.

Insert two bolts through gauge and rear axle universal joint flange. Install two nuts and hand-tighten.

NOTE: Accurate tool setup will result in accurate final readings.
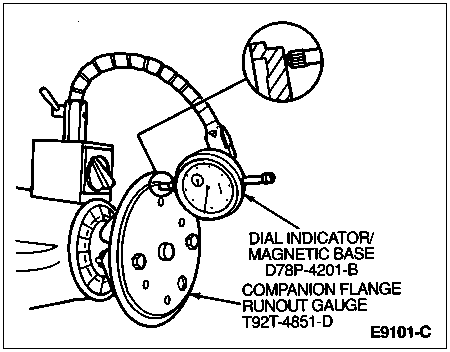
Position Dial Indicator/Magnetic Base D78P-4201-B or equivalent as shown. Adjust and lightly tighten mounting bolts and nuts so gauge runout is 0.254mm (0.010 inch) or less.

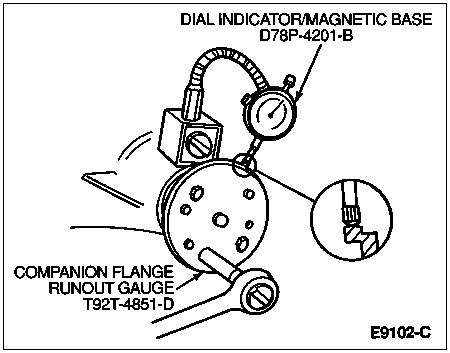
Reposition dial indicator on edge of gauge, and turn rear axle companion flange/gauge as shown until high spot is located.

 CAUTION: The following operation may disturb the pinion bearing preload. Pinion bearing preload must be reset if the pinion nut is loosened or removed for companion flange reindexing or replacement of rear axle companion flange.
Turn companion flange runout gauge as shown to locate and mark high spot on rear axle universal joint flange. If flange runout exceeds 0.254mm (0.010 inch), remove rear axle universal joint flange, reindex 180 degrees on pinion and reinstall. Check runout again. Rotate the rear axle universal joint flange until an acceptable runout is obtained. If flange runout is still greater than 0.254mm (0.010 inch), replace rear axle universal joint flange.

If excessive runout is still evident after replacement of the rear axle universal joint flange, it will be necessary to replace the differential ring gear and pinion, and repeat Step 9 until runout is within specification (0.254mm [0.010 in.]). Refer to Section 05-02A or Section 05-02D for companion flange replacement procedures.
Install driveshaft. Refer to Section 05-01.
Tooth Contact Patterns Check of Gearset
To check the gear tooth contact, paint the gear teeth with the special marking compound. A mixture that is too wet will run and smear; too dry a mixture cannot be pressed out from between the teeth.
Rotate the ring gear (use a box wrench on the ring gear attaching bolts as a lever) several complete revolutions in both directions or until a clear tooth contact pattern is obtained.
Certain types of gear tooth contact patterns on the ring gear indicate incorrect adjustment. Incorrect adjustment can be corrected by readjusting the ring gear or the pinion.
The illustration shows acceptable tooth patterns for all axles. In general, desirable tooth patterns should have the following characteristics:
- The drive pattern should be fairly well centered on the tooth.
- The coast pattern should be fairly well centered on the tooth.
- Some clearance between the pattern and the top of the tooth is desirable.
- There should be no hard lines where the pressure is high.
Ring Gear Contact Pattern Location

| Item | Part Number | Description |
| A | — | Normal or Desirable Pattern |
| B | — | Backlash Correct. Thinner Pinion Position Shim Required. |
| C | — | Backlash Correct. Thicker Pinion Position Shim Required. |
| D | — | Pinion Position Shim Correct. Decrease Backlash. |
| E | — | Pinion Position Shim Correct. Increase Backlash. |
