Section 04-00: Suspension, Service | 1996 F-150, F-250, F-350, F-Super Duty and Bronco Workshop Manual |
DIAGNOSIS AND TESTING
Pinpoint Tests
PINPOINT TEST A: DRIFT LEFT OR RIGHT
A1 CHECK TIRES
- Inspect tires for excessive wear or damage.
Are tires excessively worn or damaged?
| Yes | No |
|---|
| REPLACE tires. | GO to A2. |
A2 CHECK STEERING LINKAGE
- Raise vehicle on hoist. Refer to Section 00-02.
- Check steering linkage for indications of excessive wear or damage.
Is there indication of excessive wear or damage?
| Yes | No |
|---|
| SERVICE or REPLACE worn or damaged components as necessary. | GO to A3. |
A3 CHECK VEHICLE ALIGNMENT
- Place vehicle on an alignment rack.
- Check vehicle alignment.
Is alignment within specification?
| Yes | No |
|---|
| GO to A4. | ADJUST alignment as necessary. |
A4 BRAKE DRAG DIAGNOSIS
Does drift or pull occur when brakes are applied?
PINPOINT TEST B: STEERING WHEEL OFF-CENTER
B1 CHECK CLEAR VISION
- Place vehicle on alignment rack.
Is clear vision within specifications?
| Yes | No |
|---|
| GO to B2. | ADJUST clear vision to specification. |
B2 INSPECT STEERING COMPONENTS
- Raise vehicle on hoist. Refer to Section 00-02.
- Inspect steering components for excessive wear or damage.
Are steering components excessively worn or damaged?
PINPOINT TEST C: TRACKS IMPROPERLY
C1 CHECK CASTER
- Place vehicle on alignment rack.
Are caster and caster split (LH minus caster) within specification?
| Yes | No |
|---|
| GO to C2. | ALIGN vehicle. |
C2 CHECK REAR SUSPENSION
- Measure vehicle wheel base for LH and RH.
- Compare measurements.
Are measurements the same?
| Yes | No |
|---|
| GO to D1. | INSPECT rear suspension components for wear or damage. SERVICE or REPLACE worn or damaged components as required. REFER to Section 04-02. |
PINPOINT TEST D: ROUGH RIDE
D1 CHECK FRONT SHOCK ABSORBERS
- Raise vehicle on hoist. Refer to Section 00-02.
- Inspect front shock absorbers for oil leaks or damage.
Are front shock absorbers leaking?
D2 CHECK REAR SHOCK ABSORBERS
- With vehicle on hoist, inspect rear shock absorbers for oil leak or damage.
Are shock absorbers leaking?
PINPOINT TEST E: EXCESSIVE NOISE
E1 INSPECT SUSPENSION
- Raise vehicle on hoist. Refer to Section 00-02.
- Inspect shock absorber mount bolts.
Are mounting bolts loose or broken?
E2 INSPECT SPRINGS
- With vehicle on hoist, inspect springs for damage.
Are springs damaged?
E3 INSPECT FRONT SUSPENSION
- Inspect front suspension components for excessive wear or damage.
Are front suspension components worn or damaged?
PINPOINT TEST F: IMPROPER TIRE WEAR
F1 INSPECT TIRES
- Raise vehicle on hoist. Refer to Section 00-02.
- Inspect tires for uneven wear on inner or outer shoulder.
Is there uneven tire wear?
| Yes | No |
|---|
| ALIGN vehicle. REPLACE tires if badly worn. | GO to F2. |
F2 UNEVEN TIRE WEAR
- With vehicle on hoist, inspect tires for sawtooth pattern.
Do tires have sawtooth pattern?
| Yes | No |
|---|
| ALIGN vehicle. REPLACE tires if badly worn. | GO to F3. |
F3 CHECK FOR CUPPED TIRE
- With vehicle on hoist, inspect tires for cupping or dishing.
Are tires cupped or dished?
| Yes | No |
|---|
| BALANCE and ROTATE tires. REFER to Section 04-04. | Vehicle OK. |
PINPOINT TEST G: VIBRATION
G1 ROAD TEST
- Accelerate vehicle to the speed at which the customer indicated the vibration occurred.
Is a vibration present?
| Yes | No |
|---|
| GO to G2. | Vehicle OK. |
G2 INSPECT WHEEL BEARINGS
- Spin front tires by hand to check for wheel bearing roughness. Check bearing end play.
Is end play OK?
| Yes | No |
|---|
| GO to G3. | ADJUST or REPLACE and LUBRICATE bearings as necessary. PERFORM road test. |
G3 TIRE RUNOUT ON VEHICLE
- Measure wheel/tire assembly runouts on vehicle using Rotunda Radial Run-Out Gauge 007-0056A or equivalent. Refer to Section 04-04.
Is measurement in specification?
G4 TIRE RUNOUT OFF VEHICLE
- Measure tire assembly from any position that exceeds 1.59mm (0.062 inch) radial or lateral. Before removing wheel/tire assembly, mark wheel stud and corresponding bolt hole so assembly can be installed in same position. Remove assembly and mount on wheel balancer. Measure runout as in Step G3. Assembly runout should be less than 1.59mm (0.062 inch) radial and lateral.
Is measurement in specification?
| Yes | No |
|---|
| CHECK rotor drum and bolt circle runout. GO to G7. | GO to G5. |
G5 MATCH MOUNTING
- Mark the high runout location on the tire and also on the wheel. Break the assembly down and rotate the tire 180 degrees (halfway around) on the wheel. Inflate the tire and measure the runouts.
Are tires/wheels balanced?
| Yes | No |
|---|
| BALANCE assembly and INSTALL on vehicle. PERFORM road test. | If high spot is not within 101.6mm (4 inches) of first high spot on the tire, GO to G6. |
G6 WHEEL RUNOUT
- Dismount tire and mount wheel on wheel balancer. Measure runouts on both flanges. Refer to Section 04-04.
Is there proper runout?
| Yes | No |
|---|
| LOCATE and MARK low spot on wheel and INSTALL tire, matching high spot on wheel. BALANCE assembly and PERFORM road test. | REPLACE wheel. CHECK runouts on new wheel. If new wheel is within limits, LOCATE and MARK the low spot. INSTALL tire, matching high spot of tire with low spot of wheel. BALANCE assembly and INSTALL on vehicle. PERFORM road test. |
G7 INSPECT BRAKES
- Inspect the rear brake shoes and linings. Refer to Section 06-00.
Are the rear brake shoes and linings OK?
| Yes | No |
|---|
| INSPECT and SERVICE the front disc brakes as necessary. REFER to Section 06-00. PERFORM the road test when complete. | SERVICE the rear brake shoes and linings as necessary. PERFORM a road test when complete. |
G8 INSPECT WHEELS
- If wheels are equipped with locking wheel hub bolt nuts, check that proper counterbalance wheel weight is installed opposite wheel hub bolt nut.
Is wheel weight correct?
| Yes | No |
|---|
| GO to G9. | INSTALL counter. BALANCE wheel weight opposite locking wheel hub bolt nut. PERFORM road test. |
G9 FRONT TIRES
- Spin front tires with a wheel balance spinner while vehicle is raised on hoist. Feel for vibration in front fender or while seated in vehicle.
Is vibration felt?
| Yes | No |
|---|
| BALANCE front wheels. PERFORM road test. | GO to G10. |
G10 REAR TIRES
- Engage drivetrain while vehicle is raised on hoist. Carefully accelerate the drive wheels while feeling for vibration.
Is vibration felt?
G11 DRIVETRAIN
- Remove rear wheels, secure brake drums, if so equipped, by installing wheel hub bolt nuts, reversed. Carefully accelerate the drivetrain while feeling for vibration.
Is vibration felt?
| Yes | No |
|---|
| GO to G12. | BALANCE rear wheels. PERFORM road test. |
G12 WHEEL BALANCE
- Balance all wheels not previously balanced. Road test vehicle.
Are wheels balanced?
| Yes | No |
|---|
| GO to A1. | GO to G13. |
G13 SUBSTITUTE WHEELS AND TIRES
- Substitute a known good set of wheels and tires. Road test vehicle.
Is vibration felt?
| Yes | No |
|---|
| REFER to Vibration and Roughness. | INSTALL the original tire/wheel assemblies, one by one, road testing at each step, until the defective tire(s) is identified. REPLACE tire(s) as necessary and RETEST. |
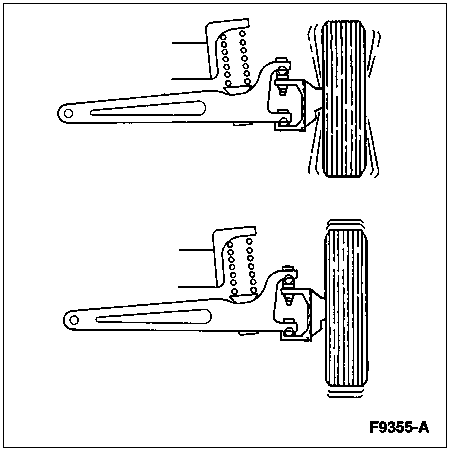
Ball Joints, Front Suspension Upper Arm and Lower, Twin I-Beam Front Axle Equipped with Joints
Prior to performing any inspection of front suspension lower arm ball joints (3050) or front suspension upper ball joints (3049), adjust the front wheel bearings as described in Section 04-01A or Section 04-01B.
Raise the vehicle and place safety stands under the I-beam axle beneath the spring.
Have an assistant grasp the lower edge of the tire and move the wheel in and out.
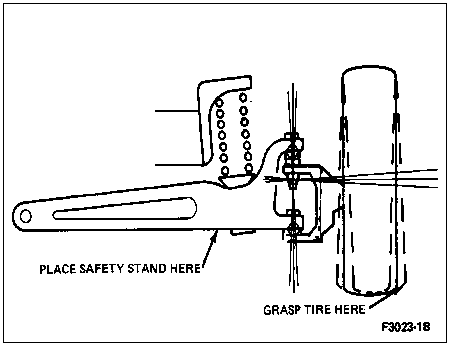
While the wheel is being moved, observe the lower spindle arm and the lower part of the axle jaw. A 0.794mm (1/32-inch) or greater movement between the lower portion of the I-beam and the lower spindle arm indicates that the front suspension lower arm ball joint must be replaced.
To check the front suspension upper ball joints, grasp the upper edge of the tire and move the wheel in and out. A 0.794mm (1/32-inch) or greater movement between the upper spindle arm and the upper portion of the I-beam indicates that the front suspension upper ball joint must be replaced.