Remove the twelve oil pan retaining bolts.
Section 03-01D: Engine, Diesel, 7.3L | 1996 F-Series Workshop Manual |
Removal
Remove the engine assembly. Refer to Engine — Automatic Transmission or Engine — Manual Transmission in the Removal and Installation portion of this section.
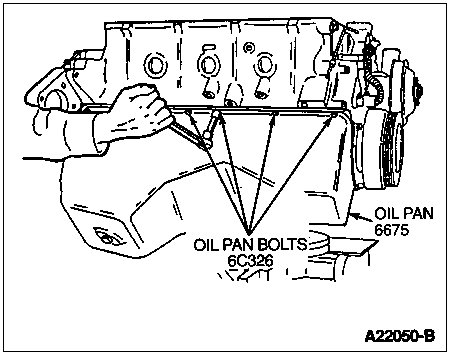
Remove the twelve oil pan retaining bolts.
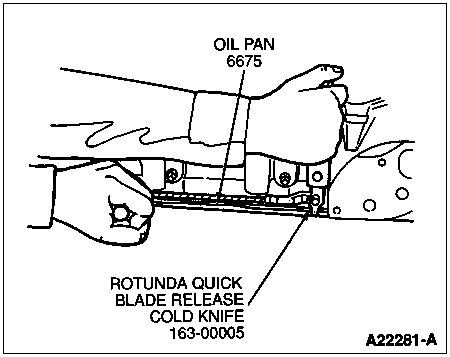
Remove the oil pan (6675) using Rotunda Quick Blade Release Cold Knife 163-00005 or equivalent to cut the RTV sealant on each side rail.
Pry up on one side of the oil pan to break the RTV seal at the engine front cover and engine rear cover and remove the oil pan.
Remove the oil pump screen cover and tube screws at the engine front cover and remove the nut retaining oil pump screen cover and tube (6622) to the crankshaft main bearing cap stud (6345).
Remove the oil pump screen cover and tube.
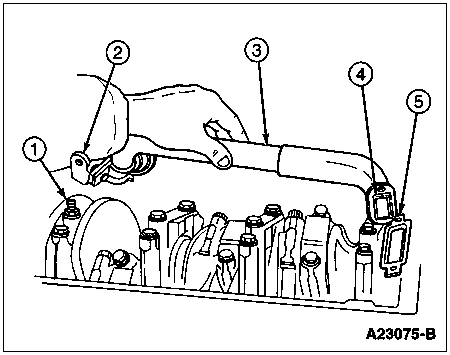
| Item | Part Number | Description |
|---|---|---|
| 1 | 6345 | Crankshaft Main Bearing Cap Stud |
| 2 | 6A661 | Bracket, Oil Pump Screen Cover and Tube |
| 3 | 6622 | Oil Pump Screen Cover and Tube |
| 4 | 6626 | Oil Pump Inlet Tube Gasket |
| 5 | — | Mounting Flange (Part of 6B070) |
Clean the oil pan mating surfaces and the oil pump screen cover and tube mating surfaces.
Inspect the oil pan and the oil pump screen cover and tube for damage.
Installation
![]() CAUTION: Do not apply excessive amounts of RTV that could enter into the oil lubrication system and cause a restriction.
CAUTION: Do not apply excessive amounts of RTV that could enter into the oil lubrication system and cause a restriction.
Install oil pump screen cover and tube on oil pump screen cover and tube mounting flange. Use a small amount of RTV sealant to hold oil pump inlet tube gasket (6626) in place if necessary.
Install the oil pump screen cover and tube to the engine front cover and crankshaft main bearing cap stud.
Install the oil pump screen cover and tube retaining screws finger-tight.
Install the oil pump screen cover and tube retaining nut. Tighten nut to standard Torque Specification listed at the end of this section.
Tighten the oil pump screen cover and tube retaining screws to 24 Nm (18 lb-ft).
![]() CAUTION: Do not apply excessive amounts of RTV that could enter into the oil lubrication system and cause a restriction.
CAUTION: Do not apply excessive amounts of RTV that could enter into the oil lubrication system and cause a restriction.
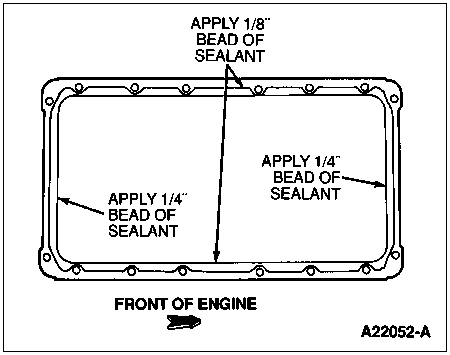
NOTE: Install oil pan and retaining bolts within 10 minutes of applying RTV sealant.
Apply a 3.2mm (1/8-inch) bead of Silicone Rubber F5TZ-19G204-AB or equivalent meeting Navistar specification D15-5012 Type 2 to the crankcase oil pan flange on the inside of the oil pan bolt holes.
Apply a 6.35mm (1/4-inch) bead of Silicone Rubber F5TZ-19G204-AB or equivalent meeting Navistar specification D15-5012 Type 2 to the engine front and engine rear cover flange.
Install four temporary locating studs in the oil pan bolt holes.
Install the oil pan and eight retaining bolts finger-tight.
Remove the four temporary locating studs.
Install the remaining four oil pan bolts. Tighten bolts to standard Torque Specification listed at the end of this section.
Install the engine. Refer to Engine — Automatic Transmission or Engine — Manual Transmission in the Removal and Installation portion of this section
P>