Section 03-01D: Engine, Diesel, 7.3L | 1996 F-Series Workshop Manual |
| Description | Tool Number |
|---|---|
| Fuel/Oil/Turbo Protector Cap Set | T94T-9395-AH |
| Fan Clutch Nut Wrench | T83T-6312-B |
| Fan Clutch Pulley Holder | T94T-6312-AH |
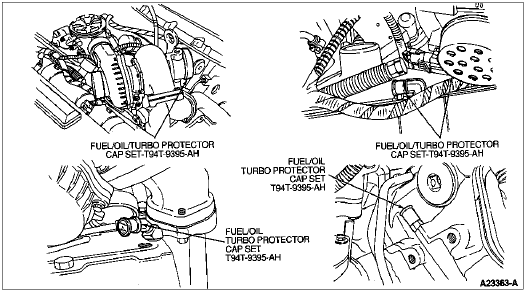
Install Fuel/Oil/Turbo Protector Cap Set T94T-9395-AH as required for any fittings, lines or ports left exposed to prevent the entry of contaminants.
Protector Cap Locations
Removal
Install memory saver. Disconnect both battery ground cables and the left battery positive cable.
Position a drain pan and drain the cooling system.
Using Rotunda R-143a Refrigerant Center or equivalent, evacuate the air conditioning system.
Mark location of the hood hinges for installation. Remove the hood.
Remove the engine cover.
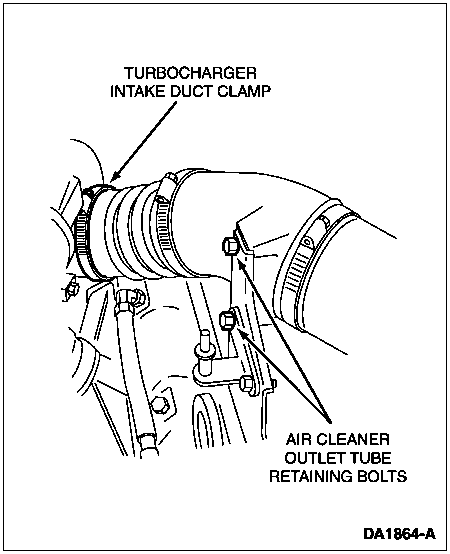
Remove the two (2) bolts retaining the air cleaner outlet tube to the support bracket on the left valve cover. Disconnect the crankcase ventilation hose and discard the clamp. Loosen the clamp at the turbocharger intake duct and disconnect.
Remove bolt and nut retaining the air cleaner assembly, disconnect the air intake sensor and remove the air cleaner assembly.
NOTE: Removal of the turbocharger is for automatic transmission only.
Remove the Marmon clamp at the turbocharger exhaust outlet.
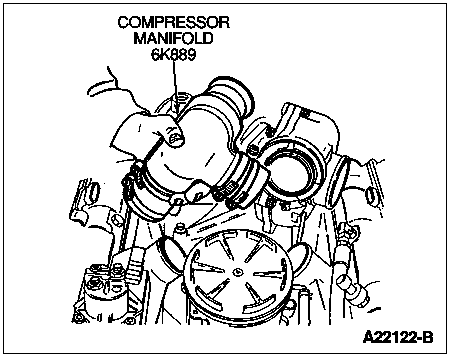
Loosen the two (2) upper hose clamps where the compressor manifold splits to the intake manifold and the Marmon ring retaining the compressor manifold to the turbocharger. Remove the compressor manifold and discard the O-ring from the turbocharger.
Remove the two (2) bolts and the two (2) nuts retaining the exhaust inlet adapter to the turbocharger.
NOTE: Install Fuel/Oil/Turbo Protector Cap Set T94T-9395-AH if turbocharger is not being replaced.
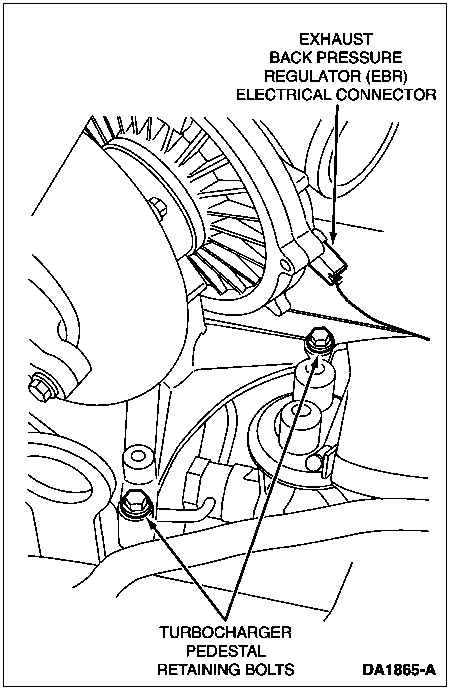
Install protective caps. Remove the four (4) bolts retaining the turbocharger pedestal assembly to the cylinder block. Disconnect the electrical connector from the turbocharger then remove the turbocharger pedestal assembly.
![]() CAUTION: Take necessary precautions to prevent any debris from entering the oil galleys and the exhaust inlet adapter.
CAUTION: Take necessary precautions to prevent any debris from entering the oil galleys and the exhaust inlet adapter.
Remove and discard the oil galley O-rings and cover openings. Remove the exhaust inlet adapter gasket and discard.
Disconnect the upper radiator hose and the coolant reservoir hose from the radiator and position out of the way.
![]() CAUTION: Fan clutch has right-hand thread. Remove the turning nut counterclockwise.
CAUTION: Fan clutch has right-hand thread. Remove the turning nut counterclockwise.
Remove the cooling fan and clutch assembly using Fan Clutch Nut Wrench T83T-6312-B and Fan Clutch Pulley Holder T94T-6312-AH. Position the assembly forward in the fan shroud.

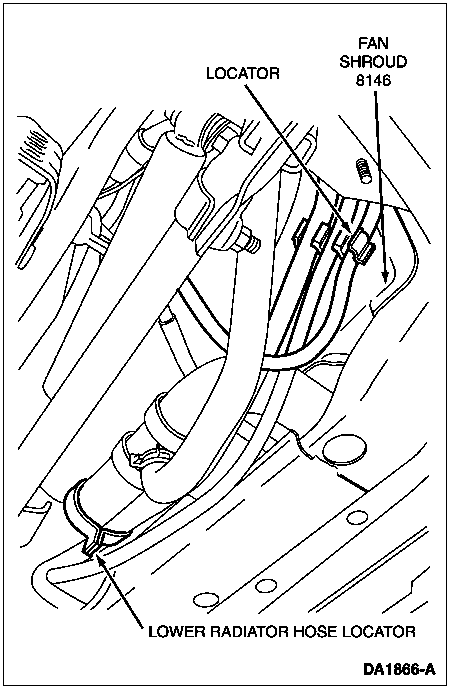
Raise the vehicle. Remove the three (3) hoses from the locator at the right side of the fan shroud. Disconnect the lower radiator hose locator from the fan shroud. Disconnect the lower radiator hose from the radiator.
Disconnect the heater hose and the transmission cooler lines (automatic transmission only) from the radiator. Install the protective caps over the transmission line openings and the cooler fittings.
Lower the vehicle. Remove the bolts retaining the fan shroud, then remove the fan shroud and cooling fan as an assembly.
Remove the four (4) bolts retaining the radiator and remove the radiator.
Remove the serpentine drive belt.
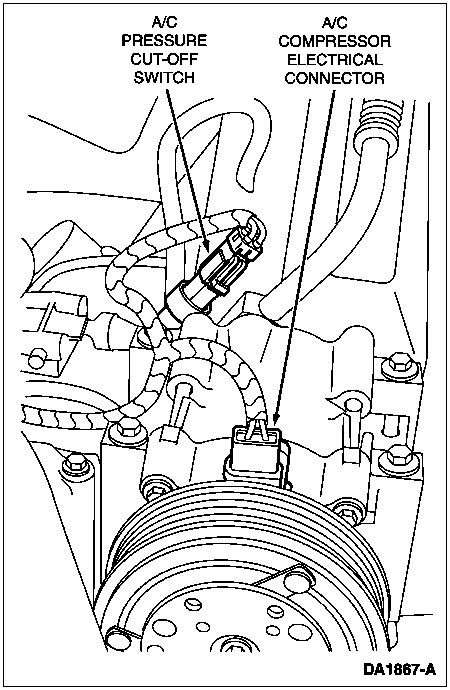
Disconnect the wiring connectors at the A/C compressor and at the A/C pressure cut-off switch. Disengage the two (2) wiring locators at the engine cover bracket. Remove the generator retaining bolts and position the generator out of the way.
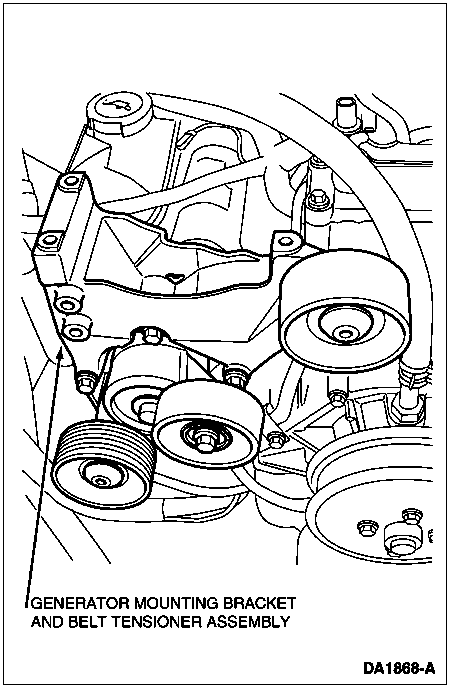
Remove the generator mounting bracket and belt tensioner assembly.
Loosen the A/C manifold retaining bolt at the compressor and disconnect. Disconnect the discharge line from the condenser and the suction line from the accumulator drier. Disconnect the line from the locators at the dash panel and remove the assembly. Install protective caps at the open ports on lines, accumulator, condenser and compressor. Remove the two (2) locators from the dash panel.
Disconnect the vacuum pump hose from the vacuum pump. Disconnect the heater hoses at the water pump and at the right cylinder head. Remove the upper radiator hose.
Position a drain pan, then disconnect the power steering pressure and return hoses from the power steering pump. Install protective caps over both of the lines and the pump openings.
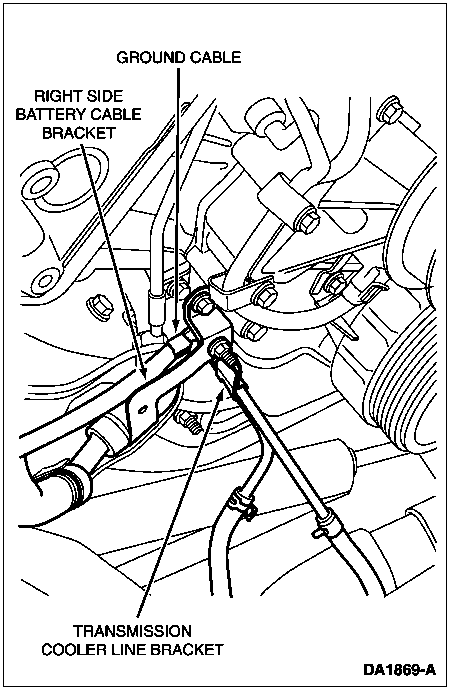
Remove the bolt and nut retaining the right side battery cable bracket to the engine. Remove the transmission cooler line bracket from the stud and remove ground cable.
Disconnect the lower radiator hose from the water pump.
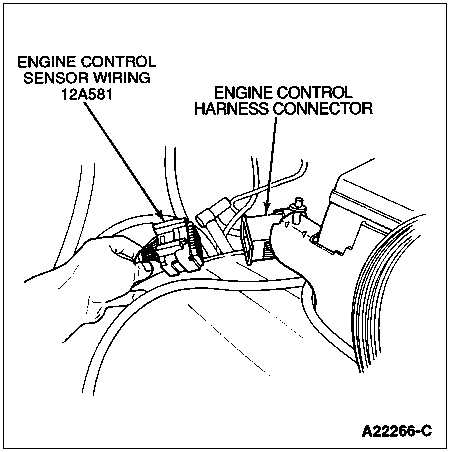
Loosen the retaining bolt and disconnect the engine control sensor wiring harness connector at the left side of the engine compartment and position over the engine.
Disconnect the MAP sensor vacuum hose from the intake manifold cover.
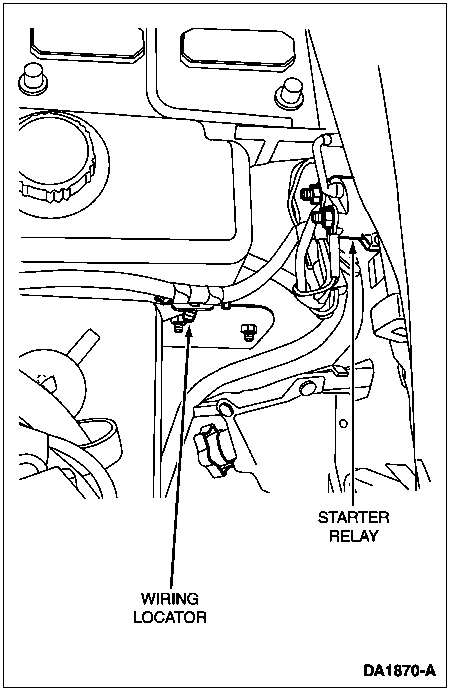
Disconnect the two (2) wiring locators and the wiring harness from the starter relay, then position the harness over the engine.
Disconnect the vacuum hose for the heater control at the vacuum tee and position it out of the way.
Remove the jack handle.
Remove the front battery cable-to-starter relay harness plastic fasteners and position the harness out of the way.
Raise the vehicle. Drain the engine oil into a suitable container and remove the oil filter.
Disconnect the engine block heater connector.

Remove the starter motor and secure out of the way.
Remove the filler tube and the ground strap retaining bolt at the rear of the right rear cylinder head.
Remove the transmission inspection cover.
NOTE: Use crankshaft pulley bolt to rotate engine to gain access to torque converter retaining nuts.
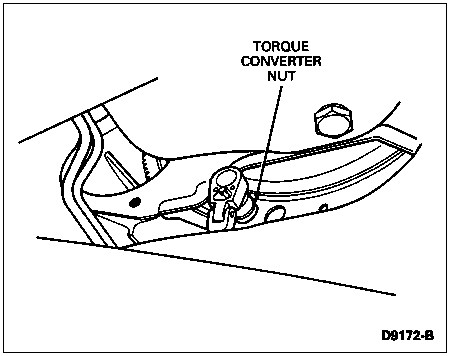
Paint mark the position of the flex-plate hole to the torque converter stud. Remove and discard the torque converter retaining nuts.
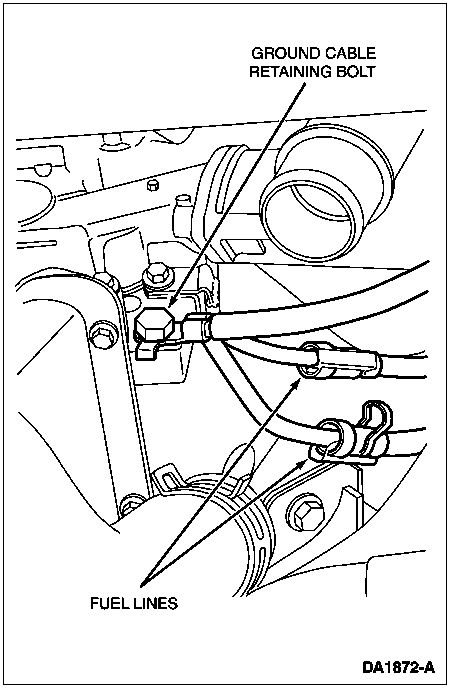
Remove the bolt retaining the ground cable at the front left side of the engine block.
Remove the safety clips and disconnect the fuel lines at the fuel line quick disconnects. Install protective caps over the lines.
Loosen the two (2) nuts at the exhaust outlet pipe to converter flange.
Remove the transmission-to-engine retaining bolts.
Remove the right and left engine mount insulator retaining nuts.
Lower the vehicle.
Position a floor jack with a block of wood and raise the transmission slightly.
![]() CAUTION: Make sure surrounding components (wiper motor, A/C condenser, etc.) are not damaged when removing engine from vehicle.
CAUTION: Make sure surrounding components (wiper motor, A/C condenser, etc.) are not damaged when removing engine from vehicle.
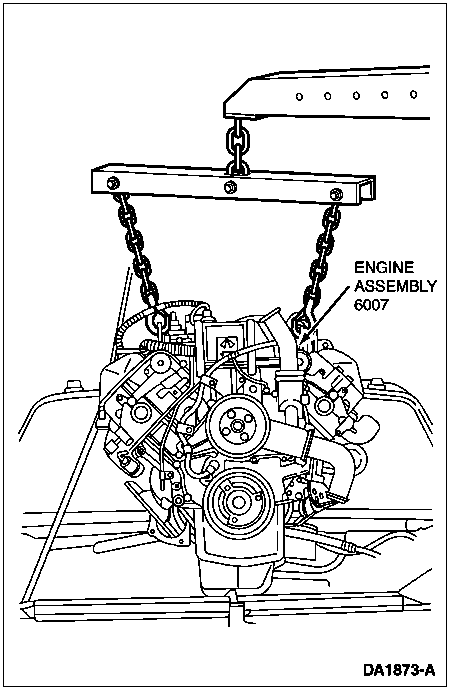
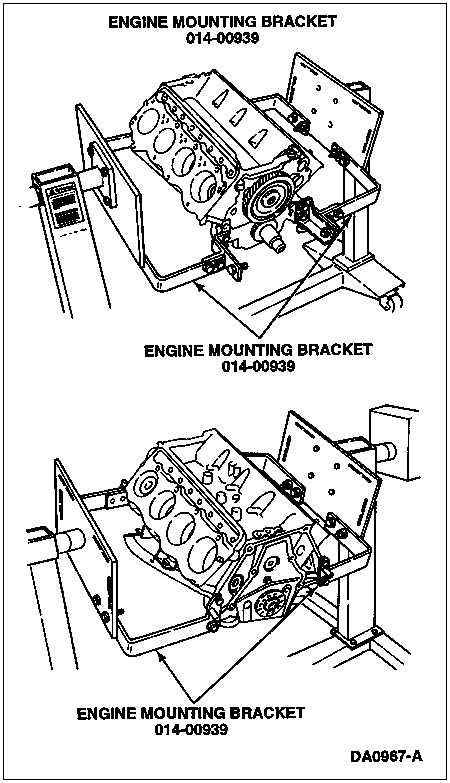
NOTE: If a replacement engine is going to be installed, the replacement engine must be secured to an engine stand.
Position Rotunda Floor Crane 077-00043 with Spread Bar 303-F047 to engine-lifting brackets. Slightly raise the engine and carefully separate the engine from the transmission. Carefully lift the engine out of the engine compartment.
Installation
![]() CAUTION: Make sure surrounding components (wiper motor, A/C condenser, etc.) are not damaged when positioning engine in engine compartment.
CAUTION: Make sure surrounding components (wiper motor, A/C condenser, etc.) are not damaged when positioning engine in engine compartment.
NOTE: Make sure that studs on torque converter align with holes in flexplate, and that torque converter is fully seated to transmission. Align balancing marks on converter stud and flywheel.
Carefully lower the engine into the engine compartment. Position the torque converter pilot into the flywheel. Align the paint marks on the flywheel with the paint marks on the torque converter stud. Lower the transmission and the engine to the engine mounting locations.
Remove the spread bar from the lifting brackets and remove the lift equipment from the vehicle. Remove the floor jack.
Raise the vehicle.
Install the transmission-to-engine retaining bolts. Tighten the bolts to 62 Nm (46 lb-ft).
Install the right and left engine support insulator retaining nuts. Tighten the nuts to 111 Nm (82 lb-ft).
NOTE: Use crankshaft pulley bolt to rotate engine to gain access to torque converter studs.
Install the four (4) new torque converter retaining nuts. Tighten the nuts to 39 Nm (29 lb-ft).
Install the transmission inspection cover. Tighten the bolts to 20 Nm (15 lb-ft).
NOTE: Inspect and replace O-rings as necessary.
Remove the protective caps and connect the fuel lines at the fuel line quick disconnects. Install the safety clips.
Position the ground cable at the front left side of the engine and install the retainer. Tighten the bolt to 35 Nm (26 lb-ft).
Install the starter motor. Tighten the bolts to 23 Nm (17 lb-ft).
Install a new oil filter and connect the engine block heater connector.
Partially lower the vehicle, then position the filler tube and the ground strap to the rear of the right cylinder head. Install the retaining bolt and tighten to 20 Nm (15 lb-ft).
Lower the vehicle. Position the front battery cable harness across the upper radiator support and install the plastic retainers. Install the jack handle.
Connect the vacuum hose for the heater control at the vacuum tee. Connect the MAP sensor vacuum hose to the intake manifold cover.
Connect the two wiring locators and the wiring harness to the starter relay. Tighten the nut to 12 Nm (9 lb-ft).
Connect the engine control sensor wiring connector at the left side of the engine compartment. Tighten the bolt to 5 Nm (44 lb-in).
Connect the lower radiator hose to the water pump.
Install the ground cable. Tighten the stud bolt to 40 Nm (30 lb-ft). Install the transmission cooler line bracket and the right side battery cable bracket. Tighten the nut and bolt to 25 Nm (18 lb-ft).
Connect the heater hose to the right cylinder head.
Install the generator mounting bracket and belt tensioner assembly. Tighten the retainers to 42 Nm (31 lb-ft).
Install new oil galley O-rings lubricated with engine oil and a new exhaust inlet adapter gasket.
NOTE: Start right rear retaining bolt first.
Remove Fuel/Oil/Turbo Protector Cap Set T94T-9395-AH. Install the turbocharger assembly and connect the turbocharger electrical connector. Tighten the pedestal bolts to 24 Nm (18 lb-ft).
Install the two (2) bolts and the two (2) nuts to the exhaust inlet adapter. Tighten the retainers to 49 Nm (36 lb-ft).
Install the compressor manifold with a new O-ring at the turbocharger. Tighten the hose clamps and the Marmon clamp to 3 Nm (27 lb-in).
Position the exhaust outlet pipe to the turbocharger and install the Marmon clamp. Tighten the clamp securely.
Remove protective caps from the power steering pump lines and fittings. Using Teflon Seal Replacer Set D90P-3517-A3, install a new Teflon® seal onto the pressure line fitting. Connect the power steering return hose to the pump. Connect the pressure line to the pump. Tighten the fitting to 35 Nm (26 lb-ft).
NOTE: Left retaining bolt also retains heater hose bracket.
Position the generator and bracket. Install the retaining bolts. Tighten the bolts to 42 Nm (31 lb-ft).
Connect the heater hose to the water pump. Connect the vacuum pump hose to the vacuum pump and secure the clamp.
NOTE: Replace O-rings as necessary.
Install the two locators at the dash panel. Remove protective caps. Inspect and lube O-rings with A/C refrigerant oil. Position the A/C manifold lines to the A/C compressor and connect. Tighten the bolt to 18 Nm (13 lb-ft). Position the vacuum hose for heater control into the locators.
Connect the discharge line at the condenser. Tighten the fitting to 24 Nm (18 lb-ft). Connect the line at the suction accumulator drier. Tighten the fitting to 44 Nm (32 lb-ft).
Connect the wiring connectors and locators at the A/C compressor and at the A/C pressure cut-off switch.
Install the serpentine drive belt.
![]() CAUTION: Fan clutch has right-hand thread. Install by turning nut clockwise.
CAUTION: Fan clutch has right-hand thread. Install by turning nut clockwise.
Install the fan and clutch assembly using Fan Clutch Nut Wrench T83T-6312-B and Fan Clutch Pulley Holder T94T-6312-AH. Tighten the nut to 133 Nm (98 lb-ft).
Position the fan shroud over the cooling fan and clutch assembly. Install the radiator and the retaining bolts. Tighten the bolts to 29 Nm (21 lb-ft). Install the fan shroud. Tighten the bolts to 6 Nm (53 lb-in).
Raise the vehicle.
Remove protective caps from the transmission cooler lines and fittings. Connect the transmission cooler lines (automatic transmission only) and the heater hose to the radiator.
Connect the lower radiator hose to the radiator.
Connect the three (3) hoses to the locator at the right side of the fan shroud. Connect the lower radiator hose locator at the bottom of the fan shroud.
Tighten the two (2) nuts on the exhaust outlet pipe to the converter flange to 49 Nm (36 lb-ft). Lower the vehicle.
Connect the coolant reservoir hose to the radiator. Install the upper radiator hose.
Position the air cleaner assembly and connect the air intake sensor. Install the bolt and nut retaining the air cleaner assembly. Tighten the bolt to 8 Nm (71 lb-in). Tighten the nut to 6 Nm (53 lb-in).
Position the air cleaner outlet tube to the support bracket on the left valve cover and install the two (2) retaining bolts. Tighten the bolts to 16 Nm (12 lb-ft). Connect the crankcase ventilation hose and secure with new clamp. Connect the turbocharger intake duct and tighten the clamp to 3 Nm (27 lb-in).
Install the engine cover. Tighten the nuts securely.
Install the hood. Tighten the bolts to 22 Nm (16 lb-ft).
NOTE: When the battery is disconnected and reconnected, some abnormal drive symptoms may occur while the vehicle relearns its adaptive strategy. The vehicle may need to be driven 16 km (10 mi.) or more to relearn the strategy.
Connect the left battery positive cable and both battery ground cables. Remove the memory saver.
Fill the engine with the proper grade and amount of oil.
Fill the power steering system.
Fill the cooling system.
Evacuate and recharge the A/C system. Refer to Section 12-00 in the Body Chassis Manual.
Start the engine and check operation.