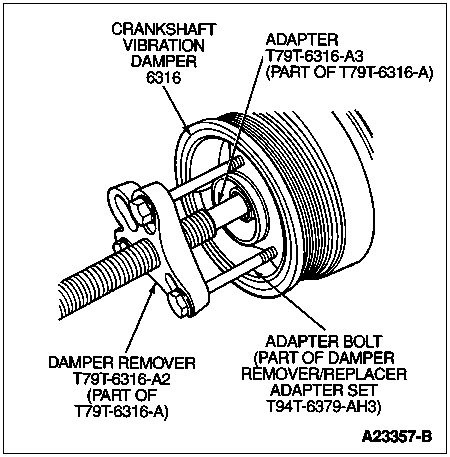
Section 03-01D: Engine, Diesel, 7.3L
1996 F-Series Workshop Manual
REMOVAL AND INSTALLATION

Crankshaft Damper

 
SPECIAL SERVICE TOOL(S) REQUIRED
DescriptionTool Number
Fan Clutch Nut WrenchT83T-6312-B
Fan Clutch Pulley HolderT94T-6312-AH
Flywheel Holding ToolT74P-6375-A
Damper Remover/Replacer ToolT79T-6316-A
  Driver/Puller Screw
  Damper Remover
  Adapter
  Driver Sleeve
T79T-6316-A1
T79T-6316-A2
T79T-6316-A3
T79T-6316-A4
Damper Service Set
  Damper Wear Ring Remover
  Damper Wear Ring Replacer
  Damper/Remover/Replacer Adapter
T94T-6379-AH
T94T-6379-AH1
T94T-6379-AH2
T94T-6379-AH3
Bearing Collet SleeveT77F-7025-C
Remover TubeT77J-7025-B
Forcing ScrewT84T-7025-B
Driver HandleT80T-4000-W

Removal

  1. Drain the engine cooling system. Refer to Section 03-03.

  1. Remove the upper radiator hose clamps and upper radiator hose (8260).

  1. Disconnect the radiator coolant recovery reservoir hose at radiator (8005).

  1.  CAUTION: Fan clutch has right-hand thread. Remove by turning nut counterclockwise.

    Remove the fan and clutch assembly using Fan Clutch Nut Wrench T83T-6312-B and Fan Clutch Pulley Holder T94T-6312-AH. Set fan and clutch assembly in fan shroud (8146).

  1. Remove the fan shroud screws.

  1. Remove the fan shroud, and the fan and clutch assembly.

  1. Disconnect the lower radiator hose (8286) from the radiator.

  1. Remove the four radiator retaining bolts.

  1. Disconnect the heater hose and transmission cooler hoses from the radiator (automatic transmission only).

  1. Remove the radiator.

  1. Raise vehicle.

  1. Remove the flywheel housing cover attaching screws and flywheel housing cover (if equipped).

  1. NOTE: To prevent the crankshaft (6303) from rotating, use a breaker bar for in-vehicle service or Flywheel Holding Tool T74P-6375-A for bench overhaul.

    Remove crankshaft pulley bolt (6A340) and washer.

  1. Remove crankshaft vibration damper (6316) using Damper Remover T79T-6316-A2 (Part of T79T-6316-A), Adapter Bolt (Part of Damper Remover/Replacer Adapter Set T94T-6379-AH3), and Adapter T79T-6316-A3 (Part of T79T-6316-A) or equivalent.

  1. Remove crankshaft damper wear ring as follows:

    1. Assemble Step Plate Adapter D80L-630-A or equivalent, Damper Wear Ring Remover T94T-6379-AH1, Bearing Collet Sleeve T77F-7025-C, Remover Tube T77J-7025-B and Forcing Screw T84T-7025-B (not shown) to the crankshaft vibration damper as illustrated.
    1. Tighten forcing screw until crankshaft damper wear ring is pulled free from hub of crankshaft vibration damper.

      ItemPart NumberDescription
      16316Crankshaft Vibration Damper
      2T94T-6379-AH1Damper Wear Ring Remover
      36310Crankshaft Damper Wear Ring
      4T77F-7025-CBearing Collet Sleeve
      5T77J-7025-BRemover Tube
      6Step Plate Adapter (Part of D80L-630-A)

Installation

  1. Assemble Driver Handle T80T-4000-W to Damper Wear Ring Replacer T94T-6379-AH2. Insert crankshaft damper wear ring into Damper Wear Ring Replacer T94T-6379-AH2 and position tool assembly onto crankshaft vibration damper as shown. Use ballpeen hammer to seat crankshaft damper wear ring into hub of crankshaft vibration damper (apply Loctite® 271 to inside diameter of wear sleeve to prevent oil migration).

  1. NOTE: A new crankshaft damper wear ring should be installed whenever the crankshaft vibration damper is removed. Refer to Oil Seal, Crankshaft — Front in the Removal and Installation portion of this section.

    NOTE: Apply RTV sealant to the crankshaft keyway prior to crankshaft vibration damper installation.

    Install the crankshaft vibration damper using Driver/Puller Screw T79T-6316-A1 (Part of T79T-6316-A), Driver Sleeve T79T-6316-A4 (Part of T79T-6316-A) and Thread Adapter (Part of T94T-6379-AH3).

  1. NOTE: To prevent the crankshaft from rotating, use a breaker bar for in-vehicle service or Flywheel Holding Tool T74P-6375-A for bench overhaul.

    Install the crankshaft pulley bolt and washer. Tighten crankshaft pulley bolt to 287 Nm (212 lb-ft).

  1. Remove the flywheel holding tool.

  1. Install the flywheel housing cover and screws. Tighten screws to 17-23 Nm (13-17 lb-ft).

  1. Lower vehicle.

  1. Install the radiator and the radiator lower retaining bolts. Tighten the retaining bolts to 24-34 Nm (18-25 lb-ft).

  1. Connect the heater hose and transmission cooler hoses to the radiator (automatic transmission only).

  1. Install the four radiator retaining bolts and tighten to 24-34 Nm (18-25 lb-ft).

  1. Install the lower radiator hose to the radiator. Install hose clamp.

  1. Install the fan shroud and the fan and clutch assembly.

  1. Install the fan shroud retaining screws and tighten to 5-8 Nm (44-71 lb-in).

  1.  CAUTION: Fan clutch has right-hand thread. Install by turning nut clockwise.

    Install the fan and clutch assembly using Fan Clutch Nut Wrench T83T-6312-B and Fan Clutch Pulley Holder T94T-6312-AH.

  1. Connect the radiator coolant recovery reservoir hose at radiator.

  1. Install the upper radiator hose and hose clamps.

  1. Refill and bleed the engine cooling system. Refer to Section 03-03.

  1. Check and refill crankcase oil.