Check glass for looseness. If loose, push on glass until it is fully seated.

Section 01-09: Mirrors, Rearview | 1996 F-150, F-250, F-350 and Bronco Workshop Manual |
Removal
Removefront door trim panel (23942). Refer to Section 01-05.
Disconnect outside mirror control wiring (14A684) on power mirror.
Remove two screws attaching outside rear view mirror (17682) to the exterior of the front door (20124).
Remove one screw attaching outside rear view mirror to the interior of the front door.
Remove outside rear view mirror.
Installation
Follow removal procedures in reverse order.

Glass, Outside Mirror
Removal
Push in on the inboard edge of the glass assembly until it stops.
Protect the mirror body with a rag or similar material at the outboard edge and insert a flat blade screwdriver (in about one inch) between the mirror body and glass assembly.
Pry the glass assembly out from mirror body until it snaps loose.
Remove the screwdriver and continue to pull the glass assembly by hand until it is completely unsnapped.
Installation
Position the glass assembly in the mirror, making sure the U-shaped alignment tabs on the glass are lined up with the motor actuator bar and slightly move glass around until it drops into place.
Push on the center of the glass assembly to snap it in place.
Check glass for looseness. If loose, push on glass until it is fully seated.
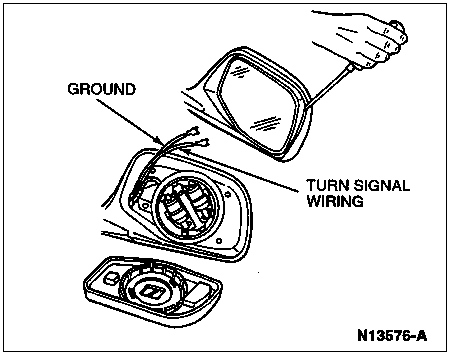
Glass, Signal Mirror
Removal
Push in on the inboard edge of the glass assembly until it stops.
Protect mirror body with a rag or similar material at the outboard edge and insert a flat blade screwdriver (in about one inch) between the mirror body and glass assembly.
Pry the glass assembly out from mirror body until it snaps loose.
Remove screwdriver and continue to pull the glass assembly by hand until it is completely unsnapped.
Disconnect the two circuits (turn signal and ground) from the terminals on the back of the glass assembly.
Installation
Connect two circuits (turn signal and ground) to the terminals on the back of glass assembly.
Verify signal display operation by operating the right and left turn signals.
Position glass assembly in mirror, making sure the U-shaped alignment tabs on the glass assembly are lined up with the motor actuator bar, and slightly move glass around until it drops into place.
Push on center of the glass assembly to snap it into place.
Check glass assembly for looseness. If loose, push on glass assembly until it is fully seated.
Mirror Control
Removal
Insert a small, thin-bladed screwdriver into spring tab slots located at front and rear of window regulator switch housing (14527) and apply pressure to make the window regulator switch housing pop out.
NOTE: The switch is held in place by an electrical contact pin.
Remove three screws attaching connectors to window regulator switch housing.
Remove outside rear view mirror control (17B676) by carefully prying the outside rear view mirror control from connector using a small screwdriver.
Installation
Follow removal procedure in reverse order. The outside rear view mirror control is keyed to the connector and can be installed only one way.
Mirror Motor
Removal
Remove the glass assembly as described in Glass, Outside Mirror in the Removal and Installation portion of this section. Mark the motor with tape or grease pencil to indicate top of motor.
Remove the four screws attaching the motor to the mirror body.
Pull motor away from the mirror body.
Remove the plastic cover plate from the back of the motor. Pull off by hand.
Use masking tape on the wires. Mark on the wire its location in the motor with the terminal number shown on the motor where the wires plug in.
Carefully pull the wires/terminals out of the motor.
Installation
Install wires into the motor by matching the terminal number marked on the wires and on the motor. Remove masking tape from the wires.
Make sure wires are placed in the retaining slots in back of motor, then align the opening in the plastic cover plate with the wires on the back of motor and push on back cover.
Make sure the rubber seal is properly installed on the motor.
Position motor in mirror body using the mark (added during removal) indicating top of motor and line up the four screw holes.
Install the four screws and hand-tighten. Do not overtighten.
Install the glass assembly as described in Glass, Outside Mirror in the Removal and Installation portion of this section.

| Item | Part Number | Description |
|---|---|---|
| 1 | 17682 | Outside Rear View Mirror |
| 2 | — | Power Mirror Motor (Part of 17682) |
| 3 | — | Screws (4 Req'd) (Part of 17682) |
| 4 | — | Outside Rearview Mirror Housing (Part of 17682) |
| 5 | — | Connecting Wires to Motor (Part of 17682) |
| 6 | — | Power Mirror Motor Cap (Part of 17682) |
| 7 | — | Power Mirror Motor (Part of 17682) |
| 8 | — | Rubber Gasket (Part of 17682) |
| 9 | — | Signal Mirror, Ground Wiring, Bronco Only (Part of 17682) |
| 10 | — | Turn Signal Wiring, Bronco Only (Part of 17682) |