Section 03-00: Engine, Service | 1997 F-250 Heavy Duty, F-350 and F-Super Duty Workshop Manual |
SERVICE PROCEDURES
Cylinder Heads
Cleaning
With the valves installed to protect the valve seats, remove deposits from the combustion chambers and valve heads with a scraper and a wire brush. Be careful not to damage the cylinder head gasket surface.
After the valves are removed, clean the valve guide bores. Use cleaning solvent to remove dirt, grease and other deposits from the valves with a fine wire brush or buffing wheel.
Inspection
Inspect the cylinder heads (6049) for cracks or excessively burned areas in the exhaust outlet ports.
Check the cylinder head for cracks and inspect the gasket surface for burrs and nicks. Small imperfections of this type can be dressed down using an oil stone. Replace the cylinder head if it is cracked.
The following inspection procedures are for a cylinder head that is to be completely overhauled. For individual repair operations, use only the pertinent inspection procedure.
Spark Plug Thread Service
NOTE: The use of power or air driven tools is not approved for the installation of tapersets.
Damaged spark plug threads in the cylinder head can be serviced using Rotunda Thread Repair Kit 107-R0921 or equivalent.
The procedure involves cutting new threads in the spark plug hole. After rethreading operation, a tapered sleeve will be installed in the cylinder head. The sleeve is threaded on the inside and outside. The outside threads into the cylinder head while the inside provides new threads for the spark plug (12405).
The service is permanent and will have no effect on cylinder head or spark plug life.
 CAUTION: The cylinder head must be removed from engine (6007) before installing a taperset. The service procedure includes a thread cutting process that produces metal chips. Performing this procedure while the cylinder head is on the engine will cause metal chips to fall into the cylinder. Once in the cylinder, these chips can damage the cylinder wall when the engine is started.
Thoroughly clean spark plug counterbore, seat and threads of all dirt or other foreign material.

Start tap into spark plug hole, being careful to keep it properly aligned.
As tap begins cutting new threads, apply aluminum cutting oil to tap.
Continue cutting threads and applying oil until stop ring bottoms against spark plug seat.
Remove tap. Remove all metal chips using compressed air.
Coat threads of mandrel with cutting oil. Thread taperset onto mandrel until one thread of mandrel extends beyond taperset.
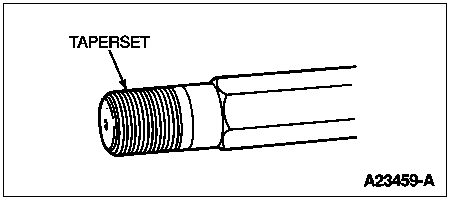
NOTE: A properly installed taperset will be flush to 1 mm below spark plug gasket seat.
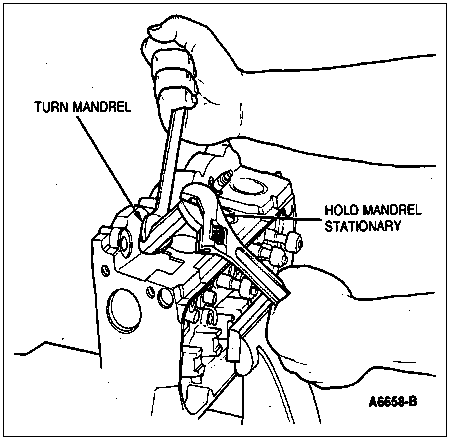
Thread taperset into tapped spark plug hole using a torque wrench. Continue tightening mandrel until torque wrench indicates 61 Nm (45 lb-ft).
To loosen mandrel for removal, hold mandrel stationary and turn mandrel body approximately one-half turn. Remove mandrel.
Cylinder Head Flatness
NOTE: Do not plane or grind off more than 0.254 mm (0.010 inch).
NOTE: The cylinder head used on the 7.3L diesel engine is not refinishable. Replacement is the only authorized service.
When a cylinder head is removed because of gasket leaks, check the flatness of the cylinder head gasket surface for conformance to specification. For specifications, refer to Section 03-01A (5.8L MFI), Section 03-01B (7.5L MFI) or Section 03-01C (7.3L diesel). If necessary, refinish the cylinder head surface.

Valve Seat Runout
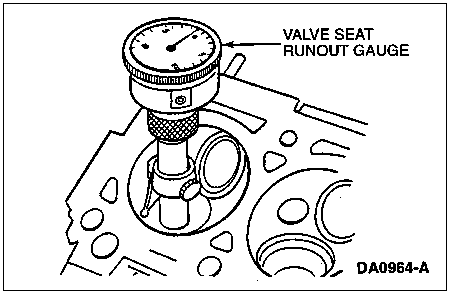
Check the valve seat runout with Valve Seat Runout Gauge. Follow the instructions of the gauge manufacturer. If the runout exceeds the wear limit, reface the valve and valve seat. For specifications, refer to the appropriate engine section.
Valve Stem-to-Valve Guide Clearance
Check the valve stem-to-valve guide clearance of each valve in its respective valve guide (6510) with Valve Stem Clearance TOOL-6505-E or equivalent. Use a flat-end indicator point.
Install the tool on the valve stem until it is fully seated, and tighten the knurled setscrew firmly. Permit the valve to drop away from its seat until the tool contacts the upper surface of the valve guide.
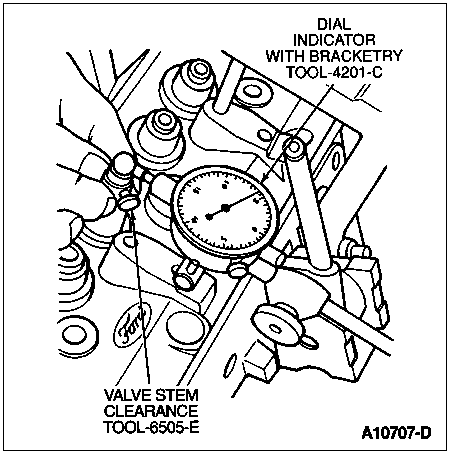
Position the dial indicator with its flat tip against the center portion of the tool's spherical section at approximately 90 degrees to the valve stem axis.
Move the tool back and forth in line with the indicator stem.
Take a reading on the dial indicator without removing the tool from the valve guide upper surface.
Divide the reading by 2, the division factor for the tool.
If valve stem-to-valve guide clearance exceeds the wear limit, ream the valve guide for the next oversize valve stem as described in this section.
Valves, Select Fitting
If the valve stem-to-valve guide clearance exceeds the service clearance, ream the valve guide for the next oversize valve stem. Valves with oversize stem diameters of 0.38 mm and 0.76 mm (0.015 inch and 0.030 inch) are available for service in diameters of 0.41 mm and 0.81 mm (0.016 inch and 0.032 inch) oversize. Always reface the valve seat after the valve guide has been reamed. Refer to Valve Guides, Reaming, in this section.
In the case of valve stem-to-valve guide clearance, the service clearance is intended as an aid to diagnosing engine noise only, and does not constitute a failure or indicate need for service. However, when overhauling or reconditioning a cylinder head, the service clearance should be regarded as a practical working value, and used as a determinant for installing the next oversize valve to make sure service life is extended.
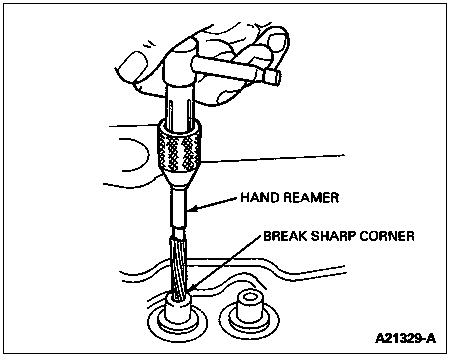
Valve Guides, Reaming
If it becomes necessary to ream a valve guide to install a valve with an oversize stem, a hand reaming kit is available that contains the following reamer and pilot combinations: a 0.38-mm (0.015-inch) OS reamer with a 0.076-mm (0.003-inch) OS pilot, and a 0.76-mm (0.030-inch) reamer with a 0.38-mm (0.015-inch) OS pilot.
NOTE: If oversize valve stems and oversize stem seals are not available, bore out original valve guide and install service bushing. Ream inside diameter for specified clearance for standard size valve. Reface valve seat, as required. Install standard size valve stem oil seal.
When replacing a standard size valve with an oversize valve, always use the reamer in sequence (smallest oversize first, and then next smallest, etc.) so as not to overload the reamers.
NOTE: Always reface the valve seat after the valve guide has been reamed, and use a suitable scraper to break the sharp corner (inside diameter) at the top of the valve guide.
NOTE: The interference angle of the valve and seat should not be lapped out. Remove all grooves or score marks from the end of the valve stem, and chamfer it as necessary. Do not remove more than 0.254 mm (0.010 inch) from the end of the valve stem.
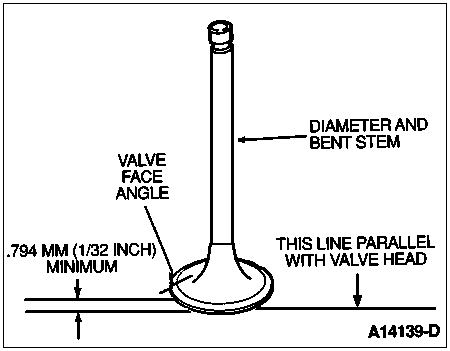
If the valve face runout is excessive or to remove pits and grooves, reface the valves to a true 45-degree angle. Remove only enough stock to correct the runout or to clean up the pits and grooves. If the edge of the valve head is less then 0.794 mm (1/32 inch) thick after grinding, replace the valve as the valve will run too hot in the engine.
If the valve or valve seat has been refaced, it will be necessary to check the clearance between the rocker arm pad and the valve stem with the valve train assembly installed in the engine.
Valve Seats, Refacing
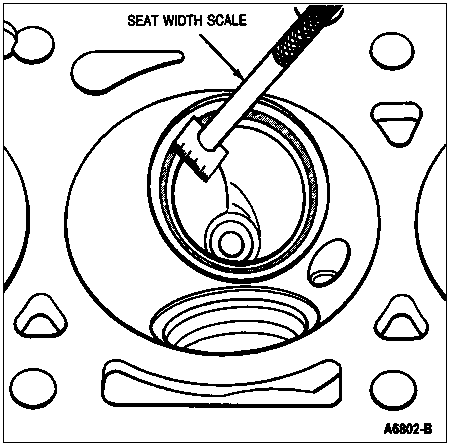
Measure the valve seat width. Reface the valve seat(s) if the width is not within specifications. Refer to the appropriate engine section.
Refer to Engine Service in the Rotunda Tool catalog for a description of the various types of valve seat grinders and cutters available.
Refacing the valve seat should be closely coordinated with the refacing of the valve face so that the finished seat and valve face will be concentric and the specified interference angle will be maintained. This is important so that the valve and seat will have a compression-tight fit. Make sure refacer grinding wheels are properly dressed.
Grind the valve seats of all cylinder heads to a true 45-degree angle. Remove only enough stock to clean up pits and grooves or to correct the valve seat runout. After the seat has been refaced, use a seat width scale or a machinist scale to measure the seat width. Narrow the seat, if necessary, to bring it within specification. For specifications, refer to Section 03-01A (5.8L MFI), Section 03-01B (7.5L MFI) or Section 03-01C (7.3L diesel).

| Item | Part Number | Description |
|---|
| 1 | 6507 | Intake Valve |
| A | � | Valve Seat Angle |
| B | � | Seat Width and Proper Location on Valve |
| C | � | Bottom Narrowing Angle 75 Degrees |
| D | � | Top Narrowing Angle 30 Degrees |
| E | � | Valve Face Angle |
| F | � | Valve Margin |
If the valve seat width exceeds the maximum limit, remove enough stock from the top edge or bottom edge or both edges of the seat to reduce the width to specification.
On the intake and exhaust seats, use a 60-degree angle grinding wheel to remove stock from the bottom of the seat (raise the seats). A 30-degree angle wheel is used to remove stock from the top of the seats (lower the seats).
The finished valve seat should contact the approximate center of the valve face. It is good practice to determine where the valve seat contacts the face.
To do this, coat the seat with Prussian blue and set the valve in place. Rotate the valve with light pressure. If the blue is transferred to the center of the valve face, the contact is satisfactory. If the blue is transferred to the top edge of the valve face, lower the valve seat. If the blue is transferred to the bottom edge of the valve face, raise the valve seat.
Valves
The critical inspection points and tolerances of the valve are illustrated below. Refer to Specifications in Section 03-01A (5.8L MFI), Section 03-01B (7.5L MFI) or Section 03-01C (7.3L diesel) for service limits.
Inspect the valve stem for bends, and the end of the stem for grooves or scoring.
Inspect the valve face and the edge of the valve head for pits, grooves or scores. Inspect the stem for a bend condition and the end of the stem for grooves or scores. Check the valve head for signs of burning or erosion, warpage and cracking. Minor pits, grooves, etc., may be removed. Discard severely damaged valves.
Inspect the valve spring assembly, valve spring retainers, locks and sleeves and discard any visually damaged parts.
Valves, Refacing
NOTE: Discard any excessively worn or damaged valve train parts.
Minor pits or grooves can be removed. Discard valves that are severely damaged if the face runout cannot be corrected by refinishing or if stem clearance exceeds specification. Refer to the appropriate engine section for specifications.
Refer to Engine Service in the Rotunda Tool catalog for a description of the various types of valve resurfacing equipment.
The valve refacing operation should be closely coordinated with the valve seat refacing operations so that the finished angles of the valve face and valve seat will be to specifications and provide a compression-tight fit.
Make sure refacer grinding wheels are properly dressed.
Valve Spring Tension
Inspect the valve spring (6513), valve spring retainers, and keys for wear or damage. Discard any damaged parts.
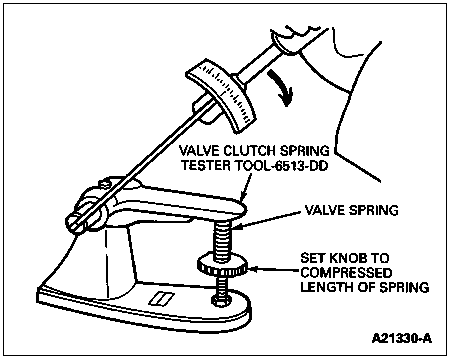
Check the valve springs for proper pressure at the specified spring lengths using Valve/Clutch Spring Tester TOOL-6513-DD or equivalent. Tighten until click is heard; read torque wrench and multiply reading by two. Weak valve springs cause poor engine performance. Replace any valve spring not within specification. For specifications, refer to Section 03-01A (5.8L MFI), Section 03-01B (7.5L MFI) or Section 03-01C (7.3L diesel). Manually rotating the valve spring assemblies while installed in the engine will not determine condition of valve springs.
CAUTION: Make sure the valve springs are reassembled to their own original dampers by pushing damper on the spring. Do not open damper with any kind of tool in order to reassemble.
Valve Spring Squareness
Check each valve spring for squareness using a steel square and a flat surface. Stand the valve spring and square on end of the flat surface. Slide the valve spring up to the square. Revolve the valve spring slowly and observe the space between the top coil of the valve spring and the square. Refer to the illustration below.
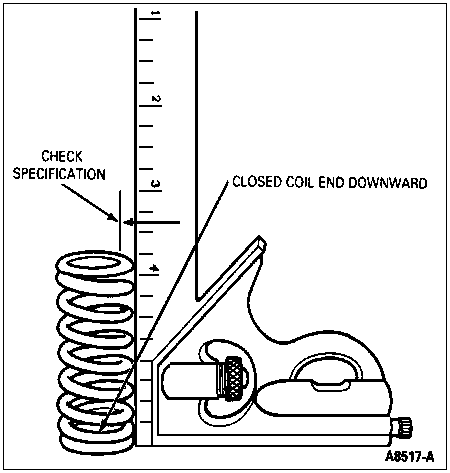
Refer to Specifications in Section 03-01A (5.8L MFI), Section 03-01B (7.5L MFI) or Section 03-01C (7.3L diesel) for out-of-square limits. Follow the same procedure to new valve springs before installation.
Make sure the proper valve spring (color-coded) is installed.
CAUTION: Make sure the valve springs are reassembled to their own original dampers by pushing damper on the valve spring. Do not open damper with any kind of tool in order to reassemble.