Section 15-01: Radio, Tape Chassis and Digital Audio Compact Disc Player | 1996 F-150, F-250, F-350, F-Super Duty and Bronco Workshop Manual |
NOTE: The following removal and installation procedures also apply to compact disc player, digital audio, non-premium sound and/or premium sound systems.
| Description | Tool Number |
|---|---|
| Radio Removing Tool | T87P-19061-A |
![]() WARNING: USE ONLY PROPERLY INSTALLED FCC APPROVED RADIO TRANSMITTING EQUIPMENT. USE OF OTHER TRANSMITTING EQUIPMENT MAY CAUSE THE VEHICLE TO MALFUNCTION OR STALL. IF THE ENGINE STALLS, POWER BRAKE AND POWER STEERING ASSIST WILL STOP. CONSULT YOUR AUTHORIZED DEALER BEFORE INSTALLING ANY RADIO TRANSMITTER.
WARNING: USE ONLY PROPERLY INSTALLED FCC APPROVED RADIO TRANSMITTING EQUIPMENT. USE OF OTHER TRANSMITTING EQUIPMENT MAY CAUSE THE VEHICLE TO MALFUNCTION OR STALL. IF THE ENGINE STALLS, POWER BRAKE AND POWER STEERING ASSIST WILL STOP. CONSULT YOUR AUTHORIZED DEALER BEFORE INSTALLING ANY RADIO TRANSMITTER.
Removal
Disconnect the battery to starter relay cable (14300).
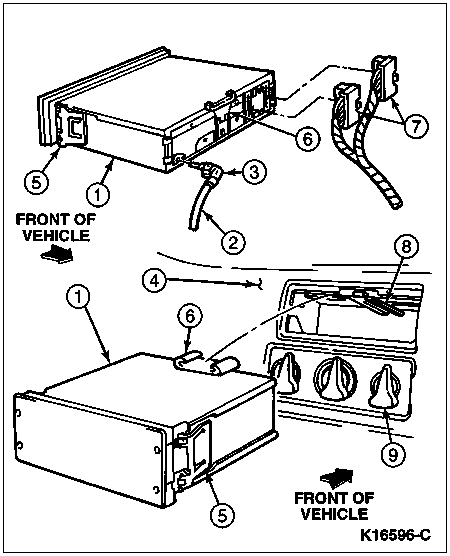
Insert Radio Removing Tool T87P-19061-A into radio face plate. Press in 25.4mm (1 inch) to release radio retaining clips. While flexing the radio removal tool outward, away from the center of the radio chassis (18806), pull radio chassis outward from instrument panel (04320) using tool as handles.
Disconnect the radio antenna lead in cable (18812) and radio wiring connectors.
Installation
If radio chassis is being replaced, transfer radio chassis support (18888) to new radio chassis.
Connect the radio antenna lead in cable and radio wiring connectors.
Position the radio chassis in the instrument panel and slide the radio chassis toward the instrument panel and on the mounting bracket until holding brackets engage.
NOTE: When the battery (10655) has been disconnected and reconnected, some abnormal drive symptoms may occur while the powertrain control module (PCM) (12A650) relearns its adaptive strategy. The vehicle may need to be driven 16 km (10 miles) or more to relearn the strategy.
Connect the battery ground cable (14301).
Check the operation of the radio chassis and engine.

| Item | Part Number | Description |
|---|---|---|
| 1 | 18806 | Radio Chassis |
| 2 | 18812 | Radio Antenna Lead In Cable |
| 3 | — | Antenna Cable Jack (Part of Antenna Kit 18813) |
| 4 | 04320 | Instrument Panel |
| 5 | — | Spring Clips (Part of 18806) |
| 6 | 18888 | Radio Chassis Support |
| 7 | 14401 | Main Wiring |
| 8 | 10A860 | Mounting Bracket |
| 9 | — | Heater/A/C Control (Part of 18D283) |