A/C Clutch

Section 12-03B: Compressor and Clutch, FS-10 | 1996 F-Series and Bronco Workshop Manual |
A/C Clutch and A/C Clutch Pulley
A disassembled view of the A/C clutch (2884) and related parts is shown in the illustration.
A/C Clutch
| Item | Part Number | Description |
|---|---|---|
| 1 | N800620-S2 | Pulley Snap Ring |
| 2 | 2884 | A/C Clutch |
| 3 | — | Bolt (8mm) (Part of 19D786) |
| 4 | — | Shims (Part of 19D786) |
| 5 | 2E884 | A/C Clutch Pulley |
| 6 | 2987 | A/C Clutch Field Coil |
| Description | Tool Number |
|---|---|
| Spanner Wrench | T70P-4067-A |
| Compressor Clutch Holding Tool | T94P-19703-AH |
Removal
Remove the clutch hub retaining bolt using Spanner Wrench T70P-4067-A for diesel engines or Compressor Clutch Holding Tool T94P-19703-AH for gasoline engines to hold the A/C clutch hub steady during bolt removal.
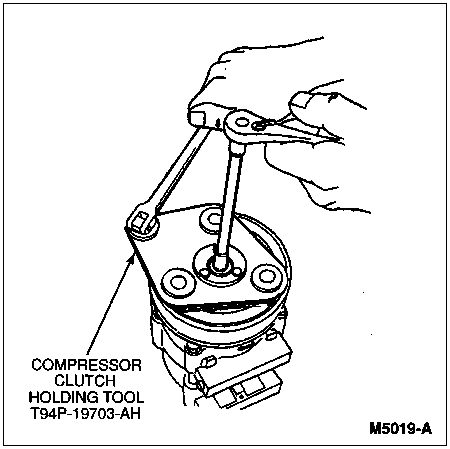
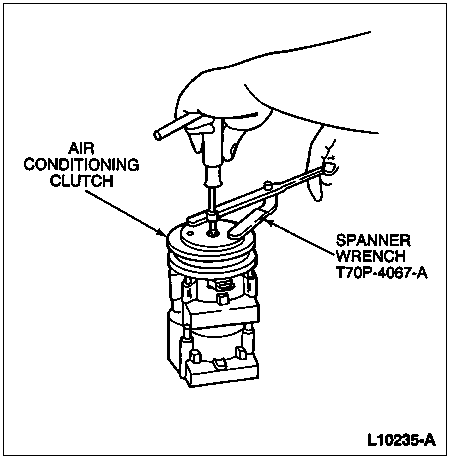
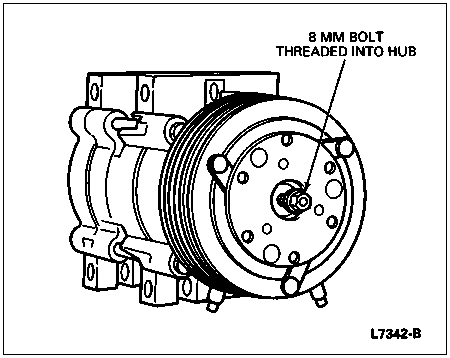
Pull clutch hub and shims from compressor shaft. If hub cannot be pulled from compressor shaft, screw an 8mm bolt into the shaft hole of the clutch hub to force the hub from the shaft.

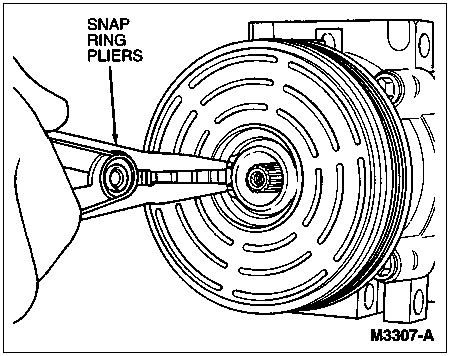
Remove pulley retaining snap ring.
Pull the A/C clutch pulley (2E884) and A/C compressor pulley bearing (2990) from A/C compressor (19703).
Installation
Clean A/C compressor pulley bearing surface of compressor head to remove any dirt or corrosion.
Install A/C clutch pulley and A/C compressor pulley bearing on A/C compressor. The bearing is a slip-fit on the compressor head and, if properly aligned, it should slip on easily.
Install pulley retaining snap ring with bevel side of snap ring out.
Place one nominal thickness spacer shim inside the hub spline opening and slide the hub on the end of the compressor shaft. Adjust air gap to 0.35-0.85mm (0.014-0.033 inch).
Thread a new 8mm hub retaining bolt into end of compressor shaft. Tighten hub retaining bolt to 11-13 Nm (8-10 lb-ft). DO NOT USE AIR TOOLS.
A/C Clutch Field Coil
The A/C clutch field coil (2987) is pressed on the front head of the A/C compressor. Special service tools are required to remove and install the A/C clutch field coil.
| Description | Tool Number |
|---|---|
| Shaft Protector for Coil Removal | T89P-19623-FH |
| Differential Side Bearing Puller | T77F-4220-B1 |
| Field Coil Replacer | T91L-19623-CH |
| Coil Pressing Tool | T89P-19623-EH |
Removal
Remove the A/C compressor from the vehicle following the recommended service procedure. Refer to Section 12-03A.
Remove the clutch hub and pulley.
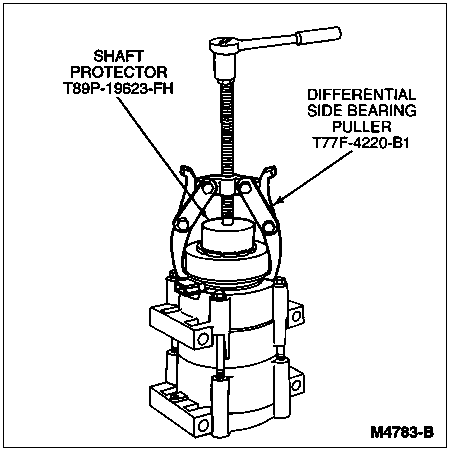
Install Shaft Protector for Coil Removal T89P-19623-FH on the nose opening of the A/C compressor.
Install Differential Side Bearing Puller T77F-4220-B1 on the A/C compressor. Place the tip of the puller forcing screw in the center pilot of the shaft protector and the jaws of the puller around the back edge of the A/C clutch field coil.
Tighten the puller forcing screw to pull the A/C clutch field coil from the compressor head. DO NOT USE AIR TOOLS.
Installation
Clean the mounting surface on the front head to remove any dirt or corrosion.
With the A/C compressor in a vertical position (nose up), place the A/C clutch field coil in position on the compressor front head. Make sure the coil electrical connector is positioned correctly.
Place Field Coil Replacer T91L-19623-CH in position centered over the A/C clutch field coil.
Place the Coil Pressing Tool T89P-19623-EH in position over the compressor nose and to the inner radius of the A/C clutch field coil.
Position 2-Jaw Puller D80L-1002-L or equivalent on the A/C compressor and the coil pressing tool. The jaws of the puller should be firmly engaged with the rear side of the compressor front mounts. The forcing screw must be piloted on the center mark of the pressing tool.
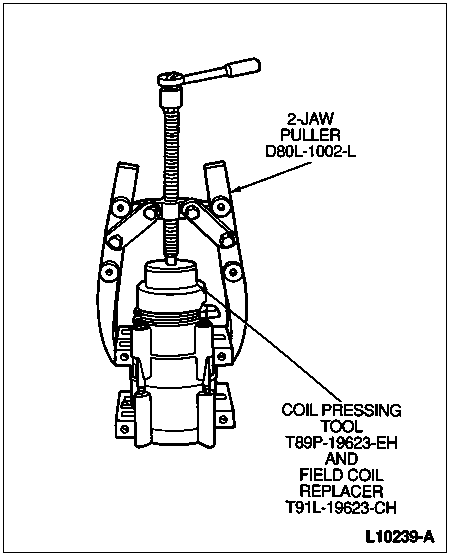
Tighten the forcing screw with a hand wrench until the A/C clutch field coil is pressed on the compressor front head. DO NOT USE AIR TOOLS. Check to make sure that the A/C clutch field coil bottoms against the head at all points around the outer diameter.
Install the clutch pulley and hub on the A/C compressor. Adjust the air gap as necessary. Refer to A/C Clutch Air Gap in the Adjustments portion of this section.
Install the A/C compressor on the vehicle following the recommended service procedure. Refer to Section 12-03A.