Section 12-03A: Air Conditioning System, Manual A/C-Heater | 1996 F-150, F-250, F-350, F-Super Duty and Bronco, F-Super Duty Motorhome Chassis Workshop Manual |
Description | Tool Number |
---|---|
Spring Lock Coupling Disconnect Tool Set | T84L-19623-B |
Removal
NOTE: Cap all open refrigerant lines and components to prevent entry of dirt and moisture into the A/C system.
Recover refrigerant from system following recommended service procedures. Refer to Section 12-00. Observe all safety precautions.
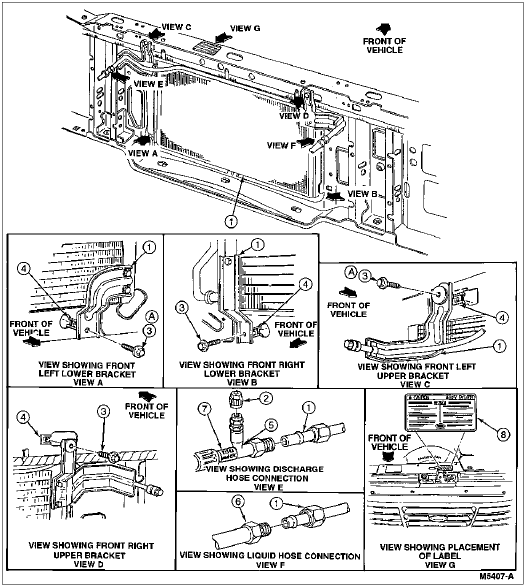
Disconnect condenser to evaporator tube (19835) from A/C condenser core (19712). Cap condenser to evaporator tube to prevent entrance of dirt and moisture.
Disconnect A/C manifold and tube (19D734) from A/C condenser core.
Partially drain radiator (8005) and disconnect upper radiator hose from radiator.
Working under vehicle, remove two screws attaching two lower mounting brackets to front of lower radiator support.
Remove bolts from radiator upper retaining brackets.
Tilt top of radiator rearward and remove two screws attaching two condenser upper mounting brackets to rear side of radiator support.
Lift A/C condenser core from vehicle.
Item | Part Number | Description |
---|---|---|
1 | 19712 | A/C Condenser Core |
2 | 19D702 | A/C Charging Valve Cap |
3 | N606691-S2 | Screw and Washer (4 Req'd Gas, 2 Req'd Diesel) |
4 | N623333-S100 | U-Nut (4 Req'd) |
5 | 19D734 | A/C Manifold and Tube |
6 | 19835 | Condenser to Evaporator Tube |
7 | — | Refrigerant Identification Tag (Part of 19D734) |
8 | 19A688 | Refrigerant Charge Information Tag |
A | — | Tighten to 14-19 Nm (10-14 Lb-Ft) |
Installation
Position A/C condenser core to vehicle with lower mounting brackets on front side of radiator support and upper brackets on rear side.
Install four screws attaching four mounting brackets to radiator support. Tighten screws to 14-19 Nm (10-14 lb-ft).
Move radiator into correct installed position and install bolts to upper retaining brackets.
Connect upper radiator hose to radiator and fill cooling system to specified level. Refer to Section 03-03.
Using a new O-ring lubricated with clean refrigerant oil, connect A/C manifold and tube discharge line to A/C condenser core. Tighten connection to 7-13 Nm (62-115 lb-in).
Connect condenser to evaporator tube to A/C condenser core using a new O-ring lubricated with clean refrigerant oil. Tighten connection to 21-27 Nm (15-20 lb-ft).
Leak test, evacuate and charge system following recommended service procedures. Refer to Section 12-00. Observe all safety precautions.
Check system for proper operation.
Refer to Evaporator Core and/or A/C Condenser Core on Vehicle Leak Test in Section 12-00.