Section 12-03A: Air Conditioning System, Manual A/C-Heater | 1996 F-150, F-250, F-350, F-Super Duty and Bronco, F-Super Duty Motorhome Chassis Workshop Manual |
Description | Tool Number |
---|---|
Spring Lock Coupling Disconnect Tool Set | T84L-19623-B |
Removal
NOTE: Cap all open refrigerant lines and components to prevent entry of dirt and moisture into the A/C system.
Disconnect the battery ground cable.
Discharge the refrigerant system using approved recovery equipment. Refer to Section 12-00 for information on refrigerant recovery.
Remove the instrument panel (04320). Refer to Section 01-12.
Disconnect vacuum supply hose at dash panel (01610). Position the A/C vacuum check valve (19A563) away from A/C evaporator case (19897).
Disconnect condenser to evaporator tube (19835) from the A/C evaporator core (19860) using Spring Lock Coupling Disconnect Tool Set T84L-19623-B.
Disconnect A/C manifold and tube (19D734) from suction accumulator/drier (19C836).
Disconnect heater water hoses (18472) from heater core (18476) and plug heater water hoses.
Remove instrument panel. Refer to Section 01-12.
Working in passenger compartment, remove two screws or nuts attaching bottom of A/C evaporator case to dash panel. One screw also attaches lower edge of A/C evaporator case to dash panel.
Unplug A/C plenum vacuum harness (18C581) and two wiring connectors to main wiring (14401) located near right end of A/C plenum vacuum harness coming from recirc. duct opening back into opening.
Remove two screws attaching right side of recirc. duct to dash panel.
Remove two retaining nuts attaching A/C evaporator case and recirc. duct to dash panel.
Pull A/C evaporator case and recirc. duct forward and remove from vehicle.
Remove the heater outlet floor duct (18C433) from heater air plenum chamber (18471).
Remove four fasteners that retain the left end of the heater air plenum chamber to the dash panel.
Disconnect A/C temperature cable (19988) and vacuum connector at A/C control (19980).
Disconnect source vacuum block secured to the right of the heater core cover (18B300).
Pull heater air plenum chamber forward to disengage three studs from dash panel.
NOTE: Care must be taken to avoid spilling any coolant from heater core.
Lower heater air plenum chamber from its location under the instrument panel.
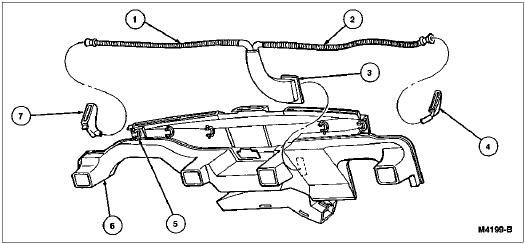
Item | Part Number | Description |
---|---|---|
1 | 19988 | A/C Temperature Cable |
2 | 18471 | Heater Air Plenum Chamber |
3 | 56950-S2 | Screw |
4 | 18C581 | A/C Plenum Vacuum Harness |
5 | 18C433 | Heater Outlet Floor Duct |
6 | 45261-S2 | J-Nut |
7 | 01610 | Dash Panel |
8 | 56956-S2 | Screw |
9 | N801969-S2 | Nut |
A | — | Tighten to 2.5-3.0 Nm (22-27 Lb-In) |
Installation
Position heater air plenum chamber against dash panel. Install one screw to attach the left end of heater air plenum chamber to dash panel.
Position A/C evaporator case against dash panel, making sure the studs are inserted through holes in dash panel and flange.
Position instrument panel and tighten its retaining screws.
Install A/C temperature cable to heater air plenum chamber. Connect control vacuum and source vacuum hoses.
Position heater outlet floor duct and install fasteners.
Working in passenger compartment, install screws to attach A/C evaporator case to dash panel.
Using a new green O-ring lubricated with clean refrigerant oil, connect A/C manifold and tube to A/C evaporator core.
Using a new green O-ring lubricated with clean refrigerant oil, connect A/C manifold and tube to suction accumulator/drier. Tighten connection to 34-44 Nm (25-32 lb-ft) using two wrenches.
Connect heater water hoses to heater core. Tighten clamps to 1.4-2.0 Nm (12-18 lb-in).
Connect A/C plenum vacuum harness and two electrical hardshell connectors to main wiring under instrument panel.
Fill and bleed cooling system. Refer to Section 03-03.
Evacuate, leak test and recharge system following recommended procedures. Refer to Section 12-00.
NOTE: When the battery (10655) has been disconnected and reconnected, some abnormal drive symptoms may occur while the powertrain control module relearns its adaptive strategy. The vehicle may need to be driven 16 km (10 miles) or more to relearn the strategy.
Connect the battery ground cable.
Check heating and A/C systems for proper operation.
Item | Part Number | Description |
---|---|---|
1 | 19E630 | A/C Side Window Demister and Hose (LH) |
2 | 19E630 | A/C Side Window Demister and Hose (RH) |
3 | 19E680 | A/C Demister Hose Connector |
4 | — | Right Demister Nozzle (Part of 19E658) |
5 | 19B632 | A/C Accumulator Tube Support Clip (5 Req'd) |
6 | — | Defroster Outlets, Instrument Panel Ducts and Floor Ducts (Part of 19E727) |
7 | — | Left Demister Nozzle (Part of 19E659) |