Section 12-03A: Air Conditioning System, Manual A/C-Heater | 1996 F-150, F-250, F-350, F-Super Duty and Bronco, F-Super Duty Motorhome Chassis Workshop Manual |
Description | Tool Number |
---|---|
Spring Lock Coupling Disconnect Tool Set | T84L-19623-B |
Removal
NOTE: Cap all open refrigerant lines and components to prevent entry of dirt and moisture into the A/C system.
Recover refrigerant from system following the recommended service procedures. Refer to Section 12-00. Observe all safety precautions.
Disconnect vacuum supply hose at dash panel. Position A/C vacuum check valve (19A563) away from A/C evaporator case (19897).
Disconnect A/C manifold and tube (19D734) from A/C evaporator core (19860) using Spring Lock Coupling Disconnect Tool Set T84L-19623B.
Disconnect evaporator to compressor suction line (19867) from suction accumulator/drier (19C836). Cap all open refrigerant lines to prevent entrance of dirt and moisture.
Disconnect heater water hoses (18472) from heater core (18476) and plug heater water hoses with suitable 15.87mm (5/8-inch) plugs.
Working in passenger compartment, remove two screws or nuts attaching bottom of A/C evaporator case to dash panel (01610). One screw also attaches lower edge of A/C evaporator case to dash panel.
Unplug A/C plenum vacuum harness (18C581) and two wiring connectors to main wiring (14401) located near right end of plenum harness coming from recirc. duct opening back into opening.
Remove two screws attaching right side of recirc. duct to dash panel.
Remove two retaining nuts attaching A/C evaporator case and recirc. duct to dash panel.
Pull A/C evaporator case and recirc. duct forward and remove it from vehicle.
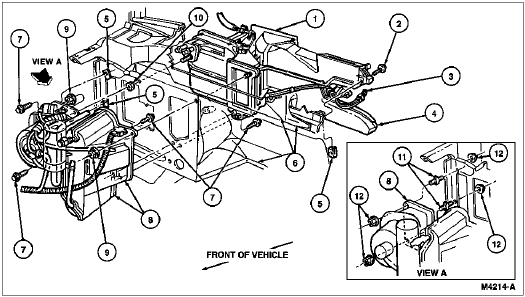
Item | Part Number | Description |
---|---|---|
1 | 18471 | Heater Air Plenum Chamber |
2 | — | Hex Screw/Washer Head (Part of 18471) |
3 | — | Vacuum Hose (Part of Vacuum Harness) |
4 | 18C433 | Heater Outlet Floor Duct |
5 | 45261-S2 | J-Nut (3 Req'd) |
6 | 01610 | Dash Panel |
7 | 56956-S2 | Hex Screw and Washer Assembly |
8 | 19850 | A/C Evaporator Housing |
9 | N621906-S2 | Nut (2 Req'd) |
10 | N801696-S2 | Nut |
11 | N803912-S2 | Stud (2 Req'd) |
12 | 621906 | Nut (4 Req'd) |
Installation
Position recirc. duct and A/C evaporator case to dash panel. Install two retaining nuts along top edge of assembly.
Install two screws along right side of recirc. duct.
Working in passenger compartment, install top screws to attach bottom of A/C evaporator case to dash panel.
Connect A/C plenum vacuum harness from recirc. duct opening to the dash panel.
Using a new green O-ring lubricated with clean refrigerant oil, connect A/C manifold and tube to A/C evaporator core.
Using a new green O-ring lubricated with clean refrigerant oil, connect evaporator to compressor suction line to suction accumulator/drier. Tighten connection to 34-44 Nm (25-32 lb-ft) using two wrenches.
Connect heater water hoses to heater core. Tighten clamps only to 1.4-2.0 Nm (12-18 lb-in).
Connect A/C plenum vacuum harness and two wiring connectors to main wiring under instrument panel (04320).
Fill and bleed cooling system. Refer to Section 03-03.
Leak test, evacuate and charge system following recommended procedures. Refer to Section 12-00. Observe all safety precautions.
Check system for proper operation.
Refer to Section 12-00 for Evaporator Leak Test.