Remove the A/C control.
Temperature Cable Removal

Section 12-03A: Air Conditioning System, Manual A/C-Heater | 1996 F-150, F-250, F-350, F-Super Duty and Bronco, F-Super Duty Motorhome Chassis Workshop Manual |
| Description | Tool Number |
|---|---|
| Temperature Control Cable Removal Tool | T94P-18532-A |
Removal
Disconnect the battery ground cable(s).
Remove the trim strip located above the A/C control (19980) and glove compartment area.
Remove two screws attaching the center finish trim panel to the instrument panel (04320).
Remove the center finish trim panel.
Remove four screws attaching the A/C control to the instrument panel and pull the A/C control away from the instrument panel far enough to gain access to the back of the A/C control.
Disconnect the electrical hardshell connectors from the function control switch and the heater blower motor switch (18578).
Disconnect the A/C plenum vacuum harness (18C581) from the A/C control.
Remove the A/C temperature cable (19988) from the A/C control using Temperature Control Cable Removal Tool T94P-18532-A and a small flat-bladed screwdriver. Insert Temperature Control Cable Removal Tool T94P-18532-A around the temperature cable head to release two of the retaining tabs. Using a small flat-bladed screwdriver, release the third retaining tab and remove the A/C temperature cable from the A/C control.
Remove the A/C control.
Installation
Connect the A/C plenum vacuum harness to the A/C control.
Connect the A/C temperature cable to the A/C control. Make sure all temperature control components are in the full warm position before installing the A/C temperature cable. Push the A/C temperature cable onto the A/C control until an audible click is heard.
Install the electrical hardshell connectors to the heater blower motor switch and the function control switch.
Insert the A/C control into the opening in the instrument panel.
Install four screws which retain the A/C control to the instrument panel.
Install the center finish trim panel to the instrument panel.
Install two screws retaining the center finish trim panel to the instrument panel.
Install the trim strip above the A/C control and glove compartment area (push on).
NOTE: When the battery (10655) has been disconnected and reconnected, some abnormal drive symptoms may occur while the powertrain control module (PCM) relearns its adaptive strategy. The vehicle may have to be driven 16 km (10 miles) or more to relearn the strategy.
Connect the battery ground cable(s).
Check the system for proper operation.
Illumination Bulbs
Removal
Remove trim strip above the A/C control and glove compartment area.
Remove two screws retaining the center finish trim panel to the instrument panel.
Remove center finish trim panel.
Remove four screws retaining the A/C control to the instrument panel.
Pull A/C control from instrument panel far enough to gain access to the back of the A/C control.
Remove instrument panel lamp socket and bulb (13B765) (2) from the A/C control by turning one-quarter turn and pull out of A/C control (one is located to the left of the function selector switch, the other is located between the heater blower motor switch and A/C temperature control bracket (19D816)).
Remove the bulb from the socket by pulling straight out.
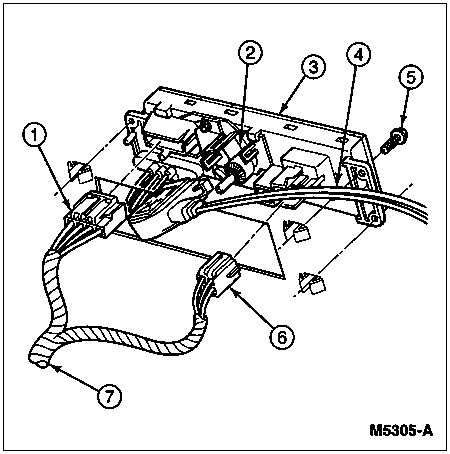
| Item | Part Number | Description |
|---|---|---|
| 1 | 14401 | Main Wiring (to Function Selector Switch) |
| 2 | 19D816 | A/C Temperature Control Bracket |
| 3 | 19980 | A/C Control |
| 4 | 19988 | A/C Temperature Cable |
| 5 | N803877-S36B | Screw (4 Req'd) |
| 6 | 14401 | Main Wiring (to Blower Switch) |
| 7 | 14401 | Main Wiring |
Installation
Replace bulb with correct replacement, refer to the Ford Master Parts Catalog for replacement bulb specification.
Insert instrument panel lamp socket and bulb into the A/C control and twist one-quarter turn to secure in place.
Install A/C control in instrument panel opening.
Install four screws retaining A/C control to instrument panel.
Install center finish trim panel.
Install two screws retaining center finish trim panel to instrument panel.
Install trim strip above A/C control and glove compartment area (push on).
Check system for proper operation.
Switch Knobs
Removal
Grasp knob (18519) in fingers and pull directly away from A/C control.
Installation
Align keyed portion of knob with keyed portion of shaft and push in place until knob bottoms against A/C control shaft. All climate control knobs remove and install in the same manner.
Heater Blower Motor Switch
Removal
Remove A/C control from instrument panel. Do not detach the cables.
Remove knob from the heater blower motor switch by pulling it off its shaft.
Move A/C control away from opening and disconnect wire hardshell connector by lifting the snap-lock retainer with a screwdriver and pulling the connector off the heater blower motor switch.
Remove the screw attaching the heater blower motor switch to the back of the A/C control, and rotate the heater blower motor switch counterclockwise to release from the retaining tabs.
Installation
Insert the shaft without its knob through its opening in the A/C control.
Rotate the heater blower motor switch clockwise to engage the retaining tabs. Replace the screw previously removed.
Connect the hardshell wire connector to the heater blower motor switch.
Install A/C control.
Install knob.
Check the heater blower motor switch for proper operation.
Function Selector Switch
Removal
Remove A/C control.
Remove the screw that secures the function selector switch to the heater control assembly and remove switch.
Pull the vacuum assembly back.
Installation
Follow removal procedures in reverse order.
Start the engine to provide vacuum. Then, move the function selector knob to each of its operating positions to verify that vacuum is being distributed properly through the function selector switch to the applicable vacuum control motor (18A318).