Section 12-00: Climate Control System, Service | 1996 F-150, F-250, F-350, F-Super Duty and Bronco, F-Super Duty Motorhome Chassis Workshop Manual |
A/C Manifold and Tube Leak Test
Tighten the retaining bolt to 18-23 Nm (13-17 lb-ft).
Add refrigerant to the system if necessary.
Leak test the O-ring seals using Rotunda Automatic Calibration Halogen Leak Detector 023-R1003 or equivalent.
If no leaks are found, the O-ring seals are good.
If a leak is found at theA/C manifold and tube (19D734) and the attaching bolt is tightened to 18-23 Nm (13-17 lb-ft), install new O-ring seals as outlined. Then, repeat the leak test.
External Leak Test
Description | Tool Number |
---|---|
Pressure Test Plate | T89P-19623-H |
If the A/C compressor (19703) is on the vehicle, discharge the system using a service center to recover, recycle and recharge. Remove the compressor from the vehicle. Observe all safety precautions.
Remove the retaining bolt and remove the A/C manifold and tube from the rear head of the compressor. Install Pressure Test Plate T89P-19623-H on the rear head of the A/C compressor using the existing attaching bolt.
Connect the high and low pressure lines of a gauge set to the corresponding fittings on the pressure test plate.
Attach the center hose of the gauge set to a refrigerant container standing in an upright position.
Using the clutch hub, hand-rotate the compressor shaft ten revolutions to distribute the oil inside the A/C compressor.
Open the low-pressure gauge valve, the high-pressure gauge valve and the valve on the refrigerant container to allow the refrigerant vapor to flow into the A/C compressor.
Using Rotunda Halogen Leak Detector 023-R1003 or equivalent check for leaks at the compressor shaft seal and the compressor center seal.
If a shaft seal leak is found, install a new shaft seal as described in Section 12-03B. If an external leak is found at the center joint of the A/C compressor, install a new A/C compressor assembly.
When the leak test is completed, close the gauge valves (both high and low) as well as the valve on the refrigerant container.
Slowly remove the gauge set hoses from the pressure test fitting tool.
Install the A/C compressor on the vehicle.
Leak test, evacuate and charge the system. Observe all safety precautions.
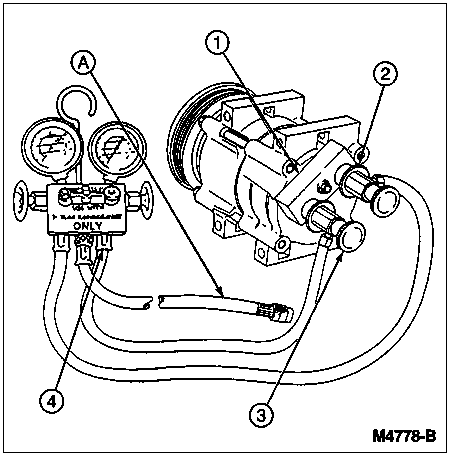
Item | Part Number | Description |
---|---|---|
1 | T94P-19623-E | Pressure Test Plate (R134a) |
2 | 176-R0036 | R-134a Low-Side Quick Disconnect |
3 | 176-R0037 | R-134a High-Side Quick Disconnect |
4 | 176-R032A | Manifold Gauge Set (R134a) |
A | — | To Refrigerant Supply Tank (Part of 176-R032A) |
Rotating Torque Check
The rotational torque of a used A/C compressor should be checked if excessive compressor drag is suspected.
Discharge refrigerant system. Observe all safety precautions.
Remove refrigerant hose and A/C manifold and tube from A/C compressor. Use care not to allow dirt to enter A/C compressor.
Remove the compressor from the vehicle. With the A/C clutch (2884) disengaged, rotate the compressor shaft one complete revolution and note the torque required to rotate the shaft another complete revolution.
If the rotational torque exceeds specification (13.0 Nm [9.6 lb-ft]), replace the A/C compressor assembly.
If the rotational torque is less than specified, excessive drag does not exist in the A/C compressor. Install the A/C manifold and tube and leak test, evacuate and charge the system.
Check the system for proper operation.