Section 08-02: Clutch Controls | 1996 F-150, F-250, F-350, F-Super Duty Chassis Cab and Bronco Equipped with Manual Transmission Workshop Manual |
Removal
Raise the vehicle and install safety stands.
Remove clutch release lever dust shield (7513) from opening in clutch housing portion of the case (7005).
Push release lever forward to compress clutch slave cylinder.
NOTE: On 7.3L diesel and 7.5L gasoline engines, the steel retainer clip is permanently attached to the clutch slave cylinder.
Remove clutch slave cylinder by prying on clip to disengage tangs while pulling clutch slave cylinder free of bracket.
Remove clutch release lever by pulling outward.
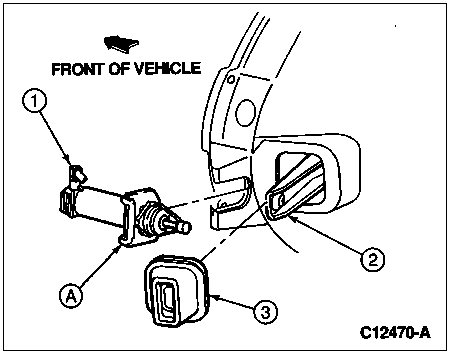
| Item | Part Number | Description |
|---|---|---|
| 1 | 7A564 | Clutch Slave Cylinder |
| 2 | 7515 | Clutch Release Lever |
| 3 | 7513 | Clutch Release Lever Dust Shield |
| A | — | Make Sure Clip Is Securely Snapped in Place on Clutch Housing |
Installation
Clean and relube clutch release shaft pivot stud, push rod pockets and fingers of clutch release lever.
Install clutch release lever on clutch release hub and bearing (7548) and pivot stubs, making sure it is properly positioned.
Push the clutch release lever inward until it snaps onto stud.
Install clutch release lever dust shield in opening in clutch housing portion of the case.
Install clutch slave cylinder and attaching clip.
Remove safety stands and lower the vehicle.
Depress the clutch pedal (7519) ten times to fill clutch slave cylinder and to seat components.
Fill and bleed system to remove any air in clutch slave cylinder, lines or clutch master cylinder (7A543). Refer to appropriate clutch hydraulic system bleeding procedure in the Adjustments portion of this section.