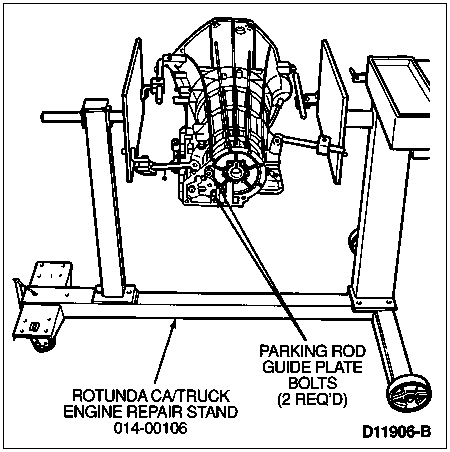
Mount the transmission case in Rotunda Car/Truck Engine Repair Stand 014-00106 or equivalent. Mount it with the pan rail facing up. Position it in front of a workbench.
Section 07-01A: Transmission, Automatic, E4OD | 1996 All F-Series and Bronco with E4OD Automatic Transmission Workshop Manual |
| Description | Tool Number |
|---|---|
| Seal Remover | TOOL-1175-AC |
| Impact Slide Hammer | T50T-100-A |
| Rear Case Bushing Replacer | T92T-7710-AH |
| Threaded Drawbar | T77F-1176-A |
| Shift Lever Seal Replacer | T74P-77498-A |
| Extension Housing Bushing Remover | T77L-7697-D |
| Extension Housing Bushing Replacer | T77L-7697-C |
| Oil Filler Tube Installer | T89T-70010-G |
| Clutch Spring Compressor | T65L-775515-A |
| Clutch Remover/Replacer | 789T-70010-E |
| Clutch Spring Fixture | 789T-70010-C |
| Aligning Pin | 789T-70010-B |
| Shift Lever Seal Replacer | T74P-77498-A |
| MLPS Alignment Tool | 789T-70010-AH |
| Extension Housing Seal Replacer | T61L-7657-B |
| Converter Handles | 5810-7902-C |
NOTE: Soak all friction clutch plates in clean Motorcraft MERCON® Multi-Purpose Automatic Transmission Fluid XT-2-QDX or MERCON® equivalent for 15 minutes.
NOTE: Lightly lubricate all O-ring seals before installing using Motorcraft MERCON® Multi-Purpose Automatic Transmission Fluid XT-2-QDX or MERCON® equivalent.
NOTE: Lightly grease all thrust washers with petroleum jelly to hold in place during assembly.
Inspect the transmission case for stripped bolt hole threads, obstructions to vent and fluid passages, and cracks or warpage. Check the gasket and mating surfaces for burrs or nicks. Inspect the extension housing for cracks, burrs, or warpage.
Mount the transmission case in Rotunda Car/Truck Engine Repair Stand 014-00106 or equivalent. Mount it with the pan rail facing up. Position it in front of a workbench.
![]() CAUTION: Be careful not to damage the case bore while removing the bushing.
CAUTION: Be careful not to damage the case bore while removing the bushing.
NOTE: Remove and replace only one bushing at a time while using the other bushing in the case to help align the tool and bushing during installation. Always replace both bushings when either bushing is replaced.
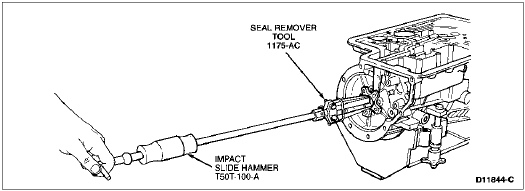
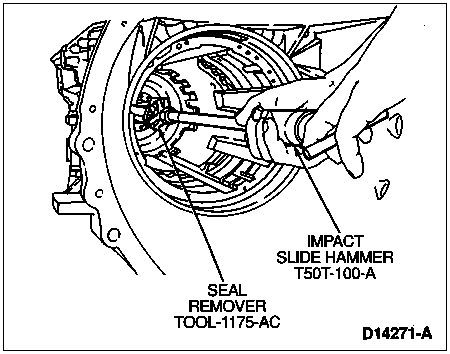
Remove all minor nicks or burrs in the case bore, using a fine oilstone. If necessary, remove the rear case bushing only, using Seal Remover Tool-1175-AC or equivalent and Impact Slide Hammer T50T-100-A.
![]() CAUTION: Make sure the bushing and tool are centered in the bore.
CAUTION: Make sure the bushing and tool are centered in the bore.
NOTE: The rear case bushing has one lube groove. The front case bushing has three lube groves.
Using Rear Case Bushing Replacer T92T-77110-AH, place the rear case bushing on the portion of the tool. Place the remaining portion of Rear Case Bushing Replacer T92T-77110-AH and 127 mm (5 inch) Threaded Drawbar T77F-1176-A through the front of the case into the front case bushing. Place the portion of the tool with the rear case bushing into the case over the drawbar. Attach a washer and nut to the drawbar and hand-tighten. Hold the drawbar with a 1/2-inch wrench while turning the nut with a 1-1/8 inch wrench. Turn the nut until the rear case bushing is fully seated. Unscrew the nut and remove all tools.

Remove the front case bushing, using Seal Remover Tool-1175-AC (or equivalent) and Impact Slide Hammer T50T-100A.
![]() CAUTION: Make sure the bushing and tool are centered in the bore.
CAUTION: Make sure the bushing and tool are centered in the bore.
NOTE: The front case bushing has three lube grooves. The rear case bushing has one lube groove.
Using Rear Case Bushing Replacer T92T-77110-AH, place the front case bushing on the tool. Set the portion of the tool with the front case bushing and drawbar into the bushing bore from the front. Place the remaining portion of Rear Case Bushing Replacer T92T-77110-AH into the rear bushing in the case as a guide. Install the washer and nut hand-tight. Hold the drawbar with a 1/2-inch wrench while turning the nut with a 1-1/8 inch wrench as shown. Turn the nut until the front case bushing is fully seated. Unscrew the nut and remove all tools.

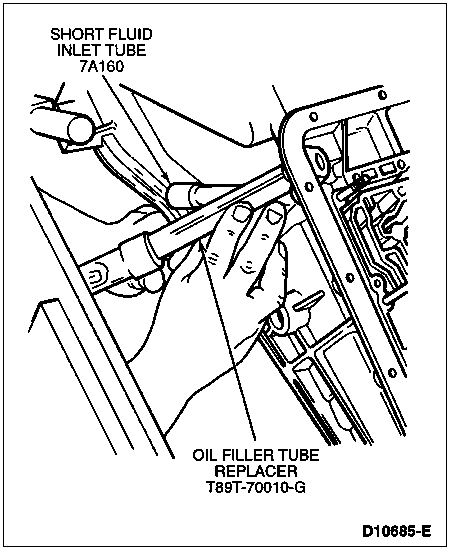
NOTE: When installing the short fluid inlet tube, use a stripe or rib on the tube for alignment. The stripe should be farthest outboard when installed. The rib should be toward the front. (No special tools are required if the plastic tube is being installed.)
If removed, install a new short fluid inlet tube, using Oil Filler Tube Replacer T89T-70010-G (or equivalent) for the steel tube. Rotate the transmission so the converter housing is facing up.
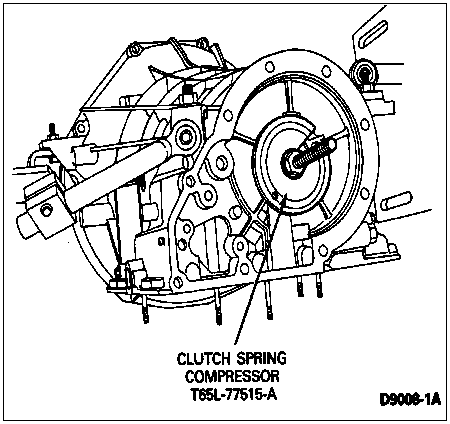
NOTE: If using a square cut seal, install the reverse clutch piston using Clutch Spring Compressor T65L-77515-A. (The tool is not required if a lip seal is being used.)
![]() CAUTION: While performing the following step, do not overtighten the compressor tool or misalign the piston in its bore.
CAUTION: While performing the following step, do not overtighten the compressor tool or misalign the piston in its bore.
Install the tool and piston.

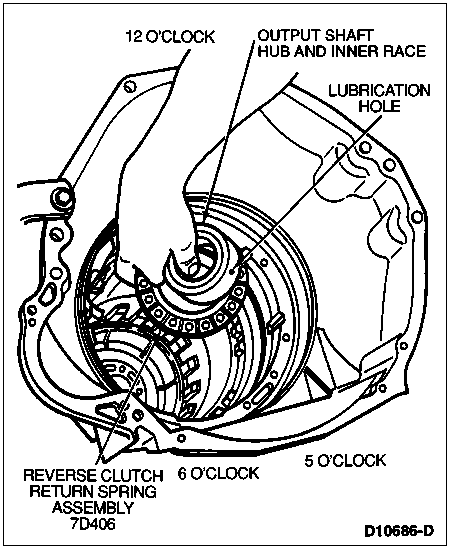
Install the reverse clutch return spring assembly. Install the low/reverse one-way clutch inner race. (The inner race must be installed with lubrication hole in 5 o'clock position.) Using two 2 -1/4 x 5/16-24 bolts, draw the race towards the rear of the case (enough to start the original bolts). Remove the two draw bolts.
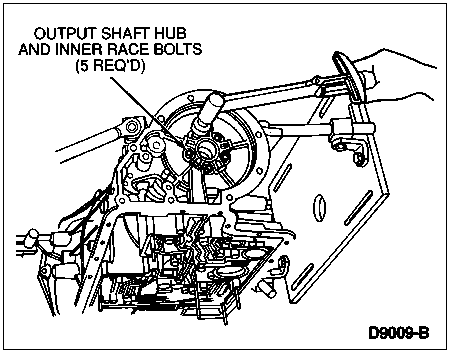
Alternately tighten the five one-way clutch inner race bolts to 29 Nm (21 lb-ft).
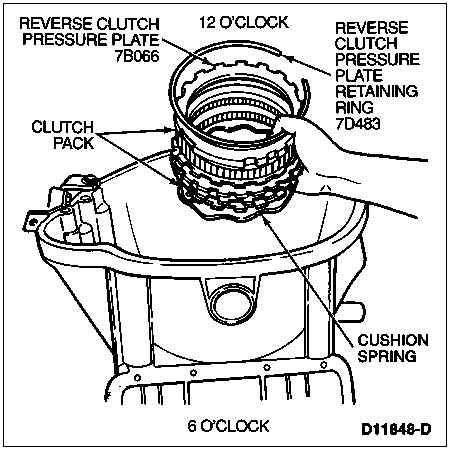
![]() CAUTION: The number of plates are model-dependent.
CAUTION: The number of plates are model-dependent.
NOTE: All friction clutch plates must be soaked in clean Mercon® Multi-Purpose Automatic Transmission Fluid XT-2-QDX (or Mercon® equivalent) for 15 minutes. No stack-up clearance measurement is required.
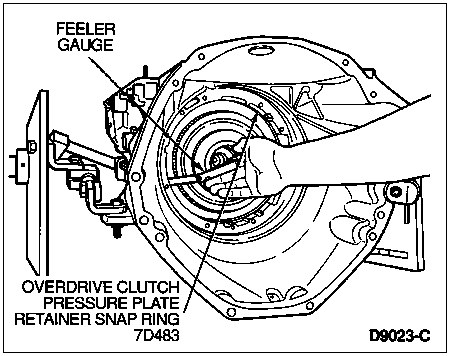
Install the cushion spring and reverse clutch pack, starting with a steel plate. Alternate steel plates with friction plates. Install the reverse clutch pressure plate and retaining ring with the retaining ring opening between the 12 o'clock and 3 o'clock positions.
NOTE: Make sure the No. 13 output shaft thrust washer is properly seated against the tab on the case.
Rotate the transmission with the pan rail facing up. Lubricate the steel side of the No. 13 output shaft thrust washer with petroleum jelly and place it on the rear of the case, so the bronze side is facing outward.

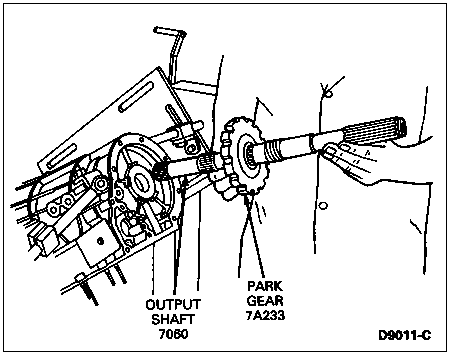
Slide the park gear onto the output shaft, with the thrust surface forward. Install the output shaft.
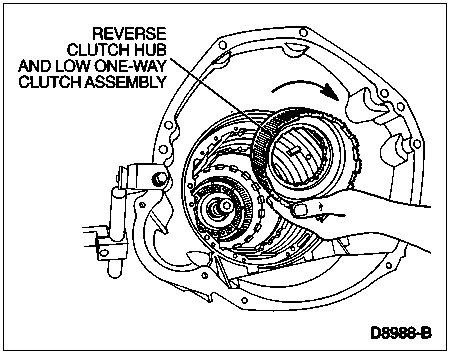
NOTE: When the reverse clutch and low one-way clutch are installed, the reverse clutch must rotate clockwise. The one-way clutch will hold and not let the clutch hub rotate counterclockwise.
Install the low reverse hub and low/reverse one-way clutch assembly by pressing the hub inward and rotating clockwise over the output shaft hub and inner race to fully seat it.
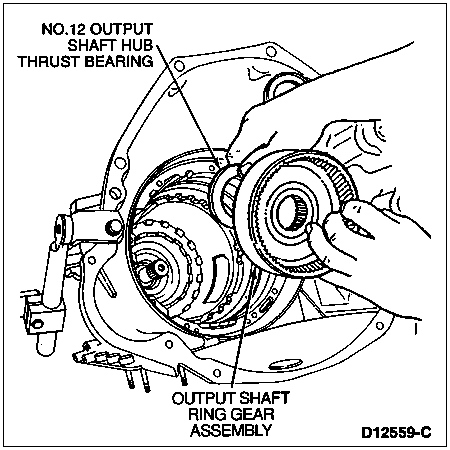
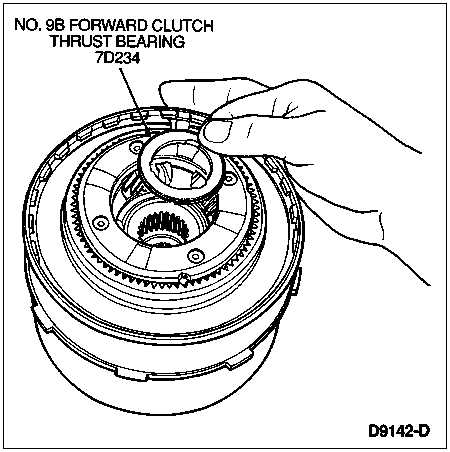
Verify the No. 12 output shaft hub thrust bearing is on the rear surface of the hub assembly. Place the output shaft ring gear assembly into the case.
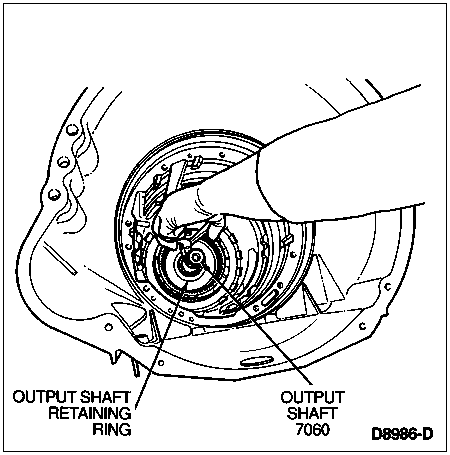
![]() WARNING: DO NOT OVEREXTEND THE OUTPUT SHAFT RETAINING RING DURING INSTALLATION. MAKE SURE THE OUTPUT SHAFT RETAINING RING IS SECURELY SEATED IN THE GROOVE.
WARNING: DO NOT OVEREXTEND THE OUTPUT SHAFT RETAINING RING DURING INSTALLATION. MAKE SURE THE OUTPUT SHAFT RETAINING RING IS SECURELY SEATED IN THE GROOVE.
Install a new output shaft retaining ring onto the output shaft.
Verify the thrust washers are installed. Install the reverse planet assembly into the reverse clutch hub with the No. 10B and No. 11 reverse planet thrust washers. Install the reverse planet retaining ring into the reverse clutch hub. Verify the retaining ring is fully seated. Rotate the transmission so the converter housing is facing up.

NOTE: This assembly was assembled during subassembly.
Verify the No. 8A intermediate brake drum thrust washer is installed onto the intermediate brake drum.Make sure the tabs are properly seated into the slots. Verify the No. 8B forward clutch needle bearing is installed. Install the direct clutch and input shell assembly into the low/reverse planetary.
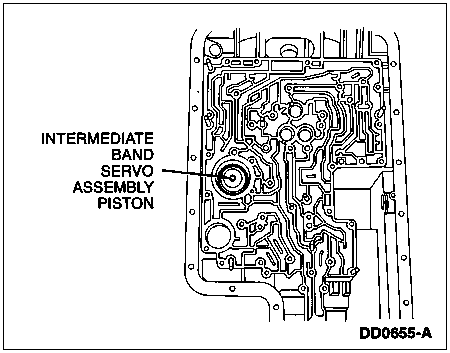
Clean and inspect the intermediate band servo piston.
NOTE: Prior to installation, lightly lubricate the servo piston seal with clean Mercon® Multi-purpose Automatic Transmission Fluid XT-2-QDX (or Mercon® equivalent).
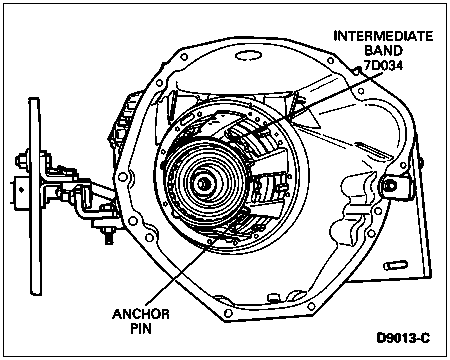
Install the intermediate band so one ear is resting on the anchor pin.
Gently press the intermediate band servo assembly piston into the case bore.
![]() CAUTION: The number of plates are model-dependent.
CAUTION: The number of plates are model-dependent.
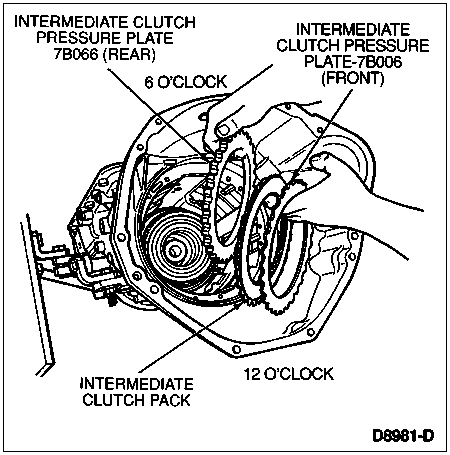
NOTE: Install the front intermediate clutch pressure plate with the blank area (no teeth) at the 6 o'clock and 12 o'clock positions. Soak all friction clutch plates in clean Mercon® Multi-purpose Automatic Transmission Fluid XT-2-QDX (or Mercon® equivalent).
Install the rear intermediate pressure plate on the bottom. Install the intermediate clutch pack, starting with an internal spline plate and alternating with external spline plates. Install the front intermediate clutch pressure plate on top.
NOTE: The following stack-up check measurement only indicates the amount of space existing between the center support assembly and the intermediate brake drum. It also will indicate if the unit has been properly built to this point.
NOTE: A thrust washer held against the center support assembly as shown will help to determine when the probe is flush. Record the micrometer reading as Reading A.
Remove the direct clutch cast iron seal rings from the center support assembly for this check. Determine the center support assembly thickness by placing Depth Micrometer D80P-4201-A (or equivalent) over the hole in the center support assembly.
Extend the micrometer probe until it is flush with the No. 6 center support thrust washer surface on the opposite side of the center support assembly.
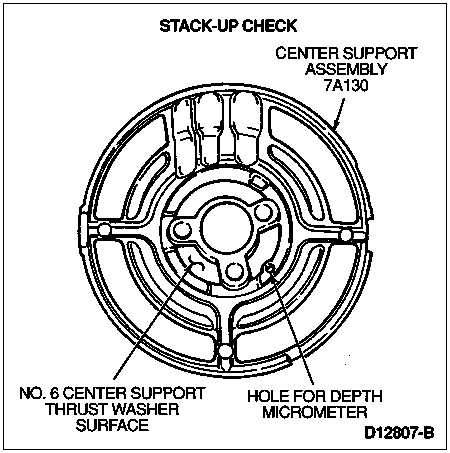
| Item | Part Number | Description |
|---|---|---|
| 1 | � | Depth Micrometer D80P-4201-A |
| 2 | � | Reading A |
| 3 | � | Depth Micrometer Probe Flush with Thrust Washer Surface |
| 4 | � | Thrust Washer on Center Support |
| 5 | 7A130 | Center Support Assembly |
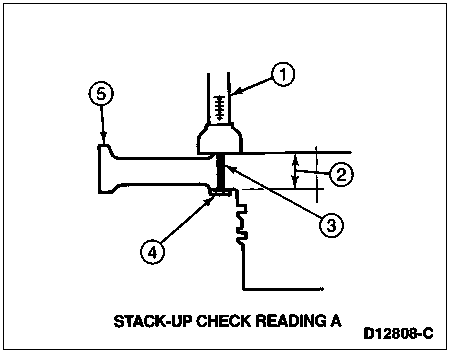
Install and fully seat the No. 6 center support thrust washer into the intermediate brake drum. Place the depth micrometer over the hole in the center support assembly and extend the micrometer probe until it contacts the thrust washer. (This is Reading B.) Subtract Reading A from Reading B. Record the difference as Reading C. Reading C must be within specification .81-2.06 mm (0.032-0.08 inch). If the final dimension is outside the specified limits, improper assembly is indicated.
| Item | Part Number | Description |
|---|---|---|
| 1 | � | Depth Micrometer D80P-4201-A |
| 2 | � | Reading B |
| 3 | � | Depth Micrometer Probe Contacting Thrust Washer |
| 4 | 7F374 | Forward Clutch Needle Bearing (No. 8B) |
| 5 | 7L326 | Center Support Thrust Washer (No. 6) |
| 6 | 7D044 | Intermediate Brake Drum |
| 7 | 7A130 | Center Support Assembly |

Install the two direct clutch cast iron seal rings to the center support assembly (removed earlier for clearance checks). Install the No. 6 thrust washer and center support assembly with the feed holes in the 6 o'clock position. Loosely install two new feedbolts; do not tighten them at this time.
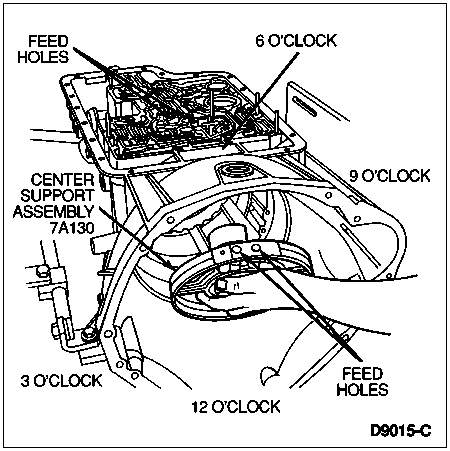
NOTE: Locate one spring leg pointing toward the 6 o'clock position of the transmission.
Install the intermediate clutch return spring with the dished surface inward.

![]() CAUTION: Do not misalign the intermediate/overdrive cylinder assembly when installing.
CAUTION: Do not misalign the intermediate/overdrive cylinder assembly when installing.
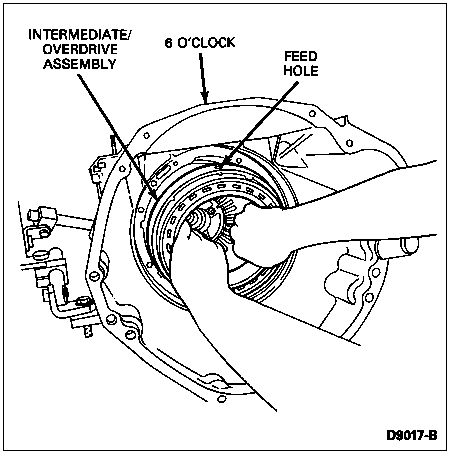
Install the intermediate/overdrive cylinder assembly into the case with the feed hole in the 6 o'clock position, aligning with the feed hole in the case.
Position the retaining ring over the intermediate/overdrive cylinder assembly so the snap ring opening is at the bottom (6 o'clock position) of the case for proper fluid drainback.

NOTE: No stack-up clearance measurement is required.
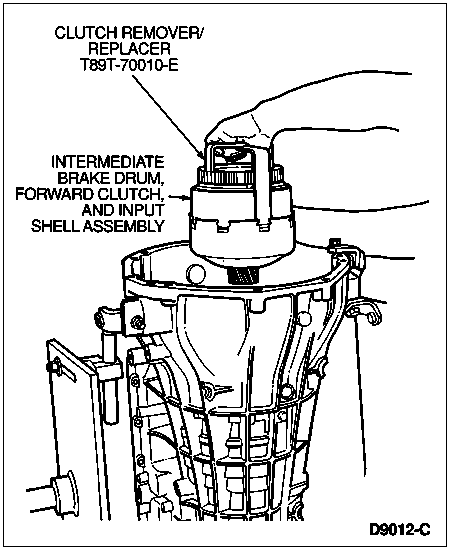
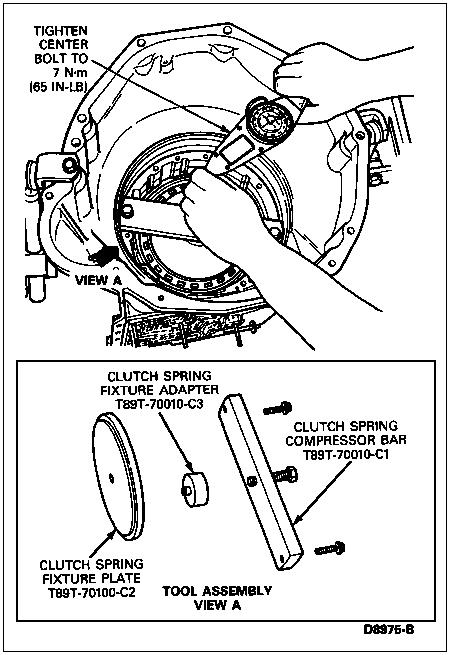
Install Clutch Spring Fixture T89T-70010-C onto the intermediate/overdrive cylinder assembly. Using two bolts, attach the tool to the pump face of the case. Tighten the center bolt to 7 Nm (65 lb-in). Seat the intermediate/overdrive cylinder retaining snap ring into the case ring groove. Loosely install one new intermediate/overdrive cylinder feed bolt.
![]() CAUTION: The input shaft and the overdrive planet assembly are serviced as mating components.
CAUTION: The input shaft and the overdrive planet assembly are serviced as mating components.
NOTE: Make sure that needle bearing assembly (No. 5) is on the rear face of the center shaft.
Install the center shaft, overdrive ring gear, planet gear overdrive carrier, and coast clutch cylinder as an assembly.

NOTE: The number of plates in the clutch pack is model-dependent.
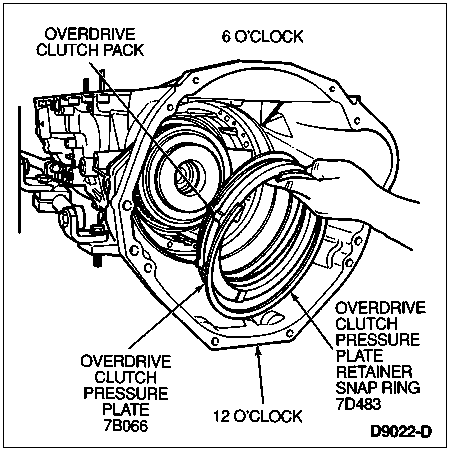
Soak all friction plates in clean Mercon® Multi-purpose Automatic Transmission Fluid XT-2-QDX (or Mercon® equivalent) for 15 minutes. Install the overdrive clutch pack, starting with a steel plate and alternating with friction plates. Install the overdrive clutch pressure plate with the dot facing outward and at the 12 o'clock position. Install the selective retaining ring with the opening at the 6 o'clock position.
Check the stack-up clearance in three positions, 120 degrees apart, using a feeler gauge. If it is not within specification, install the correct selective retaining ring and recheck.
| Selective Retaining Rings |
|---|
| 1.55-1.45 mm (0.061-0.057 inch) |
| 2.05-1.95 mm (0.081-0.077 inch) |
| 2.60-2.50 mm (0.102-0.098 inch) |
| 3.10-3.00 mm (0.122-0.118 inch) |
| 3.60-3.50 mm (0.142-0.138 inch) |
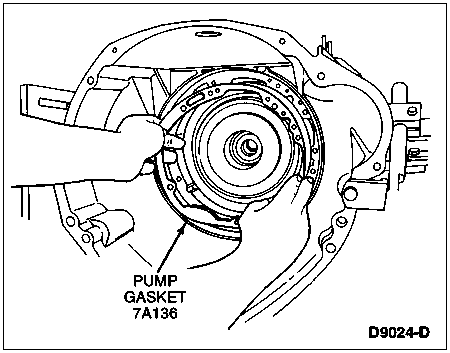
Align the holes and install a new pump gasket into the case.
![]() CAUTION: The input shaft and the overdrive planet assembly are serviced as mating components.
CAUTION: The input shaft and the overdrive planet assembly are serviced as mating components.
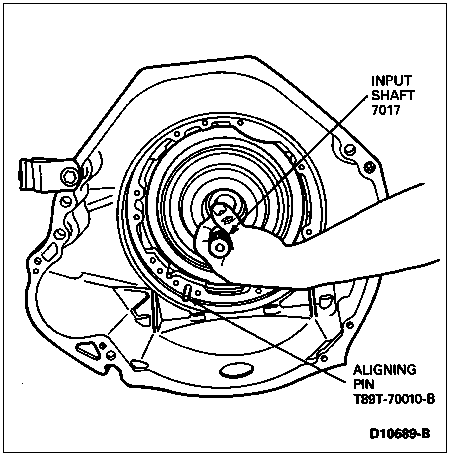
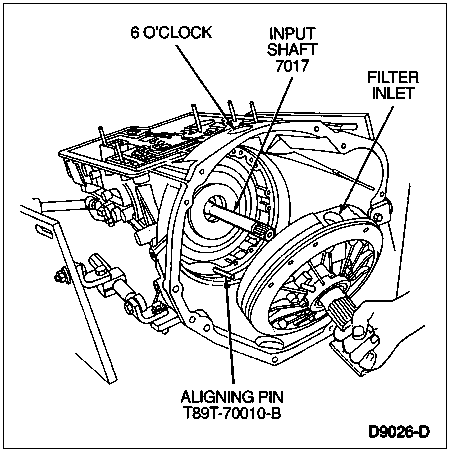
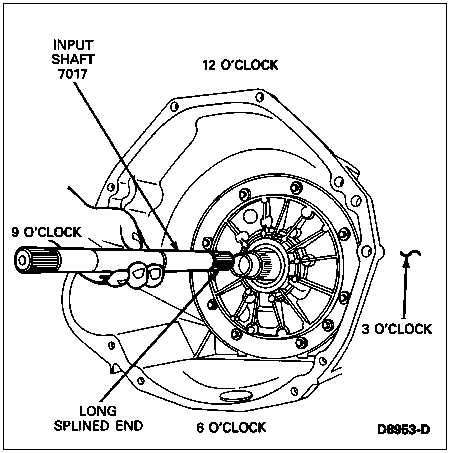
Install the input shaft (long splined end first) and thread Aligning Pin T89T-70010-B into the case.
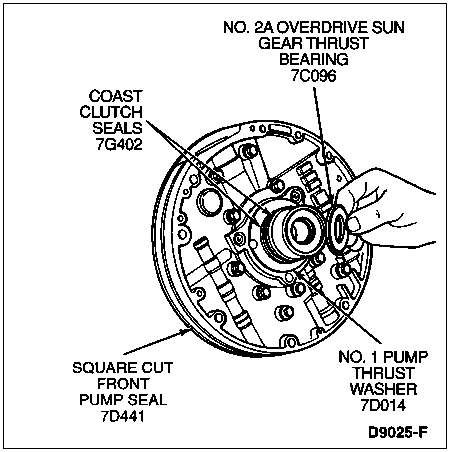
Make sure the No. 1 pump thrust washer and No. 2A overdrive sun gear thrust bearing are in place, using petroleum jelly, before installing the pump.
Lube the case and install the front pump assembly into the case. Orient the filter inlet tube bore toward the 6 o'clock position. Fully seat the front pump assembly, using hand pressure only. Do not use bolts to draw the front pump assembly into the case.
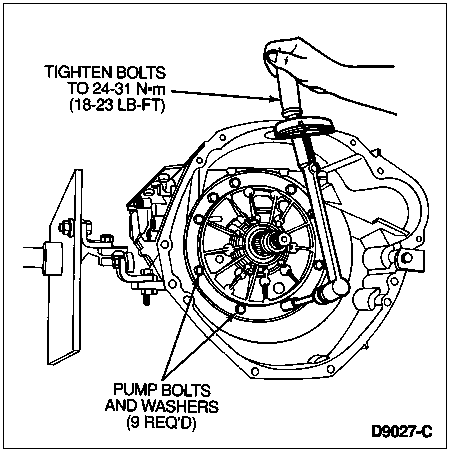
![]() CAUTION: Alternately tighten the pump bolts to avoid possible damage.
CAUTION: Alternately tighten the pump bolts to avoid possible damage.
Remove the old rubber coated washers from nine pump-to-case bolts. Install nine new pump bolt washers. Remove Aligning Pin T89T-70010-B. Install nine pump bolts. Alternately tighten the bolts to 27 Nm (20 lb-ft).
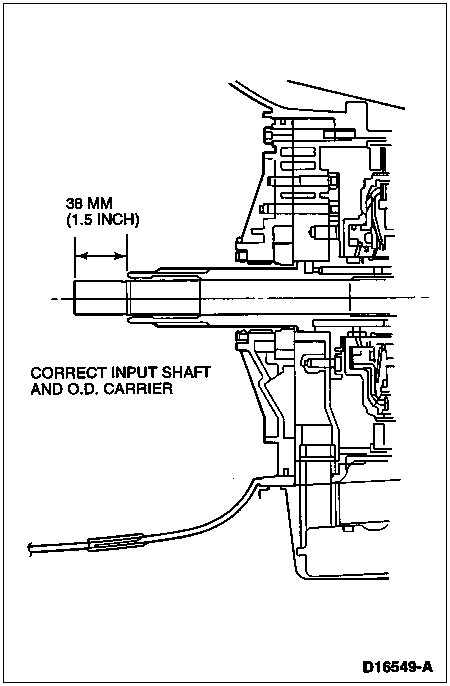
NOTE: The input shaft must extend 38 mm (5 inch) past the end of the pump stator.
If serviced, verify that the correct input shaft and overdrive planet assembly were used. Remove the input shaft.
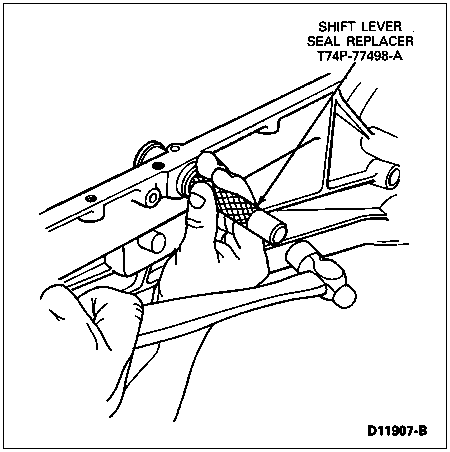
Rotate the transmission so the pan rail is facing up. Install the manual control lever seal using Shift Lever Seal Replacer T74P-77498-A.
Install the manual control valve detent lever spring and retaining bolt. Tighten the bolt to 10 Nm (89 lb-in).
Install the manual control lever shaft. Install the manual lever shaft retaining pin past the case surface. Install the transmission range (TR) sensor. Loosely install two retaining bolts and washers.
NOTE: The manual valve detent lever must be seated on the flats of the manual control lever shaft, and the parking lever actuating rod must be through the guide plate.
Install the manual valve detent lever. Install the parking lever actuating rod and nut.
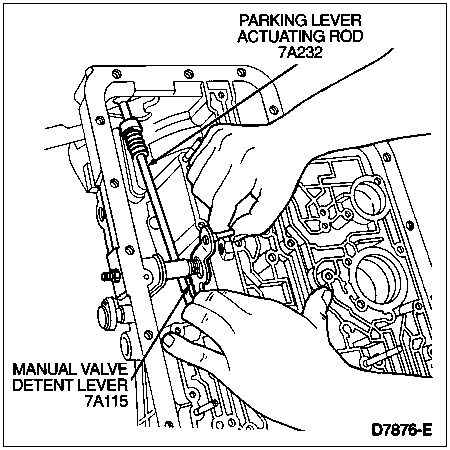
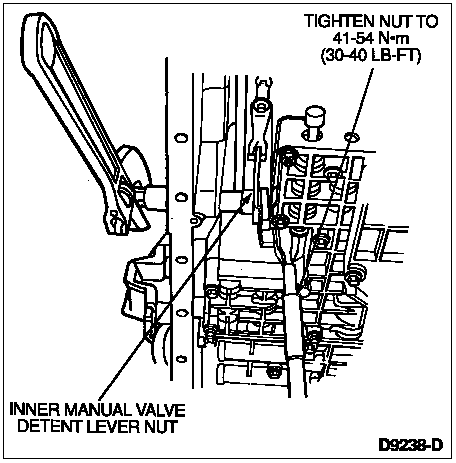
Tighten the inner manual valve detent lever nut, while holding the manual control lever shaft, to 47 Nm (35 lb-ft).
Shift the manual valve detent lever to all detent positions, to check proper engagement of all the positions and the parking mechanism. Align the transmission range (TR) sensor for the neutral gear position, using MLPS Alignment Tool T92P-70010-AH. Tighten the bolts to 7 Nm (62 lb-in).
![]() CAUTION: A new outer manual control lever shaft nut must be used to properly secure the outer manual control lever to the manual control lever shaft.
CAUTION: A new outer manual control lever shaft nut must be used to properly secure the outer manual control lever to the manual control lever shaft.
NOTE: The outer manual control lever must face up and the pin away from the transmission.
Install the outer manual control lever onto the manual control lever shaft. Install a new outer manual control lever shaft nut, while holding the outer manual control lever. Tighten the nut to 33 Nm (24 lb-ft) (cable system only).
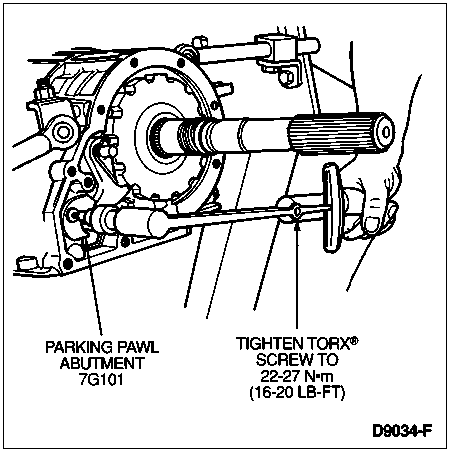
Install the parking pawl abutment with a new Torx(r) head screw (T40 bit). Tighten the screw to 22-27 Nm (16-20 lb-ft).
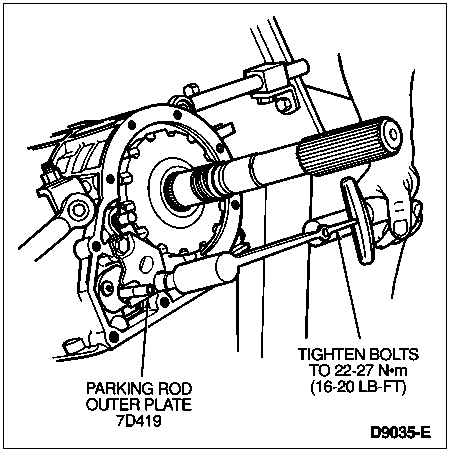
NOTE: The parking pawl return spring end rests on the inside surface of the case. Make sure the parking guide support plate dimple is facing inward and the parking lever actuating rod is in the parking rod support plate slot.
Install the parking pawl, parking pawl shaft, and parking pawl return spring on the rear face.

Install two parking rod guide plate bolts and washers. Tighten the bolts to 25 Nm (18 lb-ft).
Place a new extension housing gasket on the extension housing.
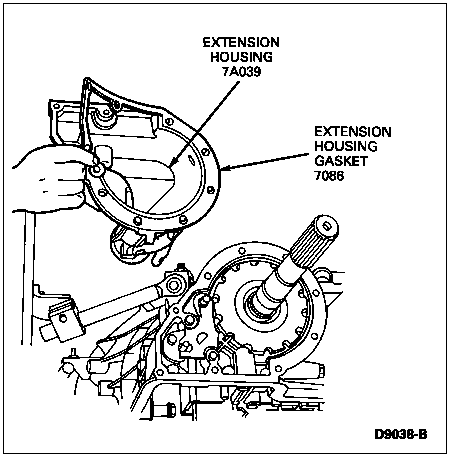
NOTE: The two bottom extension housing bolts are slightly shorter on 4x2 vehicles and slightly longer on 4x4 vehicles.
Install the extension housing and wiring bracket on the rear of the case (at approximately the 10 o'clock and 11 o'clock positions). Install nine bolts. Tighten the bolts to 33 Nm (24 lb-ft) for 4x2 vehicles or to 44 Nm (32 lb-ft) for 4x4 vehicles.

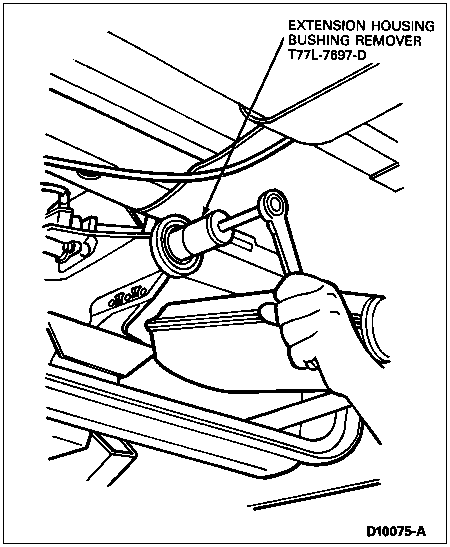
If necessary, remove the extension housing bushing using Extension Housing Bushing Remover T77L-7697-D.
Inspect the counter bore of the extension housing for burrs. If necessary, remove the burrs with an oil stone. Align the bushing in the extension housing.
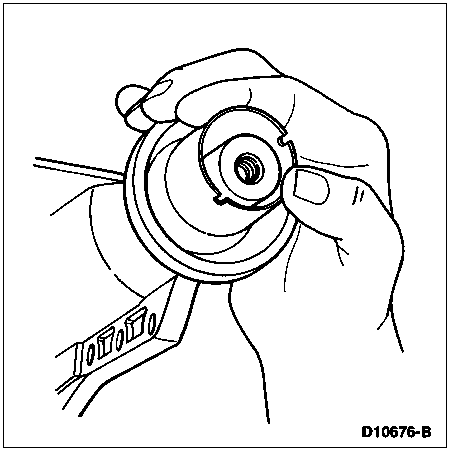
Install the extension housing bushing using Extension Housing Bushing Replacer T77L-7697-C.

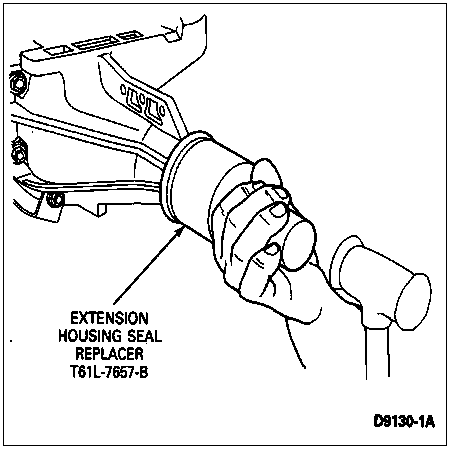
Install an extension housing seal, using Extension Housing Seal Replacer T61L-7657-B.
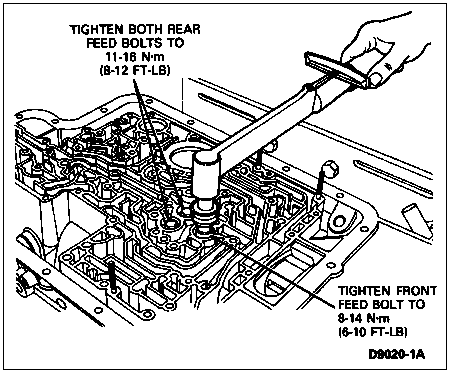
Tighten three feed bolts into the intermediate/overdrive cylinder and center support assembly. Tighten the front feed bolt to 11 Nm (8 lb-ft) and both rear feed bolts to 14 Nm (10 lb-ft).
![]() CAUTION: Always wear safety glasses when using compressed air.
CAUTION: Always wear safety glasses when using compressed air.
NOTE: A dull thud may be heard, or movement felt, when a clutch piston is applied. If a check ball or clutch seals are leaking, a hissing sound may be heard.
Apply air pressure to the appropriate clutch port. For additional information, refer to Air Pressure Test in this section under Diagnosis and Testing.
![]() CAUTION: Use care not to damage the rubber check balls.
CAUTION: Use care not to damage the rubber check balls.
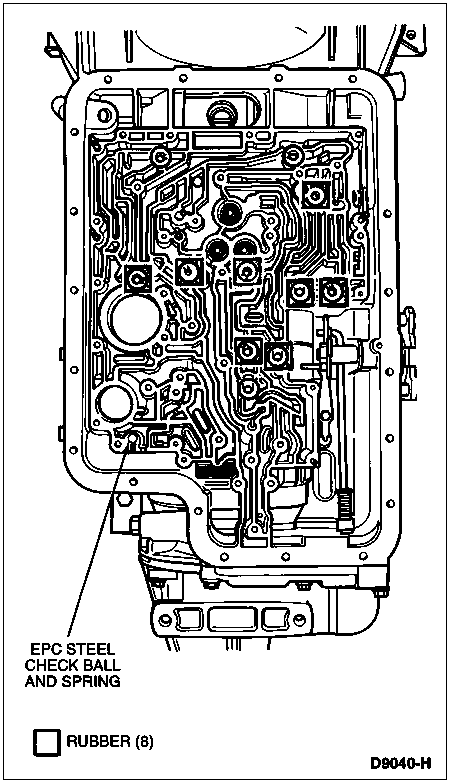
NOTE: The steel EPC check ball is 25-inch in diameter and is smaller than the rest.
Install the steel EPC check ball and spring assembly. Install eight rubber check balls.
Clean and inspect the separator plate and reinforcing plate.
NOTE: Check the placement of the steel EPC check ball.
Install a separator plate-to-case gasket and install the valve body separator plate.

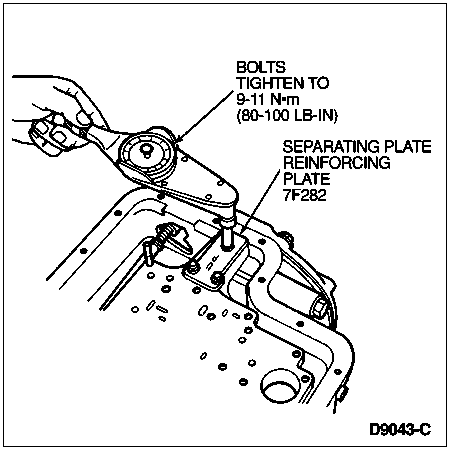
Install the separating plate reinforcing plate with the stamped word "UP" visible. Install three retaining bolts. Tighten the bolts to 10 Nm (89 lb-in).
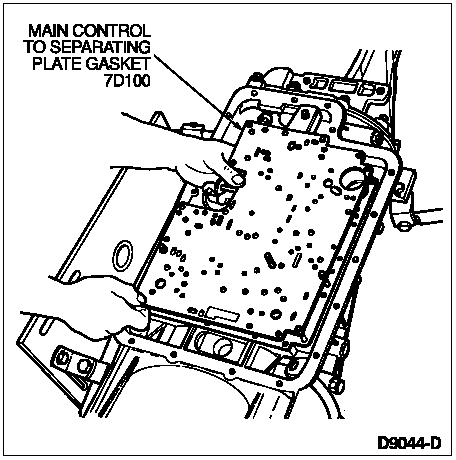
Install a main control-to-separating plate gasket.
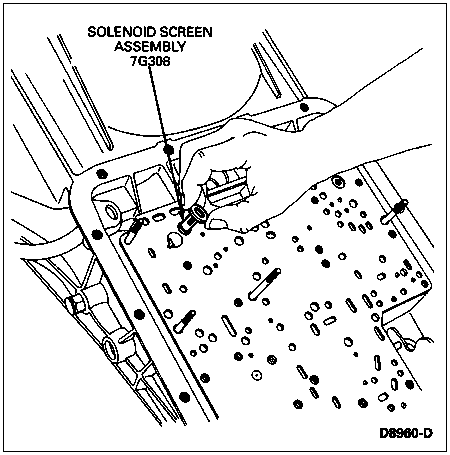
Install a new solenoid screen assembly into the separator plate by pushing in and rotating to lock.
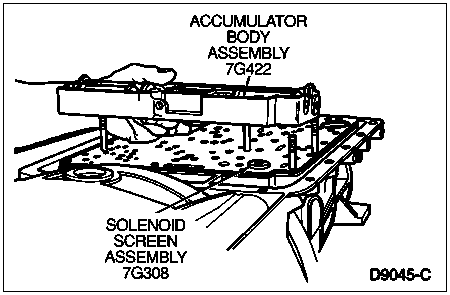
Install the accumulator body assembly. Install 2 nuts and 11 bolts finger-tight.
Lower the main control valve body over the studs. Align the manual shift valve with the manual valve detent lever. Install 2 nuts and 14 bolts finger-tight.

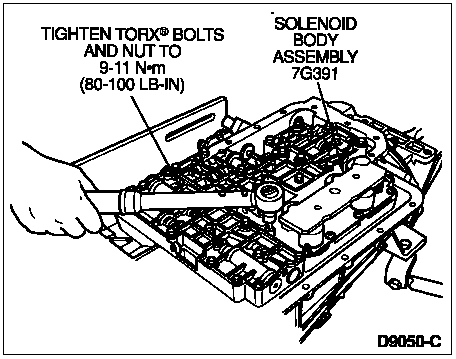
NOTE: Prior to installing the solenoid body assembly, coat the case connector bore with petroleum jelly (or equivalent).
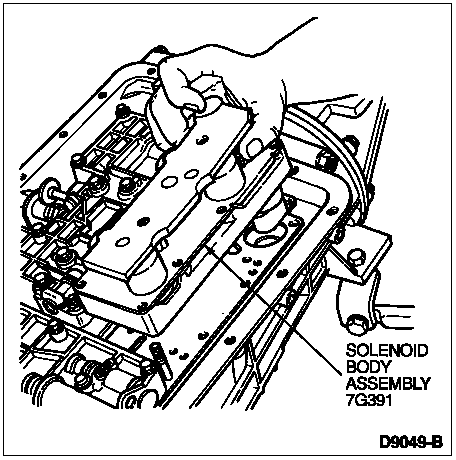
Install the solenoid body assembly over the stud. Install nine Torx(r) bolts and one nut finger-tight.
Starting in the middle and working outward, tighten all accumulator body, upper and lower control body, and solenoid body retainers (nuts, bolts, and T30 Torx(r) screws) to 10 Nm (89 lb-in).
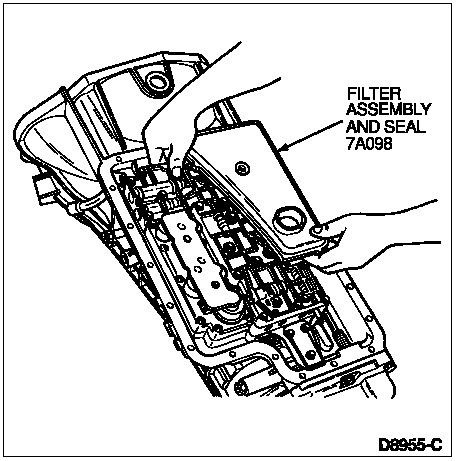
![]() CAUTION: Mixing 4x4 and 4x2 transmission fluid filters and transmission pan assembly components could cause transmission damage. Do not reuse the old filter assembly and seal.
CAUTION: Mixing 4x4 and 4x2 transmission fluid filters and transmission pan assembly components could cause transmission damage. Do not reuse the old filter assembly and seal.
Install a new filter assembly and seal by lubricating the seal with transmission fluid and pressing the filter into place.
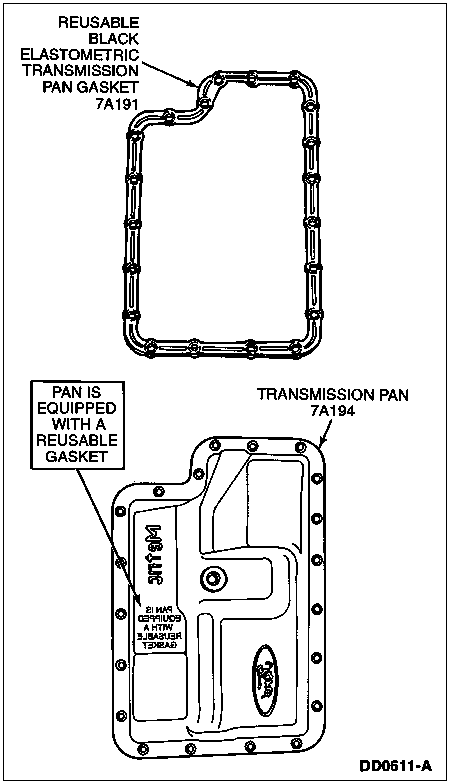
Clean the transmission pan gasket. Install the pan magnet on the dimple of the bottom of the pan.

![]() CAUTION: Cork gaskets and elastomeric gaskets are not interchangeable. If you remove a cork gasket, replace it with a cork gasket. If you remove an elastomeric gasket: clean, inspect, and reuse it unless the gasket is damaged. Be careful not to cut or bend an elastomeric gasket.
CAUTION: Cork gaskets and elastomeric gaskets are not interchangeable. If you remove a cork gasket, replace it with a cork gasket. If you remove an elastomeric gasket: clean, inspect, and reuse it unless the gasket is damaged. Be careful not to cut or bend an elastomeric gasket.
NOTE: A unique transmission pan and pan retaining bolts are required to use the new elastomeric gasket for past model service. The cork style gasket will be retained for past model service where a new transmission pan is not required. If the transmission pan is damaged and requires replacement, a kit will be available. The kit will contain a transmission pan, elastomeric gasket, and 20 pan bolts (having an increased thread length to accommodate current and past model usage).
Install a new pan-to-case gasket on the transmission.
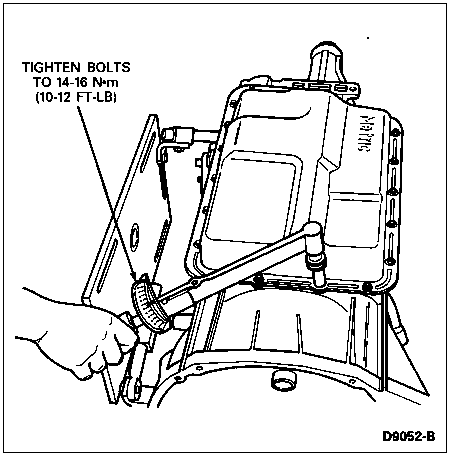
Install the pan and retaining bolts. Tighten the bolts to 15 Nm (11 lb-ft).
Install the transmission jack adapter plate to the transmission.
Rotate the transmission with the pan rail facing down. Install the input shaft, long splined end first.
Remove the transmission from the engine stand. Remove the engine stand brackets from the transmission.
Secure the transmission to a transmission jack.
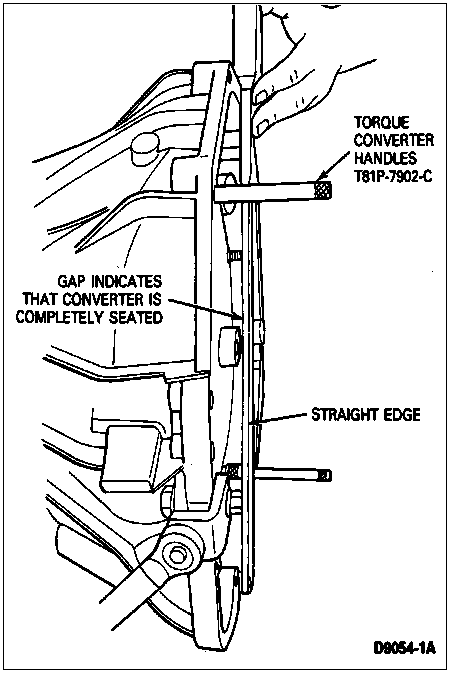
![]() CAUTION: Use care when installing the torque converter to avoid damage to the front pump support seal.
CAUTION: Use care when installing the torque converter to avoid damage to the front pump support seal.
NOTE: Check the converter crankshaft pilot for nicks or damaged surfaces that could cause interference when installing the transmission to the engine. Check the converter impeller hub for nicks or sharp edges that would damage the pump seal.
Install the torque converter, using Torque Converter Handles T81P-7902-C. Carry the torque converter with the handles in the 6 o'clock and 12 o'clock positions. Slightly lift up on the torque converter pilot and center the torque converter in the housing. Holding the torque converter by the pilot, push and rotate the converter onto the front pump assembly until it bottoms out. Check the seating of the converter.
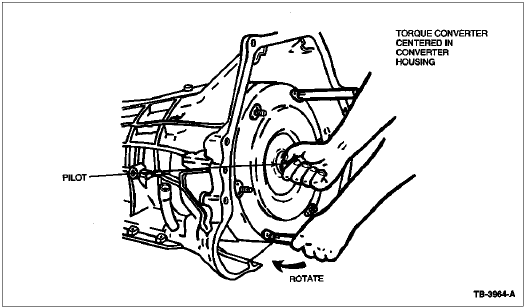
Lubricate the torque converter crankshaft pilot with Multi-Purpose Grease D0AZ-19584-A (or equivalent) meeting Ford specification ESA-M1C45A.