Place a drain pan under the transmission pan. Remove rear and side transmission pan bolts using a 10mm socket.

Section 07-01A: Transmission, Automatic, E4OD | 1996 All F-Series and Bronco with E4OD Automatic Transmission Workshop Manual |
| Description | Tool Number |
|---|---|
| Lock Nut Pin Remover | T78P-3504-N |
| Puller | T58L-101-B |
| Shift Lever Seal Replacer | T74P-77498-A |
| Transmission Range (TR) Sensor (MLPS) Alignment Tool | T92P-70010-AH |
Removal
Remove shift cable or linkage from manual control lever (7A256). Use a screwdriver and remove the cable and fitting from the manual control lever ball stud.
Place a drain pan under the transmission pan. Remove rear and side transmission pan bolts using a 10mm socket.

Loosen the front pan bolts using a 10mm socket. Lower the rear of the transmission pan from the case and allow fluid to drain.
Remove front pan bolts using a 10mm socket. Remove transmission pan.
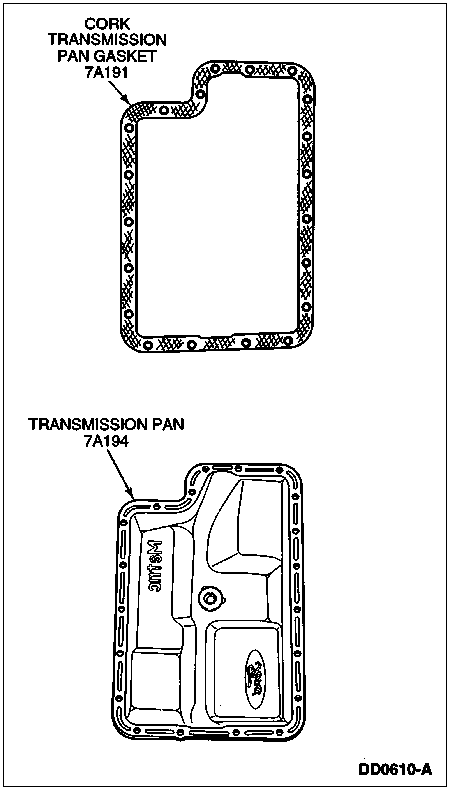
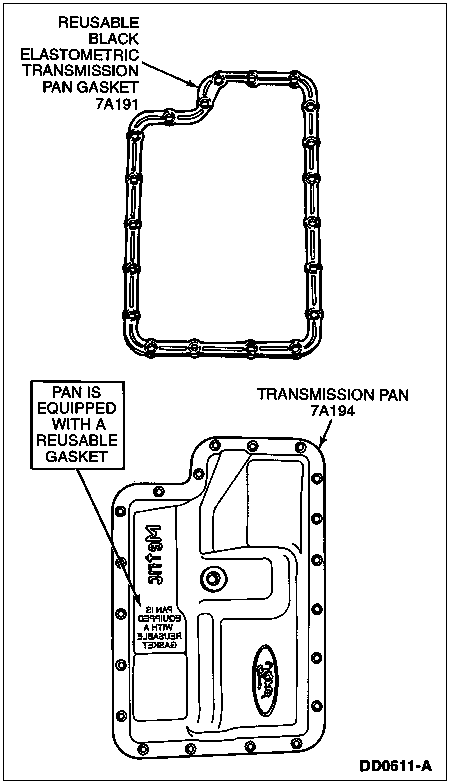
![]() CAUTION: Cork gaskets and elastomeric gaskets are not interchangeable. If you remove a cork gasket, replace it with a cork gasket. If you remove an elastomeric gasket, clean, inspect and reuse unless gasket is damaged. Be careful not to cut or bend elastomeric gasket.
CAUTION: Cork gaskets and elastomeric gaskets are not interchangeable. If you remove a cork gasket, replace it with a cork gasket. If you remove an elastomeric gasket, clean, inspect and reuse unless gasket is damaged. Be careful not to cut or bend elastomeric gasket.
Remove transmission pan gasket. If transmission is equipped with a cork gasket, discard it. If transmission is equipped with the new elastomeric reusable gasket, clean, inspect and reuse unless damaged.
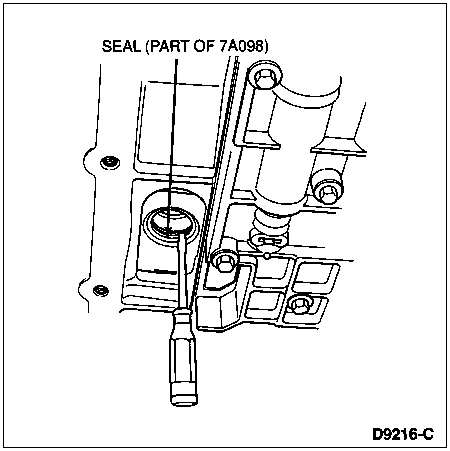
NOTE: Seal may remain in bore when filter assembly is removed.
Remove filter assembly and seal by carefully pulling and rotating filter as necessary. Discard filter assembly and seal.

![]() CAUTION: Use care not to scratch or damage aluminum pump bore.
CAUTION: Use care not to scratch or damage aluminum pump bore.
If seal remains in bore, carefully remove using a screwdriver.
![]() CAUTION: Do not damage any machined surfaces.
CAUTION: Do not damage any machined surfaces.
NOTE: A number 53 drill bit (1/16-inch) may be used as an alternative method to remove the manual lever shaft retaining pin (7B210).
Remove manual lever shaft retaining pin using Lock Nut Pin Remover T78P-3504-N.

Remove inner manual valve detent lever nut using a 21mm box wrench while holding manual lever assembly with a crescent wrench.
Remove manual valve detent lever and parking lever actuating rod assembly from manual control lever shaft (7C493).
Remove outer manual control lever shaft nut using a 15mm open end wrench while holding manual control lever with crescent wrench.
NOTE: After removal, discard outer manual control lever shaft nut. Do not reuse.
Remove manual control lever.
Disconnect transmission range (TR) sensor connector by squeezing connector tabs and pulling on connector. Check connector for terminal condition, corrosion and contamination. Check connector seal for damage. Repair or replace as required.
Remove two TR sensor bolts and washers using an 8mm socket and remove sensor.
Remove manual control lever shaft.
![]() CAUTION: Use care not to damage the manual control lever shaft bore.
CAUTION: Use care not to damage the manual control lever shaft bore.
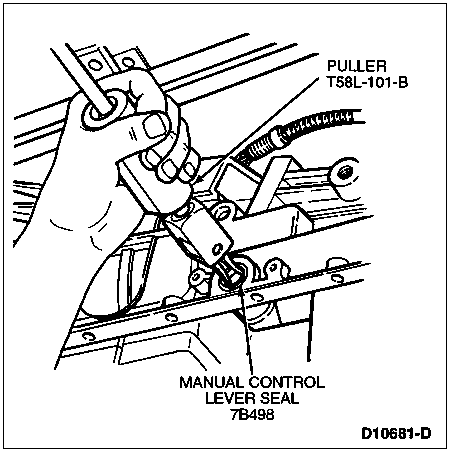
Remove manual control lever seal using Puller T58L-101-B.
Installation
Clean bore opening with mineral spirits. Install manual control lever seal using Shift Lever Seal Replacer T74P-77498-A.
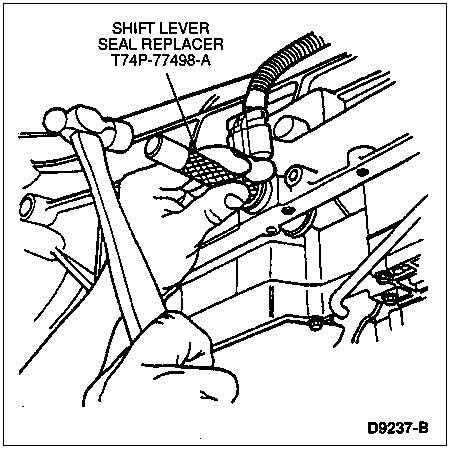
Install manual control lever shaft.
NOTE: Manual valve detent lever (7A115) must be seated on flats of manual control lever shaft. Parking lever actuating rod (7A232) must be through guide plate. Detent lever pin must be properly engaged with manual shift valve (7C389).
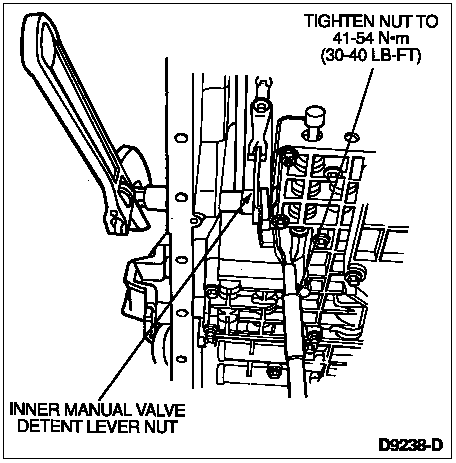
Install manual valve detent lever, parking lever actuating rod and nut.
Tighten inner manual valve detent lever nut using a 21mm crowfoot while holding manual control lever shaft with crescent wrench. Tighten nut to 41-54 Nm (30-40 lb-ft).
![]() CAUTION: Use care not to damage the transmission fluid pan sealing surface.
CAUTION: Use care not to damage the transmission fluid pan sealing surface.
Install manual lever shaft retaining pin past case surface.
Install TR sensor with two bolts and washers. Do not tighten bolts at this time.
Align transmission for neutral gear position using Transmission Range (TR) sensor (MLPS) Alignment Tool T92P-70010-AH.
![]() CAUTION: The TR sensor connector seal is located in the vehicle harness connector.
CAUTION: The TR sensor connector seal is located in the vehicle harness connector.
Using an 8mm socket, tighten bolts to 6-8 Nm (55-75 lb-in).
NOTE: After connecting TR sensor connector, verify connection by pulling on harness.
Install TR sensor harness connector. Audible click indicates full connection.
NOTE: The manual control lever must be seated on the flats of the manual control lever shaft.
Install the manual control lever onto the manual control lever shaft.
![]() CAUTION: A new outer manual control lever shaft nut must be used to properly secure manual control lever to manual control lever shaft.
CAUTION: A new outer manual control lever shaft nut must be used to properly secure manual control lever to manual control lever shaft.
Install a new outer manual control lever shaft nut using a 15mm socket while holding the manual control lever with a crescent wrench. Tighten the nut to 27-39 Nm (20-29 lb-ft).
Install shift cable onto the manual control lever. Use a screwdriver to press cable end fitting over transmission manual control lever ball stud.
Shift manual control lever to all detent positions to check proper engagement of all positions and parking mechanism.
![]() CAUTION: Mixing 4x4 and 4x2 transmission fluid filters and transmission pan assembly components could cause transmission damage.
CAUTION: Mixing 4x4 and 4x2 transmission fluid filters and transmission pan assembly components could cause transmission damage.
Select the appropriate style filter assembly and transmission pan for either 4x2 or 4x4 models.
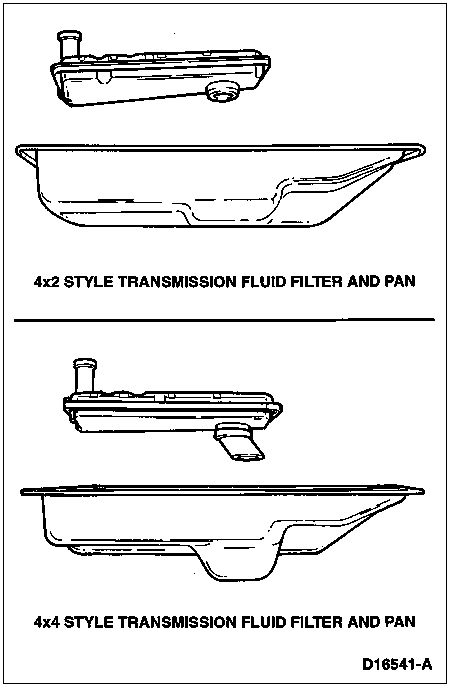
NOTE: Do not reuse old filter assembly or seal.
Install new filter assembly and seal by lubricating seal with transmission fluid and pressing filter into place.

Clean and check condition of transmission pan magnet. Position pan magnet over dimple in transmission pan.

![]() CAUTION: Cork gaskets and elastomeric gaskets are not interchangeable. If you remove a cork gasket, replace it with a cork gasket. If you remove an elastomeric gasket, clean, inspect and reuse unless gasket is damaged. Be careful not to cut or bend elastomeric gasket.
CAUTION: Cork gaskets and elastomeric gaskets are not interchangeable. If you remove a cork gasket, replace it with a cork gasket. If you remove an elastomeric gasket, clean, inspect and reuse unless gasket is damaged. Be careful not to cut or bend elastomeric gasket.
NOTE: A unique transmission pan and pan retaining bolts are required to use the new elastomeric gasket for past model service. The cork style gasket will be retained for past model service where a new transmission pan is not required. If the transmission pan is damaged and requires replacement, a kit will be available. This kit will contain a transmission pan, elastomeric gasket and 20 pan bolts having an increased thread length to accommodate current and past model usage.
If transmission is equipped with a cork gasket, discard it and install a new gasket. If transmission is equipped with the new elastomeric reusable gasket, clean, inspect and reuse unless damaged.


Install transmission pan and bolts using a 10mm socket. Tighten bolts to 14-16 Nm (10-12 lb-ft).
Remove safety stands and lower vehicle.
Fill the transmission to proper level with Motorcraft MERCON® Multi-Purpose Automatic Transmission Fluid XT-2-QDX or MERCON® equivalent.
Check shift cable adjustment. Refer to Section 07-05.