Section 07-01A: Transmission, Automatic, E4OD | 1996 All F-Series and Bronco with E4OD Automatic Transmission Workshop Manual |
External Sealing
The E4OD transmission has the following parts to prevent external fluid leakage:

| Item | Part Number | Description |
|---|---|---|
| 1 | 7902 | Converter Assembly |
| 2 | 87650-S2 | Converter Drain Plug |
| 3 | 7L323 | Front Pump Support Seal |
| 4 | 7A248 | Front Pump Seal Assembly |
| 5 | 7D441 | Front Pump Square Cut O.D. Seal |
| 6 | N805260-S | Bolt and Washer Assembly |
| 7 | 7G379 | Washer |
| 8 | 7A136 | Pump Gasket |
| 9 | 7A020 | Fluid Level Indicator |
| 10 | 7A228 | Fluid Filler Tube Assembly |
| 11 | 391308-S | Filler Tube O-Ring |
| 12 | 7N463 | Short Fluid Inlet Tube Assembly |
| 13 | 7005 | Case |
| 14 | 7034 | Vent Assembly |
| 15 | 7D273 | Fluid Tube Inlet Connector |
| 16 | 7D174 | Converter Drain Back Check Valve Assembly — Rear |
| 17 | 7086 | Extension Housing Gasket |
| 18 | 7A039 | Extension Housing (4x2) |
| 19 | 7052 | Extension Housing Seal |
| 20 | 7A039 | Extension Housing (4x4) |
| 21 | 7H183 | Extension Housing Plug |
| 22 | 7B498 | Manual Control Lever Oil Seal |
| 23 | 7G391 | Solenoid Valve Body Assembly |
| 24 | 7A191 | Transmission Pan Gasket |
| 25 | 7A194 | Transmission Pan (4x2) |
![]() CAUTION: Cork gaskets and elastomeric gaskets are not interchangeable. If you remove a cork gasket, replace it with a cork gasket. If you remove an elastomeric gasket, clean, inspect and reuse unless gasket is damaged. Be careful not to cut or bend elastomeric gasket.
CAUTION: Cork gaskets and elastomeric gaskets are not interchangeable. If you remove a cork gasket, replace it with a cork gasket. If you remove an elastomeric gasket, clean, inspect and reuse unless gasket is damaged. Be careful not to cut or bend elastomeric gasket.
NOTE: A unique transmission pan and pan retaining bolts are required to use the new elastomeric gasket for past model service. The cork style gasket will be retained for past model service where a new transmission pan is not required. If the transmission pan is damaged and requires replacement, a kit will be available. This kit will contain a transmission pan, elastomeric gasket and 20 pan bolts having an increased thread length to accommodate current and past model usage.
If transmission is equipped with a cork gasket, discard it and install a new gasket. If transmission is equipped with the new elastomeric reusable gasket, clean, inspect and reuse unless damaged.
Leakage at the transmission pan to case gasket often can be stopped by tightening the attaching bolts to 14-16 Nm (10-12 lb-ft). Service the pan gasket as required.
Old Style Transmission Pan and Cork Transmission Pan Gasket
New Style Transmission Pan and Elastomeric Pan Gasket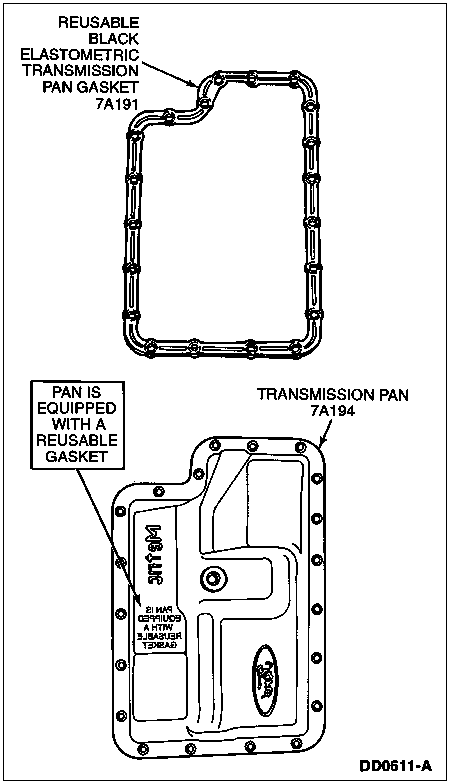
If leakage is found by the solenoid body connector, refer to Main Control Valve Body in the In-Vehicle Service portion of this section. Replace O-ring on the connector snout of the solenoid body assembly.
Check the transmission fluid filler tube connection at the transmission case. If leakage is found here, install a new short fluid inlet tube.
![]() CAUTION: Do not try to stop the fluid leak by increasing the torque beyond specification. This may cause damage to the case threads.
CAUTION: Do not try to stop the fluid leak by increasing the torque beyond specification. This may cause damage to the case threads.
Check the transmission fluid lines and fittings between the transmission and the fluid inlet short tube in the radiator tank for looseness, wear, or damage. If leakage cannot be stopped by tightening a fluid line tube nut, replace the damaged parts. When fluid is found to be leaking between the case and the cooler line fitting, tighten the fitting to maximum specification. Refer to Fluid Cooler Lines in the In-Vehicle Service portion of this section. If the leak continues, replace the cooler line fitting and tighten to specification. The same procedure should be followed for fluid leaks between the radiator cooler and cooler line fittings.
Check the engine coolant in the radiator (8005). If transmission fluid is present in the coolant, the transmission fluid cooler (7A095) in the radiator is probably leaking.
The transmission fluid cooler can be further checked for leaks by disconnecting the lines from the cooler fittings and applying no more than 345 kPa (50 psi) air pressure to the fittings. Remove the radiator cap (8100) to relieve the pressure buildup at the exterior of the fluid cooler tank. If the transmission fluid cooler is leaking and/or will not hold pressure, replace the transmission fluid cooler.
If leakage is found at the manual control lever shaft (7C493), replace the seal.
When a converter drain plug leaks, remove the drain plug. Install new drain plug. Tighten to 24-27 Nm (18-20 lb-ft).
Check for fluid leaking from the end of extension housing (7A039). Leakage may result from damaged seal, missing garter spring or worn extension bushing or damaged speedometer plug. Replace seal assembly and/or bushing as necessary.
Inspect the plugs for leakage. Ensure they are tightened to 8-16 Nm (6-12 lb-ft). If tightening does not stop the leak, replace the plug.
Using the old fluid cooler tube as a guide, bend the new fluid cooler tube as required. Add the necessary fittings and install the fluid cooler tube.
After the fittings have been tightened, add fluid as needed and check for fluid leaks.
Fluid Leakage in Torque Converter Area
In diagnosing and correcting fluid leaks in the torque converter (7902) area, use the following procedures to locate the exact cause of the leakage. Leakage at the front of the transmission as evidenced by fluid around the converter housing, may have several sources. By careful observation it is possible, in many instances, to pinpoint the source of the leak before removing the transmission from the vehicle. The paths that the fluid can take to reach the bottom of the converter housing are as shown in the following illustration. The following five steps correspond with the numbers in the illustration.
Torque Converter Area Leak Points
Fluid leaking by the torque converter impeller hub seal lip will tend to move along the converter impeller hub and onto the back of the impeller housing. Except in the case of a total seal failure, fluid leakage by the lip of the seal will be deposited on the inside of the converter housing only, near the outside diameter of the converter housing.
Fluid leakage by the outside diameter of the converter hub seal and the case will follow the same path which the leaks by the inside diameter of the seal follow.
Fluid leakage from the torque converter to the flywheel stud weld, drain plug, or seal weld will appear at the outer diameter of the torque converter on the back face of the flywheel (6375), and in the converter housing only near theflywheel. If a converter leak is suspected, remove torque converter and pressure check. Refer to Torque Converter Checks under Disassembly/Reassembly of Subassemblies in the Disassembly portion of this section.
Fluid leakage from the pump will flow down the back of the converter housing. Leakage may be from loose or missing pump bolts, torn or damaged pump-to-case gasket and/or a worn pump bushing.
Engine oil leaks are sometimes improperly diagnosed as transmission pump seal leaks. The following areas of possible leakage should also be checked to determine if engine oil leakage is causing the problem.
Leak Check Test
The following procedures should be used to determine the cause of the leakage before service is made.
Remove the fluid level indicator (7A020) and note the color of the fluid. Original factory fill fluid is dyed red to aid in determining if leakage is from the engine or transmission. Unless a considerable amount of makeup fluid has been added or the fluid has been changed, the red color should assist in pinpointing the leak.
Remove the converter housing cover. Clean off any fluid from the top and bottom of the converter housing, front of the transmission case, and rear face of the engine and pan. Clean the converter area by washing with suitable nonflammable solvent, and blow dry with compressed air.
Wash out converter housing and the front of the flywheel. The converter housing may be washed out using clean solvent and a squirt-type oil can. Blow all washed areas dry with compressed air.
Start and run the engine until the transmission reaches its normal operating temperature. Observe the back of the block and top of the converter housing for evidence of fluid leakage. Raise the vehicle on a hoist and position suitable safety stands under vehicle. Run the engine at fast idle, then at engine idle, occasionally shifting to the drive and reverse ranges to increase pressure within the transmission. Observe the front of the flywheel, back of the block (in as far as possible), and inside the converter housing and front of the transmission case. Run the engine until fluid leakage is evident and the probable source of leakage can be determined.
When a converter drain plug leaks, remove drain plug. Install new drain plug. Tighten to 24-27 Nm (18-20 lb-ft).
Leak Check Test with Black Light
Oil soluble aniline or fluorescent dyes premixed at the rate of 2.5ml (1/2 teaspoon) of dye powder to 0.24L (0.5 pint) of automatic transmission fluid have proven helpful in locating the source of fluid leakage. Such dyes may be used to determine whether an engine fluid or transmission fluid leak is present, or if the fluid in the transmission fluid cooler hose leaks into the engine coolant system. An ultraviolet light must be used to detect the fluorescent dye solution.