Disconnect the electrical connector from the low vacuum indicator switch.
Low Vacuum Indicator Switch
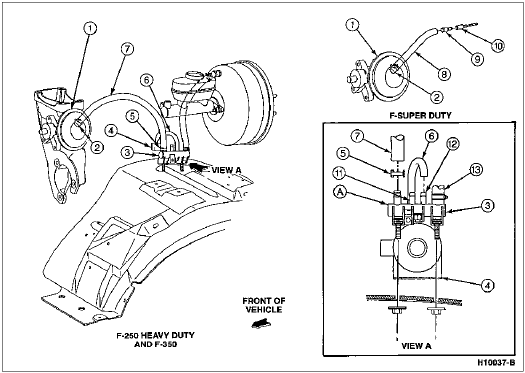
| Item | Part Number | Description |
|---|---|---|
| 1 | 2A451 | Vacuum Pump |
| 2 | 382984-S100 | Clamp |
| 3 | 9C490 | Vacuum Outlet Manifold |
| 4 | 12A182 | Low Vacuum Indicator Switch |
| 5 | 382984-S100 | Clamp |
| 6 | 381377-S080A | Vacuum Tube |
| 7 | 381298-SX11A | Vacuum Pump-to-Vacuum Outlet Manifold Hose |
| 8 | 381298-SX16A | Vacuum Pump-to-Vacuum Outlet Manifold Hose |
| 9 | 9K319 | Evaporative Emission Hose Connector |
| 10 | 19C827 | Vacuum Hose Harness |
| 11 | — | Climate Control Line Port (Part of 9C490) |
| 12 | — | Low Vacuum Indicator Switch Port (Part of 9C490) |
| 13 | — | To Power Brake Booster |
| A | — | White End Points Towards Front of Vehicle |