Section 06-06: Brake System, Hydraulic | 1996 F-150, F-250, F-350, Bronco and F-Super Duty Workshop Manual |
![]() WARNING: BRAKE FLUID CONTAINS POLYGLYCOL ETHERS AND POLYGLYCOLS. AVOID CONTACT WITH EYES. WASH HANDS THOROUGHLY AFTER HANDLING. IF BRAKE FLUID CONTACTS EYES, FLUSH EYES WITH RUNNING WATER FOR 15 MINUTES. GET MEDICAL ATTENTION IF IRRITATION PERSISTS. IF TAKEN INTERNALLY, DRINK WATER AND INDUCE VOMITING. GET MEDICAL ATTENTION IMMEDIATELY.
WARNING: BRAKE FLUID CONTAINS POLYGLYCOL ETHERS AND POLYGLYCOLS. AVOID CONTACT WITH EYES. WASH HANDS THOROUGHLY AFTER HANDLING. IF BRAKE FLUID CONTACTS EYES, FLUSH EYES WITH RUNNING WATER FOR 15 MINUTES. GET MEDICAL ATTENTION IF IRRITATION PERSISTS. IF TAKEN INTERNALLY, DRINK WATER AND INDUCE VOMITING. GET MEDICAL ATTENTION IMMEDIATELY.
NOTE: When any part of the hydraulic system has been disconnected for repair or replacement, air may get into the lines and cause spongy brake pedal action. This requires the bleeding of the hydraulic system after it has been properly connected so all air is expelled from the brake cylinders and lines. The hydraulic system can be bled manually or with pressure bleeding equipment Rotunda Brake Bleeder 104-00064 or equivalent.
Ford High-Performance DOT 3 Brake Fluid C6AZ-19542-AA or -BA or equivalent DOT 3 fluid meeting Ford specification ESA-M6C25-A must be used in the brake system.
Never use brake fluid that has been drained from the hydraulic system or that has been standing in an open container for an extended period of time.
Brake Master Cylinder Bleeding, Bench
![]() WARNING: BRAKE FLUID CONTAINS POLYGLYCOL ETHERS AND POLYGLYCOLS. AVOID CONTACT WITH EYES. WASH HANDS THOROUGHLY AFTER HANDLING. IF BRAKE FLUID CONTACTS EYES, FLUSH EYES WITH RUNNING WATER FOR 15 MINUTES. GET MEDICAL ATTENTION IF IRRITATION PERSISTS. IF TAKEN INTERNALLY, DRINK WATER AND INDUCE VOMITING. GET MEDICAL ATTENTION IMMEDIATELY.
WARNING: BRAKE FLUID CONTAINS POLYGLYCOL ETHERS AND POLYGLYCOLS. AVOID CONTACT WITH EYES. WASH HANDS THOROUGHLY AFTER HANDLING. IF BRAKE FLUID CONTACTS EYES, FLUSH EYES WITH RUNNING WATER FOR 15 MINUTES. GET MEDICAL ATTENTION IF IRRITATION PERSISTS. IF TAKEN INTERNALLY, DRINK WATER AND INDUCE VOMITING. GET MEDICAL ATTENTION IMMEDIATELY.
Support the brake master cylinder body in a vise, and fill both fluid brake master cylinder reservoirs with Ford High-Performance DOT 3 Brake Fluid C6AZ-19542-AA or -BA or equivalent DOT 3 fluid meeting Ford specification ESA-M6C25-A.
Install plugs in the front and rear brake outlet ports. Bleed the front brake system first.
Loosen the plug in the front brake outlet port. Depress the primary piston slowly to force the air out of the brake master cylinder (2140).
Tighten plug while piston is depressed or air will enter the brake master cylinder.
Repeat this procedure until air ceases to exit at the outlet port.
Repeat Steps 3, 4 and 5, for the rear brake outlet port with the front brake outlet plugged.
Tighten the plugs and try to depress the piston. The piston will not depress if all air bubbles are out of the brake system.
Install the brake master cylinder filler cap (2162).
Install the brake master cylinder in the vehicle and perform Pressure Bleeding procedure in this section.
Brake Master Cylinder Bleeding, On-Vehicle
When a brake master cylinder has been installed, or the brake system emptied or partially emptied, fluid may not flow from the wheel cylinder bleeder screws during normal bleeding. It may be necessary to prime the brake master cylinder using the following procedure.
Use a tubing wrench to remove the front brake tube (2264) and the brake master cylinder outlet rear tube from the brake master cylinder.
Install short brake tubes in the brake master cylinder and position them so that they curve into the brake master cylinder reservoir, and the ends of the tubes are submerged in brake fluid.
Fill the brake master cylinder reservoir with new Ford High-Performance DOT 3 Brake Fluid C6AZ-19542-AA or -BA or equivalent DOT 3 fluid meeting Ford specification ESA-M6C25-A.
![]() CAUTION: Brake fluid is harmful to painted and plastic surfaces. If brake fluid is spilled onto a painted or plastic surface, immediately wash it with water.
CAUTION: Brake fluid is harmful to painted and plastic surfaces. If brake fluid is spilled onto a painted or plastic surface, immediately wash it with water.
Have an assistant pump the brakes until clear, bubble-free fluid flows from both brake tubes.
Remove the short brake tubes and reinstall the front brake tube and brake master cylinder outlet rear tube (2B253) on the brake master cylinder.
Bleed each brake tube at the brake master cylinder using the following procedure:
System Gravity Bleeding
If any of the brake tubes, disc brake calipers (2B120), or rear wheel cylinders (2261) have been removed, it may be helpful to prime the system by gravity bleeding. This should be done after the brake master cylinder is primed and bled.
Fill the brake master cylinder with new Heavy-Duty Brake Fluid C6AZ-19542-AA or -BA or equivalent DOT 3 fluid meeting Ford specification ESA-M6C25-A.
Loosen both of the wheel cylinder bleeder screws (2208) and leave them open until clear brake fluid flows. Be sure to check the brake master cylinder reservoir (2K478) fluid level often and do not let it run dry.
Tighten the wheel cylinder bleeder screws to 7-9 Nm (62-80 lb-in).
One at a time, loosen the caliper bleeder screws. Leave the bleeder screws open until clear fluid flows. Check the fluid level often in the brake master cylinder reservoir and do not let it run dry.
Tighten the caliper bleeder screws to 17-24 Nm (13-18 lb-ft).
After the brake system has been primed, bleed the brake system at each wheel (1007).
Manual Bleeding
Dual Brake System Hydraulic Brake Master Cylinder
![]() WARNING: BRAKE FLUID CONTAINS POLYGLYCOL ETHERS AND POLYGLYCOLS. AVOID CONTACT WITH EYES. WASH HANDS THOROUGHLY AFTER HANDLING. IF BRAKE FLUID CONTACTS EYES, FLUSH WITH RUNNING WATER FOR 15 MINUTES. GET MEDICAL ATTENTION IF IRRITATION PERSISTS. IF TAKEN INTERNALLY, DRINK WATER AND INDUCE VOMITING. GET MEDICAL ATTENTION IMMEDIATELY.
WARNING: BRAKE FLUID CONTAINS POLYGLYCOL ETHERS AND POLYGLYCOLS. AVOID CONTACT WITH EYES. WASH HANDS THOROUGHLY AFTER HANDLING. IF BRAKE FLUID CONTACTS EYES, FLUSH WITH RUNNING WATER FOR 15 MINUTES. GET MEDICAL ATTENTION IF IRRITATION PERSISTS. IF TAKEN INTERNALLY, DRINK WATER AND INDUCE VOMITING. GET MEDICAL ATTENTION IMMEDIATELY.
![]() CAUTION: DO NOT allow the brake master cylinder reservoir to run dry during the bleeding operation. Keep the brake master cylinder reservoir filled with the specified brake fluid. Never reuse the brake fluid that has been drained from the hydraulic system.
CAUTION: DO NOT allow the brake master cylinder reservoir to run dry during the bleeding operation. Keep the brake master cylinder reservoir filled with the specified brake fluid. Never reuse the brake fluid that has been drained from the hydraulic system.
NOTE: Bleed the primary and secondary hydraulic brake systems separately.
If there is reason to believe air has entered the brake master cylinder, bleed as follows:
On the brake master cylinder reservoir, loosen the master cylinder-to-hydraulic line fittings.
Wrap a shop cloth around the tubing below the fitting to absorb escaping brake fluid.
Push the brake pedal down slowly to the floor of the cab. This will force air trapped in the brake master cylinder to escape at the fitting.
Hold the brake pedal down and tighten the fitting. Release the brake pedal. Do not release the brake pedal until the fitting is tightened or air will re-enter the brake master cylinder.
Repeat this procedure until air ceases to escape at the fitting.
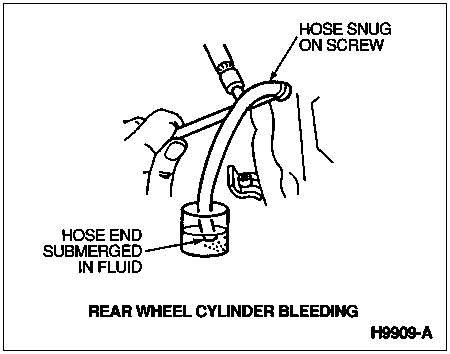
Place a box wrench on the RH wheel cylinder bleeder screw. Attach a rubber drain tube to the wheel cylinder bleeder screw making sure the end of the tube fits snugly around the wheel cylinder bleeder screw.
Submerge the free end of the tube in a container partially filled with clean brake fluid. Loosen the wheel cylinder bleeder screw approximately three-quarters of a turn.
Slowly push the brake pedal all the way down. Close the wheel cylinder bleeder screw, and return the brake pedal to the fully-released position. Repeat this operation until air bubbles no longer appear at the submerged end of the bleeder tube.
When the fluid is completely free of air bubbles, close the wheel cylinder bleeder screw and remove the bleeder tube.
Repeat this procedure at the LH rear wheel cylinder. Refill the brake master cylinder reservoir as needed.
![]() CAUTION: Do not reuse brake fluid that has been bled from the system.
CAUTION: Do not reuse brake fluid that has been bled from the system.
Place a box wrench on the bleeder fitting on the rear anti-lock brake system (RABS) valve. Attach a rubber drain tube to the bleeder fitting making sure the end of the tube fits snugly around the bleeder fitting.
Submerge the free end of the tube in a container partially filled with clean brake fluid. Loosen the bleeder fitting approximately three-quarters of a turn.
Slowly press the brake pedal all the way down. Close the bleeder fitting, and return the brake pedal to the fully released position. Repeat this operation until air bubbles no longer appear at the submerged end of the bleeder tube.
When the fluid is completely free of air bubbles, close the bleeder fitting and remove the bleeder tube.
Bleed the front brakes starting with the right front brake and then the left front brake as described in Steps 6-10 of this procedure.
When the bleeding operation is complete, fill the brake master cylinder reservoir to the maximum level line.
Pressure Bleeding
![]() WARNING: BRAKE FLUID CONTAINS POLYGLYCOL ETHERS AND POLYGLYCOLS. AVOID CONTACT WITH EYES. WASH HANDS THOROUGHLY AFTER HANDLING. IF BRAKE FLUID CONTACTS EYES, FLUSH WITH RUNNING WATER FOR 15 MINUTES. GET MEDICAL ATTENTION IF IRRITATION PERSISTS. IF TAKEN INTERNALLY, DRINK WATER AND INDUCE VOMITING. GET MEDICAL ATTENTION IMMEDIATELY.
WARNING: BRAKE FLUID CONTAINS POLYGLYCOL ETHERS AND POLYGLYCOLS. AVOID CONTACT WITH EYES. WASH HANDS THOROUGHLY AFTER HANDLING. IF BRAKE FLUID CONTACTS EYES, FLUSH WITH RUNNING WATER FOR 15 MINUTES. GET MEDICAL ATTENTION IF IRRITATION PERSISTS. IF TAKEN INTERNALLY, DRINK WATER AND INDUCE VOMITING. GET MEDICAL ATTENTION IMMEDIATELY.
NOTE: Bleed the longest lines first. Be sure the bleeder tank contains enough specified brake fluid, Ford High-Performance DOT 3 Brake Fluid C6AZ-19542-AA or -BA or DOT 3 equivalent meeting Ford specification ESA-M6C25-A to complete the bleeding operation. Charge the tank with approximately 69-206 kPa (10-30 psi) of air pressure. Never exceed 345 kPa (50 psi) of pressure. Never re-use brake fluid that has been drained from the hydraulic system.
Clean all dirt from the brake master cylinder filler cap.
Remove brake master cylinder filler cap and fill the brake master cylinder reservoir with the specified brake fluid.
NOTE: Master cylinder pressure bleeder adapter tools are available from various manufacturers of pressure bleeding equipment. Follow the instructions of the manufacturer when installing the adapter.
Install pressure bleeder adapter Rotunda Brake Bleeder 104-00064 or equivalent to the brake master cylinder reservoir, and attach bleeder tank hose to fitting on adapter.
Place a 3/8-inch box wrench on RH wheel cylinder bleeder screw. Attach a bleeder tube snugly around wheel cylinder bleeder screw.
Open valve on bleeder tank to admit pressurized brake fluid to the brake master cylinder reservoir.
Submerge free end of tube in a partially filled container with clean brake fluid and loosen wheel cylinder bleeder screw.
When air bubbles no longer appear in the fluid at the submerged end of the bleeder tube, close the wheel cylinder bleeder screw and remove tube.
Continue bleeding rest of the system going in order from the LH rear wheel cylinder (2262), then proceed to the front RH disc brake caliper, ending with front LH front disc brake caliper (2B121).
When the bleeding operation is completed, close bleeder tank valve and remove the tank hose from adapter fitting.
Remove the pressure bleeder adapter tool.
Fill brake master cylinder reservoir to MAX fill level line indicated on reservoir.
Install brake master cylinder filler cap.
Anti-Lock Brake System Bleeding
| Description | Tool Number |
|---|---|
| Anti-Lock Brake Adapter (Bleeder Box) | T90P-50-ALA |
| Anti-Lock Brake Adapter (Jumper Cable) | T93T-50-ALA |
![]() CAUTION: Perform this procedure only if the Hydraulic Control Unit (HCU) has been replaced. Follow conventional bleed procedures if the HCU is not being replaced.
CAUTION: Perform this procedure only if the Hydraulic Control Unit (HCU) has been replaced. Follow conventional bleed procedures if the HCU is not being replaced.
Perform Pressure Bleeding procedure in this section.
Connect Anti-Lock Brake Adapter T90P-50-ALA (bleeder box) and Anti-Lock Brake Adapter T93T-50-ALA (jumper cable).
Press down on the brake pedal and depress the VALVES button on the bleeder box (brake pedal will fall).
Release the VALVES button and release the brake pedal.
Repeat Steps 3 and 4 once more.
Depress the MOTOR START button and let the pump motor run for one minute.
Perform Pressure Bleeding procedure in this section.
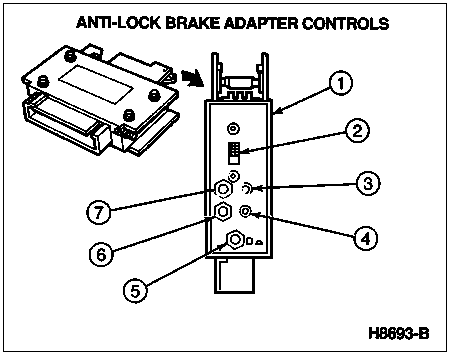
| Item | Part Number | Description |
|---|---|---|
| 1 | T90P-50-ALA | Anti-Lock Brake Adapter (Part of T90P-50-ALA) |
| 2 | — | Bleed/Harness Selector (Part of T90P-50-ALA) |
| 3 | — | Green MOTOR ON Lamp (Part of T90P-50-ALA) |
| 4 | — | Red MOTOR OFF Lamp (Part of T90P-50-ALA) |
| 5 | — | Valve Button (Part of T90P-50-ALA) |
| 6 | — | Abort Button (Part of T90P-50-ALA) |
| 7 | — | Motor Start Button (Part of T90P-50-ALA) |