Remove the cotter pin from the stud of the front suspension upper ball joint. Loosen retaining nuts of both the front suspension upper ball joint and the front suspension lower arm ball joint. Remove the top nut.
Section 05-03B: Axle, Front Drive, Dana Model 60 Monobeam | 1996 F-350 4x4 Workshop Manual |
| Description | Tool Number |
|---|---|
| Pitman Arm Puller | T64P-3590-F |
| U-Joint Tool | T74P-4635-C |
| Ball Joint Remover/Replacer | T92T-3010-A |
| 4WD Ball Joint Set (Includes Receiver Cup T80T-3010-A3) | T80T-3010-A |
| Ball Joint Remover/Replacer | T92T-3010-B |
Removal
NOTE: If replacing both or just the front suspension upper ball joint (3049), the front suspension lower arm ball joint (3050) must be removed first and installed last.
Raise the vehicle on a hoist and position suitable safety stands under the frame.
Remove the lug bolts (1107) and the wheel (1007) and tire.
Remove the disc brake caliper (2B120) as described in Section 06-03. Securely wire the disc brake caliper to the frame.
Remove the axle shaft and front wheel spindle (3105) as described under Axle Shaft in the Removal and Installation portion of this section.
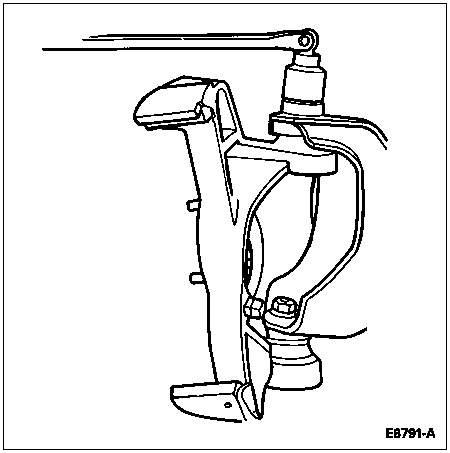
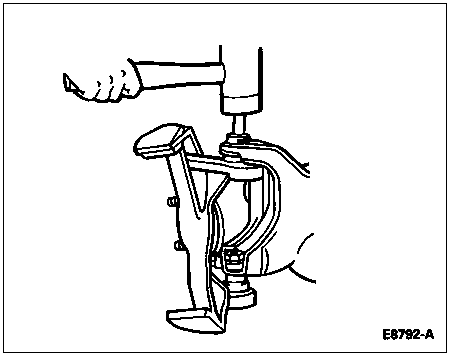
Disconnect the steering arm from the knuckle using Pitman Arm Puller T64P-3590-F.
Remove the cotter pin from the stud of the front suspension upper ball joint. Loosen retaining nuts of both the front suspension upper ball joint and the front suspension lower arm ball joint. Remove the top nut.
Using a rawhide or heavy-duty plastic hammer, hit sharply on the top stud to free the knuckle from the tube yoke. After the knuckle is free from the yoke, remove the lower nut and remove the knuckle from the tube yoke.
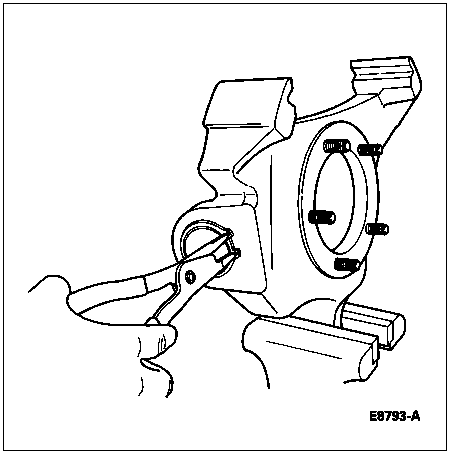
Secure the knuckle in a vise. Remove the snap ring from the front suspension lower arm ball joint.
Assemble U-Joint Tool T74P-4635-C and Ball Joint Remover/Replacer T92T-3010-A over the front suspension lower arm ball joint. Turn the forcing screw clockwise to remove the front suspension lower arm ball joint.
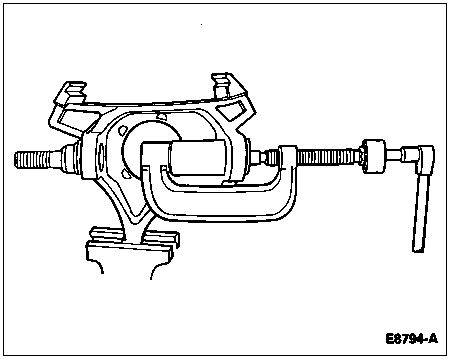
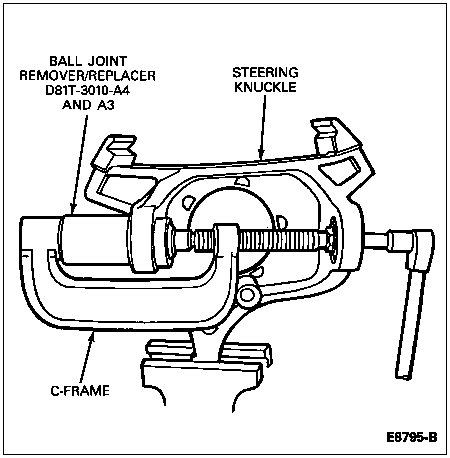
Assemble U-Joint Tool T74P-4635-C and Ball Joint Remover/Replacer D81T-3010-A4 and Ball Joint Remover/Replacer D81T-3010-A3 from Ball Joint Adapter Set D81T-3010-A or equivalents over the front suspension upper ball joint. Turn the forcing screw clockwise to remove the front suspension upper ball joint.
Installation
NOTE: The front suspension upper ball joint must be installed first.
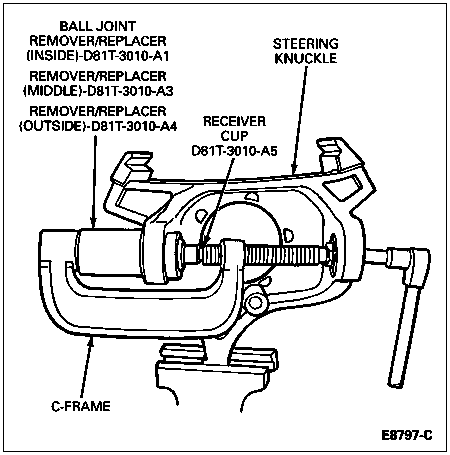
Position the front suspension upper ball joint along with U-Joint Tool T74P-4635-C and Receiver Cup D81T-3010-A5, Ball Joint Remover/Replacer Tools D81T-3010-A1, D81T-3010-A3 (part of Ball Joint Adapter Set D81T-3010-A) and D81T-3010-A4 or equivalents on the knuckle. Turn the forcing screw clockwise until the front suspension upper ball joint bottoms in the bore. Remove the tools.
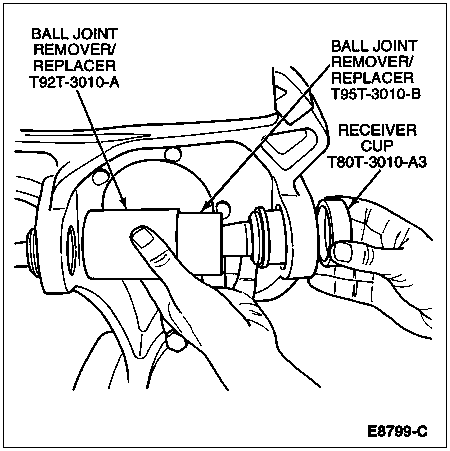
Position the front suspension lower arm ball joint and U-Joint Tool T74P-4635-C, Receiver Cup T80T-3010-A3, with Ball Joint Remover/Replacer T92T-3010-B inside of Ball Joint Remover/Replacer T92T-3010-A on the knuckle to force ball joint into position.
Turn the forcing screw clockwise until the front suspension lower arm ball joint bottoms in the bore. Remove the tools.

Install the snap ring on the front suspension lower arm ball joint.
Assemble the knuckle to the tube yoke. Install the camber bushing, if previously removed. Install the attaching nut of the front suspension upper ball joint. Do not tighten at this time.
Install the attaching nut of the front suspension lower arm ball joint.
![]() CAUTION: If these tightening procedures are not followed, life of the front suspension upper ball joint and front suspension lower arm ball joint will be reduced.
CAUTION: If these tightening procedures are not followed, life of the front suspension upper ball joint and front suspension lower arm ball joint will be reduced.
Tighten both attaching nuts as follows:
Assemble the front wheel spindle and axle shaft. Refer to Axle Shaft in the Removal and Installation portion of this section.
Install the disc brake caliper. Refer to Section 06-03.
Connect the steering arm (tie rod or connecting rod) to the steering knuckle. Tighten the attaching nut to 70-100 Nm (52-74 lb-ft).
Install the tire and wheel. Tighten the lug nuts (1012) to specifications. Refer to Section 04-04.
Remove the safety stands and lower the vehicle.