Remove the cotter pin from the stud of the front suspension upper ball joint (3049). Loosen the nut on the top stud and the bottom nut inside the steering knuckle. Remove the top nut.

Section 05-03A: Axle, Front Drive, Dana Models 44 and 50 | 1996 F-150, F-250 4x4 and Bronco Workshop Manual |
| Description | Tool Number |
|---|---|
| Pitman Arm Puller | T64P-3590-F |
| U-Joint Tool | T74P-4635-C |
| 4WD Ball Joint Tool Set | T80T-3010-A |
| Includes: | |
| Replacer | T80T-3010-A1 |
| Receiving Cup | T80T-3010-A2 |
| Receiving Cup | T80T-3010-A3 |
| Plug | T80T-3010-A4 |
Removal
Remove the front wheel spindle (3105) and the right and left shaft and joint assembly. Refer to Spindle, RH and LH Shaft and Joint Assembly in the Removal and Installation portion of this section.
Disconnect the steering linkage, if necessary, from the knuckle. Refer to Section 11-03.

| Item | Part Number | Description |
|---|---|---|
| 1 | 3B177 | Pivot Bushing |
| 2 | 3B403 | Axle Arm |
| 3 | 3050 | Front Suspension Lower Ball Joint |
| 4 | 3B440 | Camber Adjuster |
| 5 | 3049 | Front Suspension Upper Ball Joint |
| 6 | 3130 | Knuckle |
| 7 | 2K004 | Front Disc Brake Rotor Shield |
| 8 | 3105 | Front Wheel Spindle |
Remove the cotter pin from the stud of the front suspension upper ball joint (3049). Loosen the nut on the top stud and the bottom nut inside the steering knuckle. Remove the top nut.
Sharply hit the top stud with a plastic or rawhide hammer to free the knuckle from the axle arm. Remove and discard bottom nut. Use new nut upon assembly.
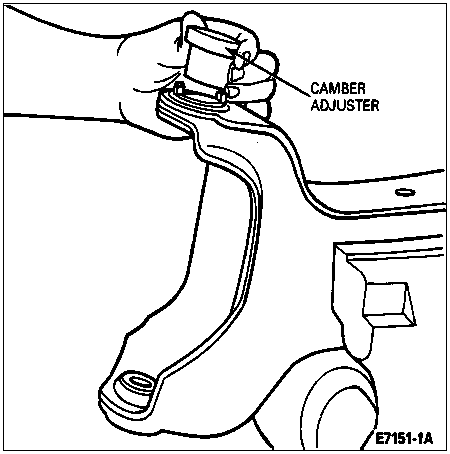
NOTE: Note the orientation of the camber adjuster to make sure of the same camber setting.
Remove camber adjuster by hand or if difficulty is encountered use Pitman Arm Puller T64P-3590-F.
Place steering knuckle in vise and remove snap ring from bottom ball joint socket if so equipped.
Remove plug from U-Joint Tool T74P-4635-C and replace with Plug T80T-3010-A4 (part of 4WD Ball Joint Tool Set T80T-3010-A).
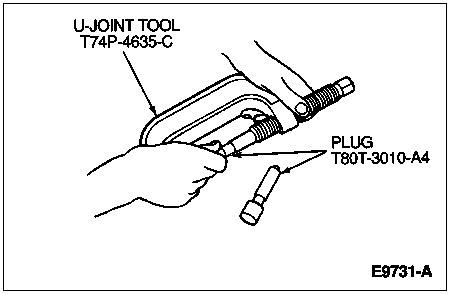
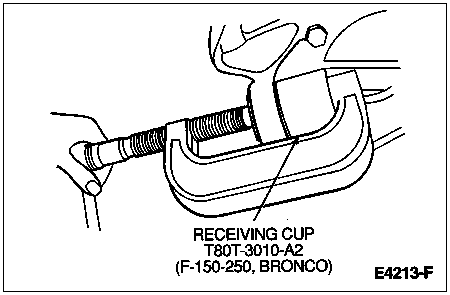
Assemble U-Joint Tool T74P-4635-C and Receiving Cup T80T-3010-A2 (part of 4WD Ball Joint Tool Set T80T-3010-A).
NOTE: Always remove front suspension lower ball joint first.
Turn forcing screw clockwise until front suspension lower ball joint is removed from steering knuckle.
Repeat procedure and remove front suspension upper ball joint.
Installation
Clean steering knuckle bore and insert front suspension lower ball joint as straight as possible.
NOTE: If ball joint cannot be installed to the proper depth, realignment of Receiving Cup T80T-3010-A3 will be necessary.
Assemble U-Joint Tool, Receiving Cup T80T-3010-A3 (part of 4WD Ball Joint Tool Set T80T-3010-A) and Installing Cup from Ball Joint Adapter Set D81T-3010-A or equivalent as shown to replace the front suspension lower ball joint.
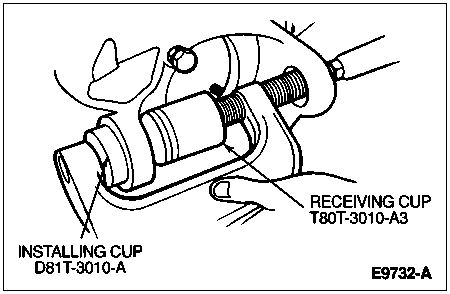
Turn forcing screw clockwise until front suspension lower ball joint is firmly seated.
Install the snap ring on the front suspension lower ball joint.
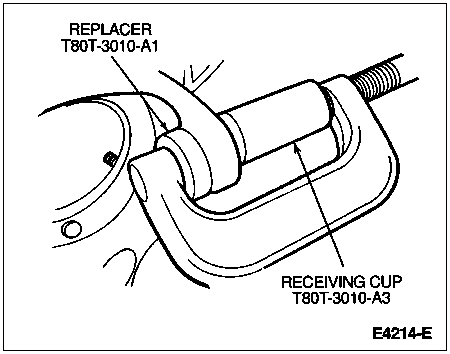
To install front suspension upper ball joint, assemble the C-Frame, Receiving Cup T80T-3010-A3 and Replacer T80T-3010-A1 (both part of 4WD Ball Joint Tool Set T80T-3010-A). Turn forcing screw clockwise until front suspension upper ball joint is firmly seated.
Assemble knuckle to axle arm assembly. Install camber adjuster on the stud of the front suspension upper ball joint with the arrow pointing outboard for positive camber, pointed inboard for negative camber.
Install new nut on bottom socket finger-tight. Install and tighten nut on top socket finger-tight. Tighten bottom nut to 47 Nm (35 lb-ft).
![]() CAUTION: If the tightening sequence is not followed in this step and Step 9, ball joint life will be reduced.
CAUTION: If the tightening sequence is not followed in this step and Step 9, ball joint life will be reduced.
NOTE: Do not loosen top nut to install cotter pin.
Tighten top nut to 136 Nm (100 lb-ft), then advance nut until castellation aligns with cotter pin hole. Install cotter pin.
Retighten bottom nut to 123-149 Nm (91-110 lb-ft).
Install the front wheel spindle and the right and left shaft and joint assembly as described in this section.