Section 05-02C: Differential, Limited Slip, Ford 10.25-Inch Ring Gear | 1996 F-250, F-350 Equipped with Ford 10.25-Inch Ring Gear Axle and Limited Slip Differential Workshop Manual |
Description | Tool Number |
---|---|
Limited Slip Differential Rotating Tool | T86T-4205-A |
Disassembly
Item | Part Number | Description |
---|---|---|
1 | 4A323 | Retainer Clips |
2 | 4211 | Differential Pinion Shaft |
3 | 4204 | Differential Case |
4 | 4236 | Differential Side Gear |
5 | 4241 | Differential Pinion Shaft Lock Pin |
6 | 4230 | Differential Pinion Thrust Washer |
7 | 4215 | Differential Pinion Gears |
8 | — | Dished Spacer (Part of 4880) |
9 | 4880 | Clutch Pack |
10 | — | Clutch Disc (Part of 4880) |
11 | — | Clutch Plate (Part of 4880) |
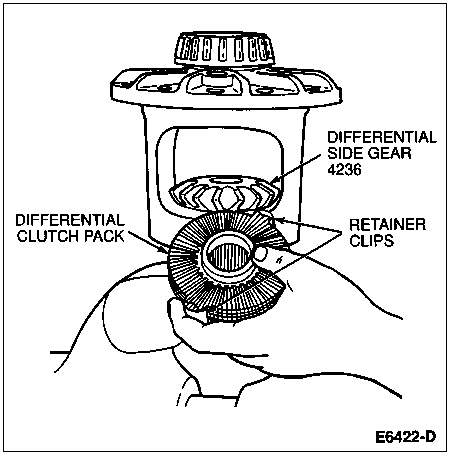
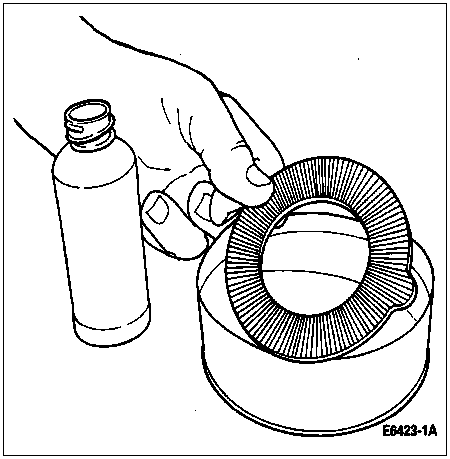
NOTE: The differential bearings (4221) need not be removed to overhaul the Ford limited slip differential. If bearing removal is required, refer to Differential Bearings in the Removal and Installation portion of this section.
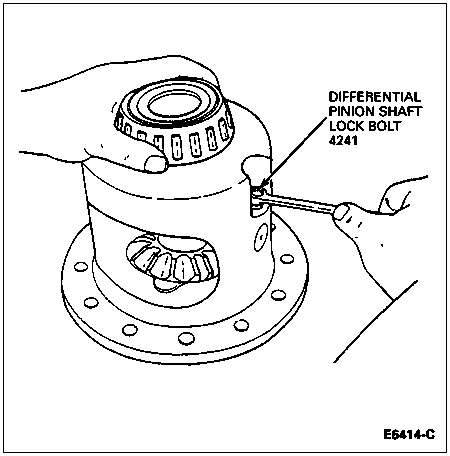
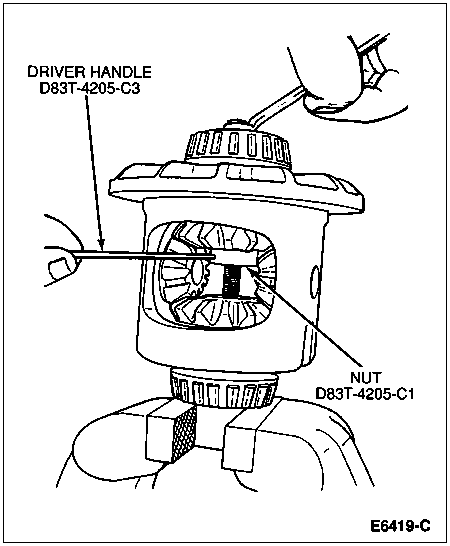
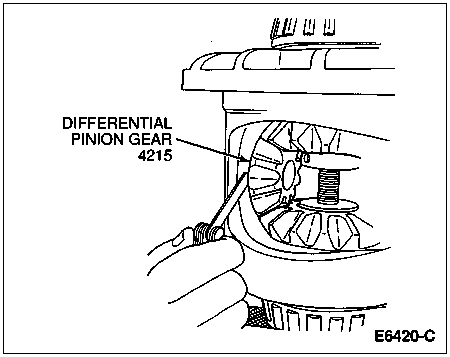
Remove the differential pinion shaft lock bolt.
Install Limited Slip Differential Tool D83T-4205-A or equivalent in a suitable vise. Install differential (4026) in the vise with the ring gear side facing up.
With a hammer and drift, drive the differential pinion shaft (4211) from the differential case (4204).
Install Step Plate D83T-4205-C2 (from D83T-4205-C) or equivalent in bottom side gear bore. Apply a small amount of grease to centering hole of the step plate.
Install nut in upper differential side gear (4236). Hold nut in position while installing hex screw. Tighten hex-head screw until contact is made with the step plate.
Insert dowel bar in hole of nut. Tighten forcing screw to force differential side gear away from the differential pinion gears (4215). The dowel bar is used to keep the nut from turning when the forcing screw is tightened.
With an appropriate size feeler gauge, push the differential pinion thrust washers (4230) out from between the pinion gears and the differential case. Remove the differential pinion thrust washers, then back off the forcing screw until it is loose (approximately one turn).
WARNING: KEEP FINGERS/HANDS AWAY FROM PINION GEARS WHEN ROTATING DIFFERENTIAL CASE WITH DIFFERENTIAL ROTATING TOOL.
Insert Limited Slip Differential Rotating Tool T86T-4205-A in the pinion shaft bore and turn the differential case to "walk" the differential pinion gears out to the differential case windows.
Remove the differential pinion gears.
Remove the forcing screw and step plates. Remove the differential side gears, retainer clips and differential clutch packs.
CAUTION: When separating the clutch plates and clutch discs, note the sequence in which they are disassembled. They must be reassembled in the same sequence.
Remove the retainer clips from both differential clutch packs to allow separation of the clutch discs and clutch plates for cleaning and inspection. Refer to the disassembled view of the limited slip differential case at the beginning of this procedure.
Assembly
Prelubricate each clutch disc and clutch plate with Additive Friction Modifier C8AZ-19B546-A or equivalent meeting Ford specification EST-M2C118-A.
Prelubricate the thrust face of the differential side gears. Assemble the clutch plates and clutch discs to the side gear splines in exactly the same sequence in which they were removed. Assemble the retainer clips to the ears of the clutch plates. Make sure both clips are completely assembled and seated onto the ears of the clutch plates.
Item | Part Number | Description |
---|---|---|
1 | 4236 | Differential Side Gear |
2 | — | Dished Spacer (Part of 4880) |
3 | — | Clutch Disc (Part of 4880) |
4 | — | Clutch Plate (Part of 4880) |
Install Limited Slip Differential Tool (holding tool) D83T-4205-A or equivalent in a suitable vise. Place differential case on holding tool with ring gear side facing up. Insert the differential clutch packs and differential side gears into the differential case. Make sure the differential clutch packs stay assembled to the side gear splines and that the retainer clips are completely seated in the pockets of the differential case. Hold the upper clutch pack and side gear assembly in place to prevent it from falling out of the differential case.
Position step plate in the bottom side gear bore. Apply a small amount of grease to the step plate bore. Position nut in the top side gear bore and hold it in place. Install the hex-head screw and tighten it two turns after it contacts the bottom step plate. Insert the dowel bar in nut bore to keep the nut from turning as the hex screw is tightened.
Position the differential pinion gears in the window of the differential case so that they mesh with the differential side gear teeth. Hold the differential pinion gears in place. Make sure that the differential pinion gears are 180 degrees apart so they will correctly align with the pinion shaft bore.
WARNING: KEEP FINGERS/HANDS AWAY FROM PINION GEARS WHEN ROTATING DIFFERENTIAL CASE WITH DIFFERENTIAL ROTATING TOOL.
NOTE: It will probably be necessary to loosen or tighten the forcing screw to allow the differential pinion gears and differential side gears to rotate.
Insert the rotating handle into the pinion shaft bore and turn the differential case. This will cause the differential pinion gears to engage the differential side gears and "walk" into the differential case. Rotate the differential case until the pinion mating shaft holes are lined up exactly with the holes in the differential pinion gears.
Prelubricate both sides of the differential pinion thrust washers with Premium Rear Axle Lubricant XL-80W90-QL or -KL or equivalent meeting Ford specification WSP-M2C197-A. Apply torque to the forcing screw to allow clearance to insert the differential pinion thrust washers. Insert the differential pinion thrust washers between the differential pinion gears and the differential case with the concave side facing in.
Be sure to align the thrust washer holes with the bore in the differential case PRIOR to installing differential pinion shaft.
Loosen the forcing screw and remove the step plate and nut from the side gear bores. Install the differential pinion shaft in the differential case. Install the differential pinion shaft lock bolt and tighten to 20-40 Nm (15-30 lb-ft) using Loctite® E0AZ-19554-B or equivalent.
If removed, install the ring gear on the differential case and tighten the attaching bolts to 136-163 Nm (100-120 lb-ft).