NOTE: Tires which show irregularities and definite roughness must be replaced.
Inspect to determine if the following conditions apply:
| Mechanical |
|---|
|
Tire Wear

Section 04-04: Wheels and Tires | 1996 F-150, F-250, F-350, F-Super Duty Chassis Cab, F-Super Duty Motorhome Chassis and Bronco Workshop Manual |
Wheel and Tire Checking Procedure
Verify the operator's original concern regarding the tires to duplicate the condition.
NOTE: Tires which show irregularities and definite roughness must be replaced.
Inspect to determine if the following conditions apply:
| Mechanical |
|---|
|
Tire Wear Diagnosis
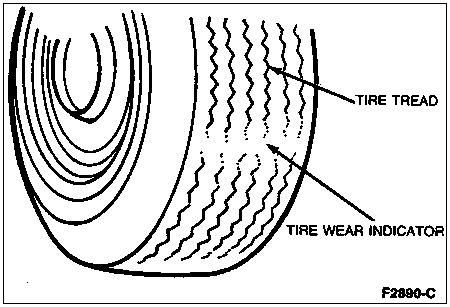
Original equipment tires have built-in tread wear indicators to show when tires need replacement. These indicators will appear as 12.7mm (1/2-inch) wide bands when the tire tread depth becomes 1.58mm (1/16 inch). When the indicators appear in two or more adjacent grooves, at three locations around the tire, or when cord or fabric is exposed, tire replacement due to tread wear is necessary.
Tire and Wheel Runout
Excessive radial and lateral runout of a wheel and tire assembly can cause roughness, vibration, wheel tramp, tire wear, and steering wheel tremor.
Before checking runout and to avoid false readings caused by temporary flat spots in the tires, check runout only after the vehicle has been driven far enough to warm tires.
The extent of the runout is measured with Rotunda Radial Runout Gauge 007-0056A or equivalent. All measurements are made on the vehicle with the tires inflated to recommended inflation pressures and with the front wheel bearings adjusted to specifications.
Tire Runout
Using Rotunda Radial Runout Gauge 007-0056A or equivalent, measure radial runout of the tire at the center and outside ribs of the tread face. Mark the high points of radial runout for future reference. On tires, radial runout should not exceed 1.27mm (0.050 inch).
Wheel Runout
Measure radial and lateral wheel runout at the positions shown in the following illustration. Runout should not exceed 1.143mm (.045 inch) in either position.

Wheel Bolt Runout
Wheel hub bolt runout can affect wheel runout. When measuring the runout on the lug bolts (1107), the feeler will not be in contact with the lug bolts at all times. Only the measurements taken at the high point of contact of each lug bolt should be considered.
Using a broad point indicator, locate the feeler perpendicular to the lug bolt, as close to the flange face as possible. Zero the indicator so the pointer can deflect either way, ensuring an accurate reading at the lowest as well as the highest contact point.

Rotate the shaft until the next lug bolt is contacted. Again, record and continue until you have one reading for each point of contact (each lug bolt). The absolute difference between the maximum and minimum contact reading will be the total indicator reading (or total runout). Wheel hub bolt circle runout should not exceed 0.41mm (0.016 inch) total indicated runout (TIR).
Match Mounting Tires
Match mounting is a technique used to reduce radial runout and tire spring rate on tire and wheel assemblies. Excessive runout is a source of ride complaints and match mounting can be used to minimize the runout. There are two ways to use match mounting: positioning the tire on the wheel and positioning the wheel on the hub.
Measure the total indicated runout on the center of the tire tread rib, and record it. Mark the tire and rim at the center of the tread rib, and record the reading. Mark the tire at the location of the valve stem for reference.
Break down the tire and remount it 180 degrees on the rim so the valve stem reference mark is opposite the valve stem on the wheel.
Reinflate the tire and measure the total indicated runout, and again mark the high spot.
If the runout is reduced to acceptable guidelines (not to exceed 1.27mm [0.050 inch]), the tire is ready to be put back into service. If the runout is still excessive, one of the following steps must be performed:
In the majority of cases, the first 180-degree turn of the tire will either fix the problem or indicate which item to replace.
Road Test
NOTE: A complete road test procedure is provided in Section 00-04.
A tire vibration diagnostic procedure always begins with a road test. The road test and customer interview (if available) will provide much of the information needed to find the source of a vibration.
During the road test, drive the vehicle on a road that is smooth and free of undulations. If vibration is apparent, note and record the following:
Use the following explanation of terms to help isolate the source of the vibration.
Torque Sensitive
The condition can be improved or worsened by accelerating, decelerating, coasting or maintaining a steady vehicle speed and application of engine torque.
Vehicle Speed Sensitive
The vibration always occurs at the same vehicle speed and is not affected by engine torque, engine speed or gear selection.
Engine Speed Sensitive
The vibration occurs at varying vehicle speeds when a different gear is selected. It can sometimes be isolated by increasing or decreasing engine speed with the transmission in NEUTRAL, or by stall testing with the transmission in gear. If the condition is engine-speed sensitive, the condition is not related to tires.
If the road test indicates that there is tire whine, but no shake or vibration, the noise originates with the contact between the tire and the road surface.
A thumping noise usually means that the tire has flat or soft spots making a noise as they slap the roadway. Tire whine can be distinguished from axle noise because axle noise diminishes or changes according to load or speed. Tire noise remains the same over a range of speeds.
![]() CAUTION: Be sure to deflate tires to their proper pressures after the following check is completed.
CAUTION: Be sure to deflate tires to their proper pressures after the following check is completed.
To verify that tire noise is not associated with shake or vibration, inflate the tires one at a time to 345 kPa (50 psi) and check for a change in the sound. The pitch or whine will change as the increased pressure changes the tire frequency.