Section 03-04D: Fuel Charging and Controls, 7.3L Diesel Engine
1996 F-250, F-350 and F-Super Duty Workshop Manual
REMOVAL AND INSTALLATION

Fuel Injector

Removal

  1. Disconnect the battery ground cables.

  1.  WARNING: RED-STRIPED WIRE HARNESS CARRIES 115V DC. SEVERE ELECTRICAL SHOCK MAY BE RECEIVED. DO NOT PIERCE.
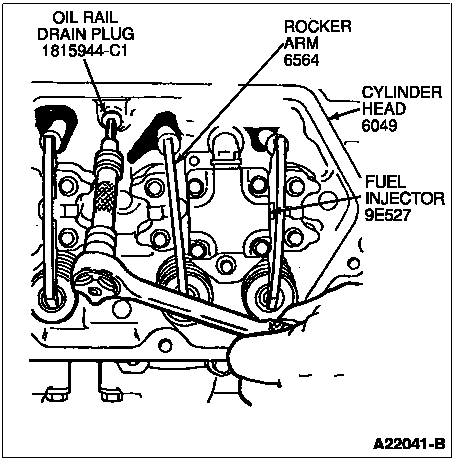
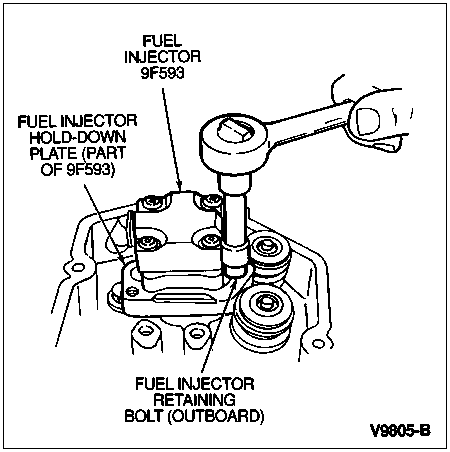
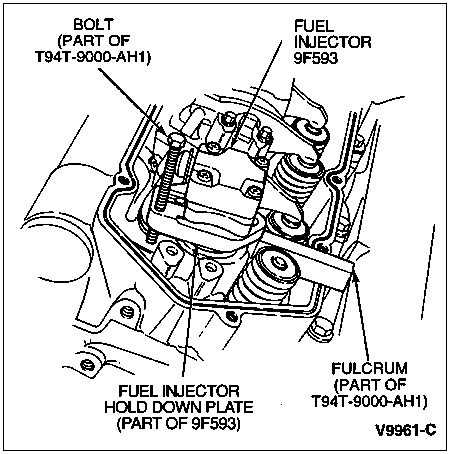
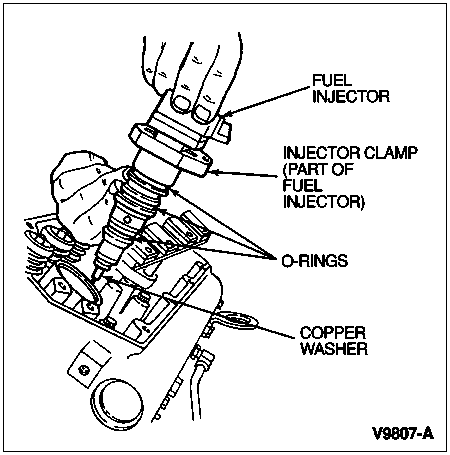
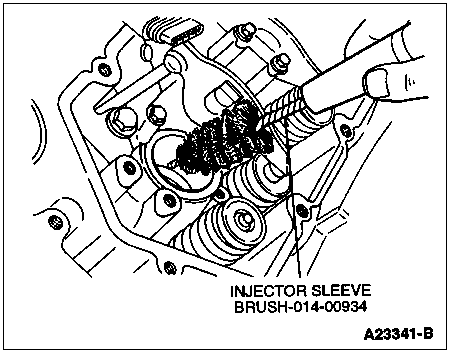
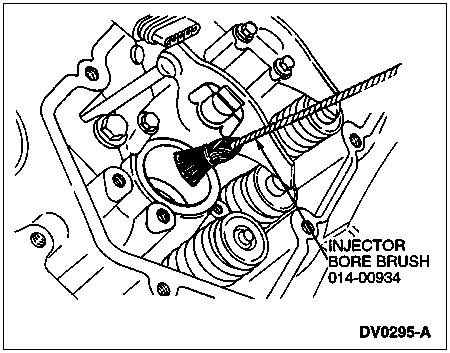
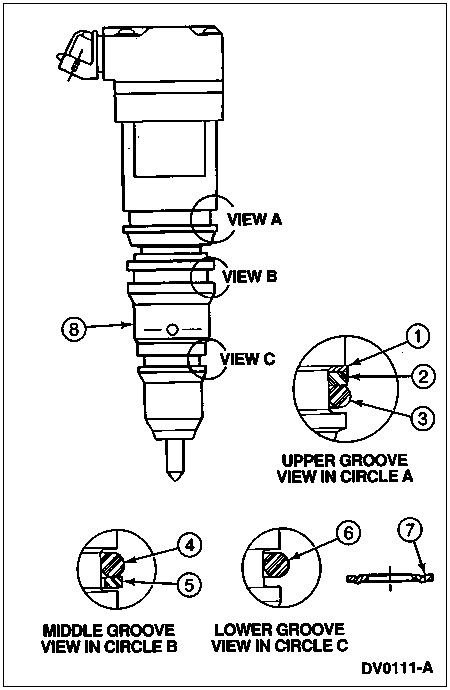
     CAUTION: Do not attempt to service the fuel injector. The fuel injector is serviced as an assembly. If the fuel injector is disassembled for any reason, the calibration of the fuel injector will be inaccurate. There are two different fuel injectors used in the 7.3L DI turbo diesel engine: a 49-state injector and the California injector (rate shaped injector). These two injectors must not be interchanged because the Powertrain Control Modules are calibrated to the specific injector. Before replacing any injectors, refer to the Vehicle Emission Control Information (VECI) decal for proper injector selection. Failure to do so can cause poor engine performance, high emissions levels or damage to engine.

    Remove the engine cover.

  1. Remove the two (2) nuts retaining the air cleaner-outlet tube support bracket to the left valve cover. Remove the engine harness bracket from the air cleaner-outlet tube support bracket and position aside.

  1. Remove and discard the crankcase ventilation hose clamp and disconnect the hose. Loosen the clamps at the turbocharger and air cleaner and disconnect the intake duct and outlet tube.

  1. Remove the bolt and nut retaining the air cleaner assembly, disconnect the air intake sensor and remove the air cleaner assembly.

  1.  CAUTION: Do not pierce engine electrical wires or damage to the harness can occur.

    Remove the engine harness tie strap from the left engine-lifting bracket.

  1. Remove the two (2) crankcase breather filter retaining screws and remove the crankcase breather filter from the left valve cover.

  1. Remove the left valve cover.

  1. Disconnect the electrical connectors from the left valve cover gasket. Remove the valve cover gasket.

  1. Disconnect the electrical connectors from the left fuel injectors and the glow plugs.

  1. Drain the oil from the left cylinder head by removing the internal oil rail drain plugs.

  1. Remove the left oil deflectors.

  1.  WARNING: DO NOT ROTATE THE CRANKSHAFT WITH THE FUEL INJECTOR REMOVED. OIL AND FUEL WILL ENTER THE COMBUSTION CHAMBER WHICH COULD CAUSE ENGINE DAMAGE OR PERSONAL INJURY.

    NOTE: The shoulder bolt on the inboard side of the fuel injector does not require removal.

    Remove the left outboard fuel injector-retaining bolts.

  1.  CAUTION: When servicing the fuel injector, it is important that all injector O-rings and the injector tip copper washer are retrieved from the injector bore. Failure to do so can cause severe damage to engine.

    Carefully remove the left fuel injectors using Injector Remover T94T-9000-AH1.

  1. Remove the backup rings, cushion rings (black), upper injector seals, middle injector seals, cushion rings (black/green), lower injector seals and injector gasket from each fuel injector.

  1. Install Rotunda Injector Protective Sleeves 014-00933 and position the fuel injector in Rotunda Injector Holding Rack 014-00933.

  1.  WARNING: REMOVE OIL AND FUEL FROM CYLINDERS BEFORE REINSTALLING FUEL INJECTORS. FAILURE TO DO SO COULD CAUSE HYDROSTATIC LOCK RESULTING IN SEVERE ENGINE DAMAGE.

    Remove all fuel and oil from the left combustion chambers using Rotunda Oil Suction Gun D94T-9000-A.

  1. Disconnect the MAP sensor electrical connector. Remove the nut retaining the MAP sensor bracket to the upper left corner of the A/C evaporator case. Unclip the MAP sensor bracket from the A/C evaporator case and position the MAP sensor aside.

  1. Disconnect the vacuum harness from the A/C vacuum reservoir tank. Remove the A/C evaporator core cover heat shield upper retaining clip and position the shield out of way. Remove the A/C vacuum reservoir tank.

  1. Remove the oil level indicator tube-retaining bracket. Remove the oil level indicator tube support bracket from the right valve cover.

  1. Remove the right valve cover.

  1. Disconnect the electrical connectors from the right valve cover gasket. Remove the valve cover gasket.

  1. Disconnect the electrical connectors from the right fuel injectors and the glow plugs.

  1. Drain the oil from the right cylinder head by removing the internal oil rail drain plugs.

  1. Remove the right oil deflectors.

  1.  WARNING: DO NOT ROTATE THE CRANKSHAFT WITH THE FUEL INJECTOR REMOVED. OIL AND FUEL WILL ENTER THE COMBUSTION CHAMBER WHICH COULD CAUSE ENGINE DAMAGE OR PERSONAL INJURY.

    NOTE: The shoulder bolt on the inboard side of the fuel injector does not require removal.

    Remove the right outboard fuel injector-retaining bolts.

  1.  CAUTION: When servicing the fuel injector, it is important that all injector O-rings and the injector tip copper washer are retrieved from the injector bore. Failure to do so can cause severe damage to engine.

    Carefully remove the right fuel injectors using Injector Remover T94T-9000-AH1.

  1. Remove the backup rings, cushion rings (black), upper injector seals, middle injector seals, cushion rings (black/green), lower injector seals and injector gasket from each fuel injector.

  1. Install Rotunda Injector Protective Sleeves 014-00933 and position the fuel injector in Rotunda Injector Holding Rack 014-00933.

  1.  WARNING: REMOVE OIL AND FUEL FROM CYLINDERS BEFORE REINSTALLING FUEL INJECTORS. FAILURE TO DO SO COULD CAUSE HYDROSTATIC LOCK RESULTING IN SEVERE ENGINE DAMAGE.

    Remove all fuel and oil from the right combustion chambers using Rotunda Oil Suction Gun D94T-9000-A.

  1. Clean gasket surfaces.

Installation

  1. Clean the injector bores and sleeves carefully with a clean shop towel. Use Injector Sleeve Brush 014-00934 to make sure that a good seating surface is provided for the fuel injectors.

  1. Use Rotunda Injector Sleeve Brush 014-00934-5 to clean the injector bores of any sealant residue. Make sure to remove any debris.

  1.  CAUTION: When installing the fuel injectors into the cylinder head, make sure the copper washer does not shift or fall free from the injector. Failure to do so will cause severe engine damage.

     CAUTION: Do not strike top of fuel injector to seat the fuel injector in the bore. Damage to fuel injector will occur. Use hand pressure on top of fuel injector until the fuel injector hold-down plate is positioned under head of shoulder bolt.

    NOTE: Apply a thin coat of High-Temperature 4x4 Front Axle and Wheel Bearing Grease E8TZ-19590-A to the copper washer to hold it in place during fuel injector installation.

    Lubricate the fuel injector and O-rings liberally with clean engine oil. Remove the fuel injectors from the holding rack and remove the protective sleeves. Install new backup rings, cushion rings (black), upper injector seals, middle injector seals, cushion rings (black/green), lower injector seals and injector copper gasket onto each fuel injector.

    ItemPart NumberDescription
    1SteelBackup Ring (Part of 9F593)
    2BlackCushion Ring (Part of 9F593)
    3BlackUpper Injector Seal (Part of 9F593)
    4WhiteMiddle Injector Seal (Part of 9F593)
    5Black/GreenCushion Ring (Part of 9F593)
    6BlackLower Injector Seal (Part of 9F593)
    7CopperInjector Gasket (Part of 9F593)
    89F593Fuel Injector
  1. Carefully install the right fuel injectors using Injector Replacer T94T-9000-AH2.

  1. Install the right outboard injector retaining bolts. Tighten the bolts to 14 Nm (10 lb-ft).

  1. Install the right oil deflectors. Tighten the bolts to 14 Nm (10 lb-ft).

  1. NOTE: Inspect the oil rail drain plug O-rings for damage, replace if necessary. Lubricate the O-rings with clean engine oil, prior to assembly.

    Install the right oil rail drain plugs. Tighten the plugs to 6 Nm (53 lb-in).

  1. Connect the right electrical connectors to the fuel injectors and the glow plugs.

  1. NOTE: Inspect the right valve cover gasket for damage, replace if necessary.

    Install the right valve cover gasket and connect the electrical connectors.

  1. Install the right valve cover. Tighten the bolts to 11 Nm (8 lb-ft).

  1. Install the oil level indicator tube support bracket to the right valve cover. Tighten the nuts to 11 Nm (8 lb-ft). Install the oil level indicator tube-retaining bracket. Tighten the bolt securely.

  1. Install the A/C vacuum reservoir tank and securely tighten the retaining screws. Reposition the A/C evaporator core cover heat shield and install the retaining clip. Connect the vacuum harness to the A/C vacuum reservoir tank.

  1. Clip the MAP sensor bracket to the A/C evaporator case. Install the MAP sensor bracket-retaining nut. Tighten nut to 5 Nm (44 lb-in). Connect the MAP sensor electrical connector.

  1.  CAUTION: When installing fuel injectors into the cylinder head, make sure the copper washer does not shift or fall free from the injector. Failure to do so will cause severe engine damage.

     CAUTION: Do not strike top of fuel injector to seat the fuel injector in the bore. Damage to fuel injector will occur. Use hand pressure on top of fuel injector until the fuel injector hold-down plate is positioned under head of shoulder bolt.

    NOTE: Apply a thin coat of High-Temperature 4x4 Front Axle and Wheel Bearing Grease E8TZ-19590-A to the copper washer to hold it in place during fuel injector installation.

    Lubricate the fuel injector and O-rings liberally with clean engine oil. Remove the fuel injectors from the holding rack and remove the protective sleeves. Install new backup rings, cushion rings (black), upper injector seals, middle injector seals, cushion rings (black/green), lower injector seals and injector gasket onto each fuel injector.

  1. Carefully install the left fuel injectors using Injector Replacer T94T-9000-AH2.

  1. Install the left outboard injector retaining bolts. Tighten the bolts to 14 Nm (10 lb-ft).

  1. Install the left oil deflectors. Tighten the bolts to 14 Nm (10 lb-ft).

  1. NOTE: Inspect the oil rail drain plug O-rings for damage, replace if necessary. Lubricate the O-rings with clean engine oil, prior to assembly.

    Install the left oil rail drain plugs. Tighten the plugs to 6 Nm (53 lb-in).

  1. Connect the left electrical connectors to the fuel injectors and the glow plugs.

  1. NOTE: Inspect the left valve cover gasket for damage, replace if necessary.

    Install the left valve cover gasket and connect the electrical connectors.

  1. Install the left valve cover. Tighten the bolts to 11 Nm (8 lb-ft).

  1. NOTE: Inspect the crankcase breather gaskets and O-rings for damage, replace if necessary. Lubricate the O-rings with clean oil, prior to assembly.

    Install the crankcase breather assembly to the left valve cover. Tighten the retaining screws to 4 Nm (36 lb-in).

  1. Secure the engine harness to the left engine-lifting bracket with a tie strap.

  1. Position the air cleaner assembly and connect the air intake sensor. Install the bolt and nut retaining the air cleaner assembly. Tighten the bolt to 8 Nm (71 lb-in). Tighten the nut to 6 Nm (53 lb-in).

  1. Position the air cleaner outlet tube support bracket to the left valve cover. Connect the crankcase ventilation hose and intake duct and tighten clamps securely.

  1. Install the engine harness bracket to the air cleaner outlet tube support bracket. Install two (2) retaining nuts. Tighten nuts to 11 Nm (8 lb-ft).

  1. Install the engine cover. Tighten the nuts securely.

  1. NOTE: When the battery is disconnected and reconnected, some abnormal drive symptoms may occur while the vehicle relearns its adaptive strategy. The vehicle may need to be driven 16 km (10 mi.) or more to relearn the strategy.

    Connect the battery ground cables.