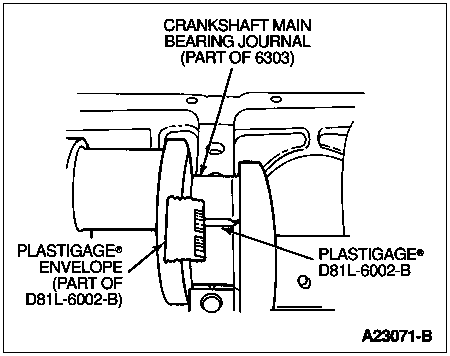
Do not disturb Plastigage®. Using Plastigage® envelope, measure widest point of Plastigage®. Reading indicates bearing clearance in thousandths of an inch.

Section 03-01D: Engine, Diesel, 7.3L | 1996 F-Series Workshop Manual |
Main Bearings
NOTE: Be sure bearing inserts, bearing bore and mating surfaces are clean. Foreign material under inserts will distort crankshaft main bearing (6333) or crankshaft thrust main bearing (6337) and cause incorrect readings and subsequent bearing failure.
Install crankshaft main bearings or crankshaft thrust main bearing.
NOTE: Lightly coat bolt threads with oil before installing.
To obtain an accurate reading using Plastigage® D81L-6002-B or equivalent method of checking, all bearing caps must be in place and tightened to 102 Nm (75 lb-ft). Retighten bolts to 129 Nm (95 lb-ft).
Remove one bearing cap and bearing insert. Leave remaining bearing caps tight while checking fit of crankshaft main bearing or crankshaft thrust main bearing.
Wipe oil from all contact surfaces such as crankshaft journal, bearing insert, bearing caps, etc.
NOTE: Do not turn crankshaft (6303) while making check with Plastigage®.
Place piece of Plastigage® D81L-6002-B or equivalent across full width of bearing surface on crankshaft journal (or bearing cap insert) approximately 6.35mm (0.25 inch) off center. Install bearing cap and tighten cap bolt to specification.
Remove bearing cap and bearing insert.
Do not disturb Plastigage®. Using Plastigage® envelope, measure widest point of Plastigage®. Reading indicates bearing clearance in thousandths of an inch.

Crankshaft must be reground and undersize crankshaft main bearing and crankshaft thrust main bearing installed if the bearing clearance is not within specifications.
Connecting Rod Bearings
NOTE: Make sure bearing inserts, bearing bore and mating surfaces on connecting rod and connecting rod cap are clean. Foreign material under bearing inserts will distort connecting rod bearing (6211) and cause incorrect readings and subsequent bearing failure.
Remove bearing cap and wipe oil from face of bearing insert and exposed portion of crankshaft journal.
NOTE: Do not turn crankshaft while Plastigage® is in place.
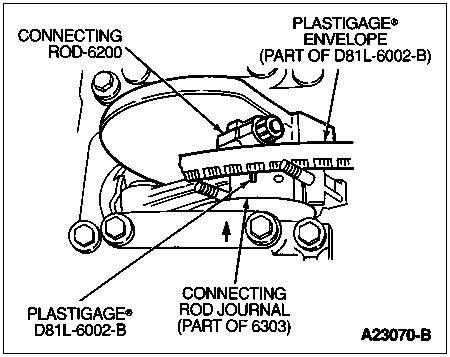
Place a piece of Plastigage® D81L-6002-B or equivalent on bearing surface across full width of connecting rod bearing about 6.35mm (0.25 inch) off center.
NOTE: Lightly coat bolt threads with oil before installing.
Install connecting rod cap and tighten connecting rod nuts (6212) to 95 Nm (70 lb-ft).
Remove bearing cap and use Plastigage® scale to measure widest point of Plastigage®. Reading indicates bearing clearance in thousandths of an inch. The opposite side of the scale indicates bearing clearance in tenths of millimeters.

Crankshaft must be reground and undersize connecting rod bearings installed if bearing clearance is not within specifications.