Section 03-01D: Engine, Diesel, 7.3L | 1996 F-Series Workshop Manual |
CLEANING AND INSPECTION
Cylinder Block
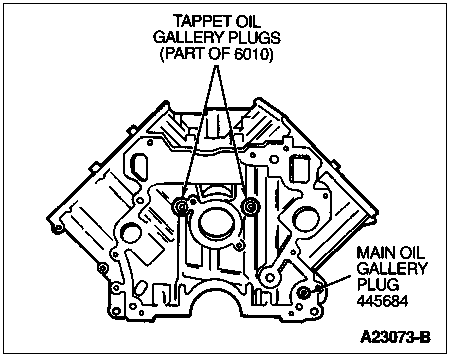
Remove main oil gallery plug and use a 9.5mm (3/8-inch) diameter brush to clean main oil gallery. Replace oil plug after coating with Perfect Seal Sealing Compound F2AZ-19554-AA or equivalent nonhardening sealing compound meeting Ford specifications ESR-M18P2-A and ESE-M4G115-A.

Remove tappet oil gallery plugs and clean tappet oil galleries with a 8mm (5/16-inch) brush. Replace tappet gallery plugs after coating with Perfect Seal Sealing Compound F2AZ-19554-AA or equivalent nonhardening Sealing Compound meeting Ford specification ESR-M18P2-A and ESE-M4G115-A.
Make sure threads in cylinder head bolt holes are clean. Dirt in threads may cause binding and result in false torque readings. Use tap to true-up threads and to remove any deposits.
Cylinder Walls, Refinishing
NOTE: It is NOT necessary to remove crankshaft (6303), however, it is good practice to oil the connecting rod journals and wrap them in a shop towel with tape.
NOTE: Obtain an electric or air-powered drill motor with adjustable speed. A speed of about 100 rpm is required. If this is not available, repair will not be successful.
Remove the piston cooling oil jet (6C327) prior to honing the cylinder, otherwise damage to piston cooling oil jet will result.
To refinish cylinder walls, obtain a "flexhone" for a 4-inch bore engine with a 120 grit rating (no color code). This type of hone looks like a wire brush with carbide balls on the ends of the bristles. Obtain a full 12-ounce container of Rust Penetrant and Inhibitor F2AZ-19A501-A or equivalent meeting Ford specification ESR-M99C56-A. This spray contains colloidal graphite and has a black appearance.
Spray cylinder wall with graphite spray and hone cylinder wall for about three seconds while stroking up and down twice a second. Remove the hone (ALWAYS REMOVE WITH HONE ROTATING), and wipe a portion of cylinder wall. Inspect the crosshatch pattern comparing it to the neighboring (untouched) cylinder. The crosshatch angle should be 120 to 135 degrees.
Comparison with a "virgin" bore is the best check, provided the engine has not been repaired before. If the pattern is flatter than called for, increase stroke speed or slow down rotation speed. Honing to the very bottom of the cylinder is not required as the piston ring travel stops well short of the bottom of the bore. The hone must be partly removed from the cylinder at the top of each stroke.
Continue honing the cylinder (after adjusting your technique to get required 120 to 135 degrees crosshatch) for 10 to 15 seconds, while an assistant continuously sprays the graphite spray at the cylinder wall. Do not spend more than 15 seconds (25 strokes) per bore. Wipe cylinder bore clean and inspect. The bore should have a satin-like sheen with a clearly identified crosshatch pattern of 120 to 135 degrees. Compare with a virgin bore to confirm correct angle. Repeat for remaining cylinders.
Wash all cylinders with mild soap and water (dishwashing solution). Dry with compressed air and immediately oil cylinder walls to prevent corrosion.
Cleaning
 CAUTION: If these procedures are not followed, rusting of the cylinder bore(s) may occur.
After any cylinder bore service operation such as honing or deglazing, clean the bore(s) with soap or detergent and water. Then, thoroughly rinse the bore(s) with clean water to remove the soap or detergent and wipe the bore(s) dry with a clean lint-free cloth. Finally, wipe the bore(s) with a clean cloth dipped in engine oil.
If the engine is disassembled, thoroughly clean the block with solvent. Remove old gasket material from all machined surfaces. Remove all pipe plugs that seal oil passages and clean out all the passages. Blow out all passages, then bolt holes, etc., with compressed air. Make sure threads in the cylinder head bolt holes are clean. Dirt in the threads may cause binding and result in a false torque reading. Use a tap to true-up threads and to remove all deposits.
Inspection
After the block has been thoroughly cleaned, check it for cracks. Tiny cracks not visible to the naked eye may be detected by coating the suspected area with a mixture of 25 percent kerosene and 75 percent light engine oil. Wipe the part dry and immediately apply a coating of zinc oxide dissolved in wood alcohol. Do not use rubbing alcohol as a substitute. If cracks are present, the coating will become discolored at the damaged area. Replace the cylinder block (6010) if it is cracked.
Check all machined surfaces for burrs, nicks, scratches and scores. Remove minor imperfections with an oilstone.
Check the cylinder block for flatness of the cylinder head gasket surface following the procedure and specifications recommended for the cylinder head (6049). The cylinder block can be machined to bring the cylinder head gasket surface within the flatness specifications listed at the back of this section, but not to exceed 0.254mm (0.010 inch) stock removal from the original gasket surface.
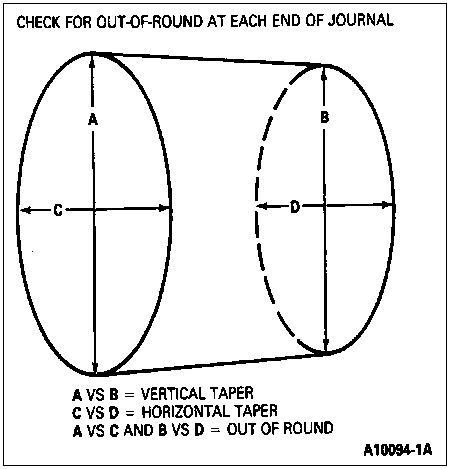
Replace all plugs that show evidence of leakage. Inspect the cylinder walls for scoring, roughness or other signs of wear. Check the cylinder bore for out-of-round and taper. Measure the bore with an accurate bore gauge following the instructions of the manufacturer. Measure the diameter of each cylinder bore at the top, middle and bottom with the gauge placed at right angles and parallel to the centerline of the engine to determine if cylinder is out of round. Use only the measurements obtained at 90 degrees to the engine centerline when calculating the piston-to-cylinder bore clearance.
Inspect the main and connecting rod journals for cracks, scratches, grooves, scores or rough finish. Inspect the crankshaft oil seal surface for nicks, sharp edges or burrs that might damage the crankshaft front seal (6700) or crankshaft rear oil seal (6701) during installation or cause premature seal wear.


