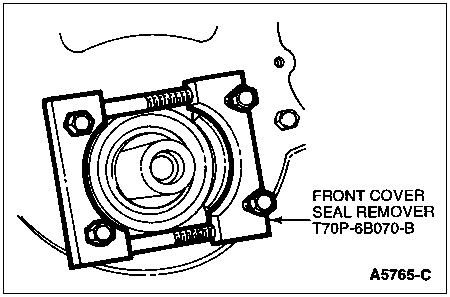
Alternately tighten the four puller bolts one-half turn at a time. Pull the crankshaft front seal from the engine front cover.

Section 03-01C: Engine, 7.5L MFI | 1996 F-250, F-350, F-Super Duty Chassis Cab and Motorhome Workshop Manual |
Replacement of the crankshaft front seal (6700) is recommended whenever the engine front cover (6019) is removed.
| Description | Tool Number |
|---|---|
| Crankshaft Damper Remover | T58P-6316-D |
| Front Cover Seal Remover | T70P-6B070-B |
| Crankshaft Seal Replacer/Cover Aligner | T88T-6701-A |
| Crankshaft Damper and Sprocket Replacer | T52L-6306-AEE |
Removal
Remove the bolts attaching the fan shroud (8146) to the radiator (8005).
Remove the fan bolts from the water pump hub. Remove the fan blade (8600), fan clutch (8A616) and fan shroud.
Remove the drive belts (8620). Refer to Section 03-05.
Remove the crankshaft pulley (6312) from the crankshaft vibration damper (6316). Remove the damper attaching bolt and washer. Remove crankshaft vibration damper using Crankshaft Damper Remover T58P-6316-D.
Remove front Woodruff key and slide crankshaft damper spacer off crankshaft (6303).
Place the Front Cover Seal Remover T70P-6B070-B onto the engine front cover over the crankshaft front seal. Tighten the two through-bolts to force the seal puller under the seal flange.
Alternately tighten the four puller bolts one-half turn at a time. Pull the crankshaft front seal from the engine front cover.

Installation
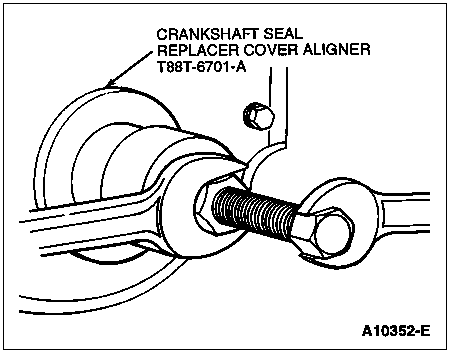
Coat a new crankshaft front seal with Ford Multi-Purpose Grease D0AZ-19584-AA or equivalent meeting Ford specification ESB-M1C93-B and place it onto the Crankshaft Seal Replacer/Cover Aligner T88T-6701-A. Place the sleeve and crankshaft front seal onto the end of the crankshaft and push it toward the engine (6007) until the crankshaft front seal starts into the engine front cover.

Place the installation screw, washer, and nut onto the end of the crankshaft. Thread the screw into the crankshaft. Tighten the nut against the washer and installation sleeve to force the crankshaft front seal into the engine front cover. Remove the installation tool from the crankshaft.
Install crankshaft damper spacer on the inner Woodruff key. Apply Gasket Maker E2AZ-19562-B or equivalent meeting Ford specification WSK-M2G348-A5 to the front of the key on the crankshaft, and in the keyway inside the crankshaft damper spacer, after installing spacer. Install Woodruff key for crankshaft vibration damper.
Apply Ford Multi-Purpose Grease D0AZ-19584-AA or equivalent meeting Ford specification ESB-M1C93-B to the front seal rubbing surface of the crankshaft vibration damper inner hub to prevent damage to the crankshaft front seal. Apply Ford Multi-Purpose Grease D0AZ-19584-AA or equivalent meeting Ford specification ESB-M1C93-B to the front of the crankshaft for crankshaft vibration damper installation.
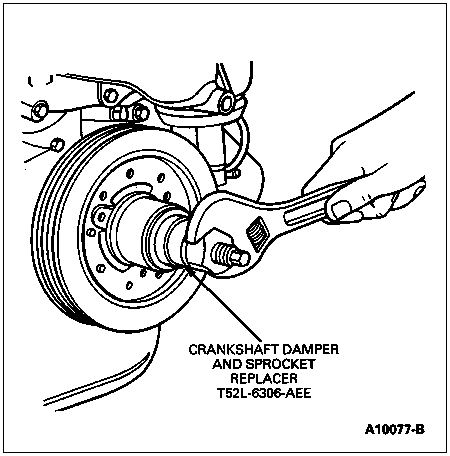
Line up the crankshaft vibration damper keyway with the key on the crankshaft. Install the crankshaft vibration damper on crankshaft using Crankshaft Damper and Sprocket Replacer T52L-6306-AEE. Install the bolt and washer. Tighten the bolt to 95-122 Nm (70-90 lb-ft). Install the crankshaft pulley.
Install the drive belts. Refer to Section 03-05.
Position the fan shroud over the water pump pulley (8509). Install the fan blade. Install the fan shroud attaching screws.
