Remove engine front cover bolts.
Section 03-01B: Engine, 5.0L and 5.8L MFI | 1996 F-150, F-250, F-350 and Bronco Vehicles Equipped with 5.0L or 5.8L MFI Engines Workshop Manual |
Removal
Refer to Water Pump in the In-Vehicle Service portion of this section. Perform all steps except removal of the water pump (8501). Leave it attached to the engine front cover (6019).
Remove oil pan. Refer to Oil Pan/Oil Pump Screen Cover and Tube, Removal in the In-Vehicle Service portion of this section.
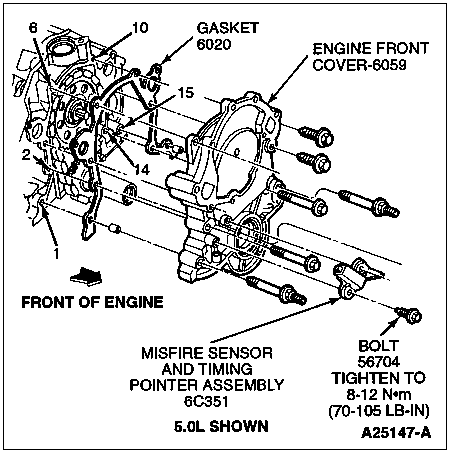
Disconnect electrical connector from misfire sensor.
NOTE: The timing pointer and misfire sensor are serviced separately on the 5.8L engine but not on the 5.0L engine where they are serviced as one assembly.
Remove two screw and washer assemblies and remove timing pointer and misfire sensor.
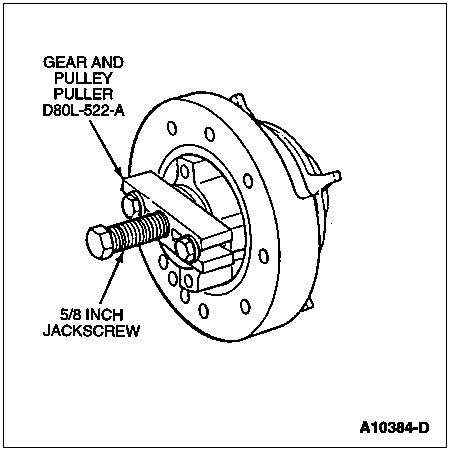
Remove the crankshaft pulley (6312) from the crankshaft vibration damper/pulse ring. Remove the damper attaching bolt and washer. Install Gear and Pulley Puller D80L-522-A or equivalent on the crankshaft vibration damper/pulse ring and remove the crankshaft vibration damper/pulse ring.
Remove engine front cover bolts.
Remove the oil pan-to-engine front cover attaching bolts. Remove the engine front cover and water pump as an assembly.
Discard the engine front cover gasket.
Installation
![]() CAUTION: Do not use solutions such as brake cleaner, carburetor cleaner, etc., as these solutions can leave a residue on the machined surfaces. Use only a cleaner which meets or exceeds Ford specification WSE-M5B392-A, such as Metal Surface Cleaner F4AZ-19A536-RA or equivalent.
CAUTION: Do not use solutions such as brake cleaner, carburetor cleaner, etc., as these solutions can leave a residue on the machined surfaces. Use only a cleaner which meets or exceeds Ford specification WSE-M5B392-A, such as Metal Surface Cleaner F4AZ-19A536-RA or equivalent.
Clean the engine front cover, and the cylinder block gasket surfaces. Clean the oil pan gasket surface where the oil pan (6675) and engine front cover fasten.
Install a new crankshaft front seal (6700).
Lubricate the timing chain/belt (6268) and sprockets with heavy engine oil.
Position the engine front cover on the cylinder block (6010). Use care when installing the engine front cover to avoid crankshaft front seal damage or possible gasket mislocation.
Install the engine front cover and water pump.
For 5.8L engine, hand-start bolts in holes 3, 4, 6, 10, 12, 13, and 14. For 5.0L engines, install bolts in holes 14 and 15 and tighten to 8-13.5 Nm (70-120 lb-in).
NOTE: On 5.8L engines, the timing pointer (6023) and misfire sensor are serviced separately. They are serviced as one assembly on 5.0L engines.
Install timing pointer and misfire sensor and tighten to 8-12 Nm (70-105 lb-in).
Tighten remaining bolts to 16-24 Nm (12-18 lb-ft).

| Item | Part Number | Description |
|---|---|---|
| 1 | 8501 | Water Pump |
| 2 | 6019 | Engine Front Cover |
| 3 | 9D930 | Fuel Charging Wiring |
| 4 | 33797 | Nut |
| 5 | 56704 | Bolt |
| 6 | 6023 | Timing Pointer |
| 7 | 6C351 | Misfire Sensor |
| A | — | Tighten to 16-24 Nm (12-18 Lb-Ft) |
| B | — | Tighten to 8-12 Nm (70-105 Lb-In) |
Connect electrical connector to misfire sensor.
Install crankshaft vibration damper/pulse ring and install bolt and washer. Tighten bolt to 54-71 Nm (48-52 lb-ft). Install crankshaft pulley on the crankshaft vibration damper/pulse ring.
Apply Multi-Purpose Grease D0AZ-19584-AA or equivalent meeting Ford specification ESB-M1C93-B or ESR-M1C159-A to the oil seal rubbing surface of the vibration damper inner hub to prevent damage to the crankshaft front seal and to the front of the crankshaft (6303) for crankshaft vibration damper/pulse ring installation.
Install oil pan. Refer to Oil Pan/Oil Pump Screen Cover and Tube, Installation in the In-Vehicle Service portion of this section.
Complete the remaining steps under Water Pump in the In-Vehicle Service portion of this section.
Operate the engine (6007) at fast idle and check the coolant level and check for oil leaks. Check and adjust the ignition timing to specifications on engine decal.