Section 03-01B: Engine, 5.0L and 5.8L MFI
1996 F-150, F-250, F-350 and Bronco Vehicles Equipped with 5.0L or 5.8L MFI Engines Workshop Manual
IN-VEHICLE SERVICE

Crankshaft Pulley Damper/Crankshaft Front Seal

SPECIAL SERVICE TOOL(S) REQUIRED
DescriptionTool Number
Crankshaft Seal Replacer/Cover AlignerT88T-6701-A

Removal

  1. Drain radiator (8005). Refer to Section 03-03.

  1. Remove jack handle.

  1. Remove air intake duct from grille reinforcement.

  1. Remove upper radiator hose.

  1. Loosen fan bolts.

  1. Remove the serpentine drive belt (8620).

  1. Remove the bolts attaching the fan shroud (8146) to the radiator.

  1. Remove the fan clutch bolts from the water pump shaft. Remove the fan blade (8600), fan clutch (8A616) and fan shroud.

  1. Remove the crankshaft pulley (6312) from the crankshaft vibration damper/pulse ring. Remove the damper attaching screw and washer. Install Gear and Pulley Puller D80L-522-A or equivalent on the crankshaft vibration damper/pulse ring and remove the crankshaft vibration damper/pulse ring.

  1. Disconnect misfire sensor electrical connector, if equipped.

  1. Remove timing pointer (6023) and misfire sensor, if equipped.

  1. Use suitable prybar to remove crankshaft front seal (6700).

Installation

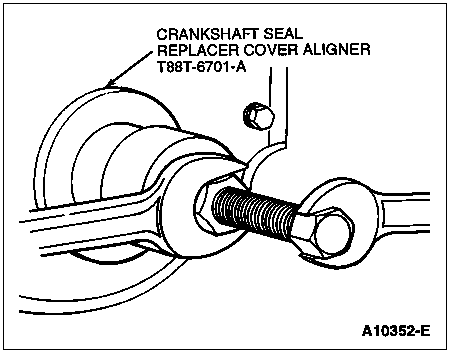
  1. Coat a new crankshaft front seal with Lubriplate or equivalent. Place it onto Crankshaft Seal Replacer/Cover Aligner T88T-6701-A. Place the sleeve and crankshaft front seal onto the end of the crankshaft (6303) and push it toward the engine (6007) until the crankshaft front seal starts into the engine front cover (6019).

  1. Place the installation screw, washer and nut onto the end of the crankshaft. Thread the screw into the crankshaft. Tighten the nut against the washer and installation sleeve to force thecrankshaft front seal into the engine front cover. Remove the installation tool from the crankshaft.
  1. Apply Multi-Purpose Grease D0AZ-19584-AA or equivalent meeting Ford specification ESB-M1C93-B or ESR-M1C159-A to the oil seal rubbing surface of the vibration damper/pulse ring inner hub to prevent damage to the crankshaft front seal and to the front of the crankshaft for crankshaft vibration damper/pulse ring installation.

  1. Apply a 4mm (0.16-inch) bead of suitable sealer on the outer end of the damper keyway.

  1. Line up the crankshaft vibration damper keyway with the key on the crankshaft. Install the crankshaft vibration damper/pulse ring on the crankshaft. Install the capscrew and washer. Tighten the screw to 95-122 Nm (70-90 lb-ft). Install the crankshaft. Make sure the crankshaft pulley is bottomed on the damper pilot.

  1. Install timing pointer and misfire sensor, if equipped.

  1. Connect misfire sensor electrical connector, if equipped.

  1. Position the fan shroud over the water pump pulley (8509). Install the fan blade and fan clutch. Install the fan shroud attaching screws.

  1. Route the drive belt according to the belt routing decal.

  1. Install upper radiator hose.

  1. Install air intake duct from grille reinforcement.

  1. Install jack handle.

  1. Fill radiator. Refer to Section 03-03.