Section 03-00: Engine, Service | 1996 All F-150, F-250, F-350, F-Super Duty and Bronco Vehicles Equipped with 4.9L, 5.0L, 5.8L or 7.5L Gasoline Engines, and 7.3L Diesel Engines Workshop Manual |
SERVICE PROCEDURES
Camshaft Lobe Lift
This procedure is for checking lift with the camshaft (6250) installed. For checking with camshaft removed, refer to Camshaft Journals, Cam Lobe Lift in the Service Procedures portion of this section.
Check the lift of each lobe in consecutive order and make a note of the readings.
Remove valve cover (6582) as outlined in Section 03-01A (4.9L SFI), Section 03-01B (5.0L and 5.8L MFI), Section 03-01C (7.5L MFI) or Section 03-01D (7.3L diesel).
Remove rocker arm fulcrum bolts, rocker arm seat (6A528) and rocker arm (6564).
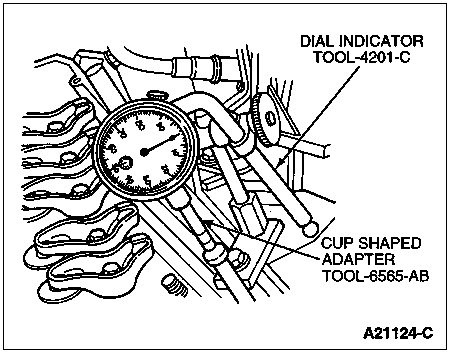
Make sure valve tappet (6500) is seated against cam. Install Dial Indicator with Bracketry TOOL-4201-C and Cup Shaped Adapter TOOL-6565-AB or equivalents in such a manner as to have ball socket adapter of indicator on top of valve tappet or push rod and in same plane as valve tappet or push rod movement.
Typical Engine with Push Rods
Remove spark plug (12405).
NOTE: If checking during engine assembly, turn crankshaft using a socket or ratchet.
Connect an auxiliary starter switch in starting circuit. Crank engine with key off. Bump crankshaft (6303) over until valve tappet is on base circle of camshaft lobe. At this point, valve tappet will be in its lowest position. If checking during engine assembly, turn crankshaft using a socket or ratchet.
Zero dial indicator. Continue to rotate crankshaft slowly until valve tappet is in fully raised position (highest indicator reading).
Compare total lift recorded on indicator with specifications.
NOTE: If lift of any lobe is below specified service limits, camshaft and valve tappets operating on worn lobe(s) must be replaced, as well as any valve tappet with pitting or contact face worn flat or concave. Refer to Hydraulic Valve Tappets in the Service Procedures portion of this section.
To check accuracy of original indicator reading, continue to rotate crankshaft until valve tappet is once again riding on base circle of camshaft lobe and read indicator. If indicator does not read zero, repeat Steps 6 through 8.
Remove dial indicator and auxiliary starter switch.
 CAUTION: After installing rocker arms, do not rotate crankshaft until valve tappets have had sufficient time to bleed down. To do otherwise may cause serious valve damage. Manually bleeding down will reduce waiting time.
Install valve cover.
Install spark plugs.
Hydraulic Valve Tappet
Hydraulic tappet noise may be caused by any of the following conditions:
- Excessive collapsed tappet gap
- Sticking tappet plunger
- Tappet check valve not functioning properly
- Air in lubrication system
- Leak-down rate too rapid
- Excessive valve guide wear
Excessive collapsed tappet gap may be caused by loose rocker arm fulcrum bolts or nuts, incorrect initial adjustment, wear of tappet face, push rod, rocker arm, rocker arm seat or valve tip. With valve tappet collapsed, check gap between valve tip and rocker to determine if any other valve train parts are damaged, worn or out of adjustment. Replace any worn or damaged parts.
A sticking tappet plunger may be caused by dirt, chips or varnish inside the tappet. This condition can be corrected by disassembling the valve tappet and removing the dirt, chips or varnish that are causing the condition.
A nonfunctioning tappet check valve may be caused by an obstruction (such as dirt or chips) preventing it from closing when the cam lobe is lifting the valve tappet. It may also be caused by a broken check valve spring (6513).
Air bubbles in the lubrication system will prevent the valve tappet from supporting the valve spring load and may be caused by too high or too low an oil level in the oil pan, or by air being drawn into the system through a hole, crack or leaking oil pump inlet tube gasket (6626) on the oil pump screen cover and tube (6622).
If the leak-down time is below the specified time for used valve tappets, noisy operation may result. If no other cause for noisy valve tappets can be found, the leak-down rate should be checked and any outside the specification should be replaced.
Assembled valve tappets can be tested with Hydraulic Tappet Leak-Down Tester TOOL-6500-E or equivalent to check the leak-down rate. The leak-down rate specification is the time in secofollows: