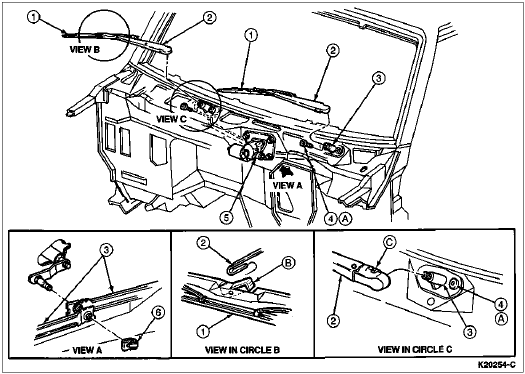
Disconnect the hose (17543). Remove the cowl top vent panel.
Cowl Top Vent Panel
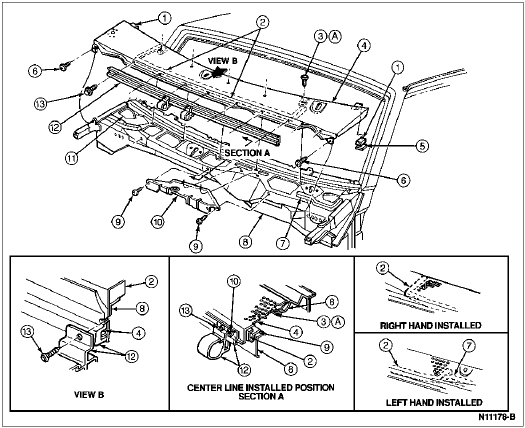
| Item | Part Number | Description |
|---|---|---|
| 1 | ESB-M3G102-A | Foam Tape |
| 2 | 022A70 | Cowl Top Grille Seal Assembly |
| 3 | 56903-S55 | Screw (5 Req'd) |
| 4 | 022A68 | Cowl Top Vent Panel with Radio Antenna Holes |
| 5 | 15022A56 | Cowl Top Vent Grille Spacer |
| 6 | 56910-S2 | Screw (2 Req'd) |
| 7 | 1502919 | Cowl Top Panel to Hood Seal |
| 8 | 02012 | Cowl Top Outer Panel |
| 9 | 55927-S2 | Screw (4 Req'd) |
| 10 | 022A48 | Cowl Top Outer Panel Extension |
| 11 | 020A50 | Cowl Top Panel Access Hole (1 Req'd LH Side) |
| 12 | 02824 | Cowl Top Panel to Hood Seal Assembly |
| 13 | 56902-S55-X | Screw (7 Req'd) |
| A | — | Tighten to 1.4-2.0 Nm (9-18 Lb-In) |