Section 01-08: Trim, Exterior | 1996 F-150, F-250, F-350, F-Super Duty and Bronco Workshop Manual |
Body Side Protection
To install or repair the body side moulding (extruded PVC with two-way tape), perform the following procedure.
Removal
Completely clean sheet metal surface area around moulding with isopropyl alcohol and a clean, soft cloth.
Before removing moulding, mark moulding location on top and at each end of moulding with masking tape.
CAUTION: Use care while removing moulding to prevent damage to the paint or sheet metal surface.
NOTE: Do not heat moulding or sheet metal surface; this only increases the adhesion. Cold temperatures of 0°C (32°F) and below allow for easier removal of moulding.
Using a nylon wedge, start at rear of door, wedging nylon tool between moulding and door. At the same time, pull moulding away with steady tension. Remove and replace one moulding at a time.
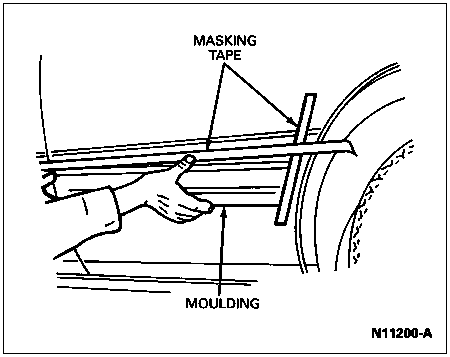
Once a few inches of moulding are free, grip moulding with both hands and pull the moulding slowly toward the front of vehicle.
NOTE: Not all of the tape will come off with the moulding. White or gray acrylic tape is most easily removed by gently stretching.
Grip tape at one end, lift and pull away slowly about 12.7mm (1/2 inch) at a time, then grip and pull again. Small pieces can be removed by rolling thumb across sheet metal surface.
To finish removing the tape, the recommended method is with 3M Scotch-Brite® Moulding Adhesive and Stripe Removal Disc, 3M Part No. 07501 or 07502.
When all tape is removed, wipe area with isopropyl alcohol and clean soft cloth, ensuring that all tape residue and road dirt is removed. A clean surface is required for application of new moulding. Should paint surface be damaged during moulding removal, surface should be repaired using paint repair procedure. Refer to Section 01-00.
Installation
NOTE: Mouldings should not be installed on vehicle unless sheet metal surface temperature exceeds 27°C (80°F) and moulding is at a minimum of 22°C (71°F).
Apply new moulding.
Starting at front of door moulding, pull back tape protective liner approximately 75-100mm (3-3.9 inches). Do not touch or contaminate tape surface.
Line up moulding with marks on masking tape at rear of door and press gently forward on door removing protective liner as you proceed forward. Be sure part is lined up correctly; once tape sticks, part cannot be removed.
Remove masking tape and wipe area under masking tape with isopropyl alcohol to remove residue.
Press moulding on with hand roller applying a minimum of 140 kPa (20 psi) pressure to ensure positive tape adhesion.